Showing posts with label Christmas. Show all posts

Monday, December 7, 2015

'Tis the Season: Scrap Busting Gift Bags Tutorial

I'm working on my final holiday shopping list.  Gift bags for little stocking stuffer items are on my list, but they seem like such a waste of money. However, I already have a drawer filled to overflowing with leftover fabric from Christmases past. This super quick pattern was just what I needed to bust my stash and to have reusable gift bags at absolutely no cost.

Sunday night, while watching a silly holiday movie, I chose the fabrics and cut out the pieces I'd need for these six little bags.  Monday, in under three hours, I completely finished all of them. The sewing, ribbon and all took less than half an hour per bag.


Finished Measurements

These bags are 9 1/2" wide and 10" tall. The base is 4" x 5". They are large enough to hold a large mug and assorted goodies, a scarf or a pair of gloves, a mini loaf of pumpkin bread, or an assortment of all sorts of other goodies. The top can be left open for larger items or pulled snuggly together for smaller items.
The white mug is a standard 12 oz size, 4 inches tall and 3 1/2" in diameter at the top.

Fabrics and Materials
  • For the outside of bag: Either one fat quarter of fabric or two rectangles 9 1/2" x 13"
  • For the lining: Either one fat quarter of contrast fabric or two rectangles 9 1/2" x 13"
  • Two 28" lengths of ribbon for the drawstrings, 5/8" or 3/4" wide. (With a satin or other smooth surfaced ribbon in the drawstring carrier the bag will slide open and closed easily. A textured ribbon like a grosgrain will tend to make opening and closing the bag a little bit harder.)
  • Thread
  • Fray Check (A half and half mixture of Elmer's glue and water can be substituted for Fray Check

Cutting

  •  Cut two rectangles, 9 1/2" x 13", from the main fabric and two of the same size from the lining fabric.
  • Cut two strips of contrast fabric, 1 1/2" x 9".
  • Cut and remove a 2"x 2" square from each corner of the bottom end of each rectangle.


Sewing Instructions
Sew all seams with a 1/4" seam allowance.

1. Fold the long edges of the 1 1/2" x 9" contrast fabric strip in 1/4". Press. Fold the two ends in 1/4". Press and stitch the two ends down.


2.  Align the top edge of a prepared contrast strip 2 1/4" down from the top of each piece of the main fabric. Center the strip 1/2" in from each side. Topstitch the long sides of the strips down with a narrow edge seam. Leave the ends open. These two strips make the carriers for the drawstrings.


3. With right sides together, sew the side seams and the seam at the bottom of the bag.

4. Sew the lining fabric in the same way, but leave a 2" space open along one side seam. This opening will be used to turn the bag when it's finished.  


5. Press all seams open. Press the edges of the opening in the lining back so they are even with the seam allowance.


6. Bring the side seams and the bottom seam of the 2" x 2" squares at the bottom of the bag together. Stitch straight across to make the boxed corners.


7. Turn the lining right side out and fit it inside the main bag. Line the seams up, and sew the bag and the lining together at the top.


8. Turn the bag right side out by pulling the entire piece through the opening in the side seam of the lining.

9. Close the opening with hand stitching, or machine sew it together with a narrow edge stitch.


10. Fold the lining to the outside of the bag and press the top seam flat. I pressed the lining to lie just barely below the main fabric.


11. From the front of the bag, topstitch right next to the upper edge of the carrier. Stitch all the way around the bag in one continuous seam.


12. Turn the bag right side out.

Inserting the ribbon for the drawstrings

1. Attach a safety pin to an end of one of the ribbon pieces. Begin on one of the carrier side openings. Insert the safety pin and pull the ribbon through. Cross to the next carrier and continue pulling the ribbon through that one, bringing the ribbon out on the same side that it went in.


2. Pull the two ends of the ribbon so the ends are even. Hold the ribbon ends together, make a loop and pull the ends through to tie in a knot.
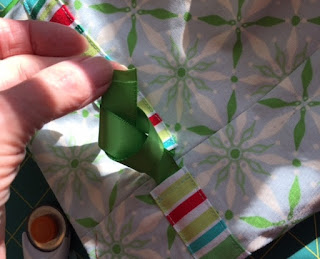
  

3. Insert the second ribbon exactly like the first, but start on the other side of the bag.
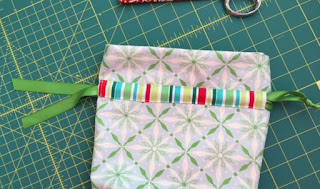
  

4. Trim the ends of ribbon close to the knots and dab with a bit of Fray Check to prevent fraying.

5. Pull on the ends of the ribbons to close the bag.


Enjoy!!

Wednesday, October 14, 2015

A Pair of Projects With Candles

The warm light of glowing candles creates feelings of home, comfort, and love. I'm sure that's why candles are symbolic of both Christmas and romantic love. I find myself particularly drawn to them as the holiday season approaches. I had planned to make a candle mug rug this year, but the table runner absolutely insisted on getting itself made at the same time. I'm so glad it did. I had the perfect batiks for the table runner in my stash, and this pair of patterns turned out to be among my all time favorites.

"Candle" mug rug.

"Candlelight" table runner.
I loved using white for candles, but the darker background fabrics were showing through on both projects. The easiest solution was to line each candle with a layer of lightweight muslin. I used fusible web between the muslin and the main white fabric to hold the two together. Then I added another layer of fusible web to the back of the muslin. It does make for a stiffer piece, so I wouldn't want to double the layers like this on a lap quilt or a bed quilt.


Quilting doesn't show up very much on the the background fabric in the table runner, so I had a perfect opportunity to practice some FMQ. Feathers and swirls went smoothly, but pebbles are beyond me! No matter how many pebbles I stitch or what size I make them, they come out disconnected and less than round. I'll keep plugging away though. I love beautifully stitched pebbles, and I've never been able to resist a challenge.


I think the candles may be my last Christmas patterns for the year. There are loads of other patterns begging to be made, but even those will wait a week or so.

Next week I'll be cooking and doing some essential fall housecleaning. A person can only squeeze so many hours from a day.

Wishing you a beautiful weekend!

And, Happy Stitching!


Saturday, October 3, 2015

A "First Christmas" Wall Hanging and a Few Lessons

fIt's been a year of exploring new ideas and experimentation. The latest "first" is finally complete.

"First Christmas", 17" x 23 1/2"

It seems like I've been working on this project for months, and in some ways I have been.

Last year, on one our quilt shop hops, we happened upon some stained glass quilts that were different from any I'd seen before. Making and working with the narrow bias tape needed for curved shapes on stained glass quilts is a daunting prospect that scares many on us away from these projects. The curved and detailed shapes of these quilts, however, were outlined with ready made fusible 1/4" bias tape. The seed for this wall hanging was planted that day. And it grew and grew.

I spent most of my spare time in September working on the design for this quilt and locating the right fabrics. The actual construction went surprisingly fast, but, oh my goodness, did I wind up doing things the hard way! It was a new experience for me, but that's how we learn. Every new step is a lesson, and those missteps become the greatest lessons of all.

New Learning

Lesson 1: Sometimes it's best to forego the nonstick applique pressing sheet and fuse appliques right onto the fabric.

I'd thought that it would be so much easier to center my applique onto the gold background oval if it was all in one piece. Normally that's very true, but lifting a large applique in one piece when it's only held together with thin strips of bias tape is just a wee bit tricky. More than a wee bit, in fact. More like almost impossible.

I've written the pattern to show an alternate, much easier way to get everything nicely centered. It involves folding the gold fabric in quarters and pressing light fold lines to guide the placement. Those folds coordinate with guidelines in the pattern. Next time I'll start out this way.

Lesson 2: A rectangle of fabric with a big hole in the middle doesn't like to lay flat.

I didn't want the dark blue fabric behind the gold to alter its color. I had found a perfect piece of soft, golden yellow batik in my stash, but it was barely large enough for my needs. My local quilt shop didn't have anything similar that I liked, so I was being super careful.


Instead of trimming the blue out from behind the gold when it was attached, I decided to cut the oval out of the blue in the first place and then lay it over the gold. But the blue became totally misshaped when I laid it on my work table with that big hole in the middle. In the end, I adhered it to a muslin foundation with quilt basting spray, then I tucked the yellow behind the blue fabric. The double thickness of fabric was too much, but I couldn't remove the muslin until I'd finished stitching the bias tape down. Again, I've written the pattern with an easier option for construction.

Lesson 3: If I ever make this quilt again, I'll either leave the darker blue decorative free motion stitching off the sleeve or I'll add it in with a machine stitch.


Mary and Joseph lived in an area of the world that has always been known for beautiful embroidery, so I thought it might be appropriate to show a bit of embroidery on Mary's sleeve. I'm afraid my level of skill and a dull needle on my sewing machine didn't allow me to accurately reproduce my vision of the embroidery in free motion quilting. It's just "okay".

Lesson 4: Taking a risk and experimenting with a brand new idea was not a mistake!!

Once again, I find myself promoting a product, but this 1/4" fusible bias tape is really excellent.  It molds easily around even small curves. I was worried about fitting it smoothly around the baby's head, but it worked beautifully with practically no effort at all.

This isn't available in my local quilt shops, but I found it easily on eBay.
Once the tape is fused with a hot iron, it needs to be stitched in place. A straight line of stitching on the edge of the tape looks great, but I chose a machine hemming stitch.


Black thread on black bias tape doesn't show in photos, so here it is on regular yellow bias tape.


Will I make another stained glass quilt? 
I've just ordered two more spools of fusible bias tape, so I am prepared. 
Just in case.

My hubby has decided that this is my "masterpiece". He's such a devoted fan. He's even chosen a special place to hang it so he can admire it every day.  Have to love that man. 


Monday, September 14, 2015

New Toys, Part 2: Constructing the Styrofoam Wreath.

After two weeks of work, almost 300 photographs, and a ton of fun along the way, the wreath is finished! It turned out exactly as I had envisioned it, and that's the biggest surprise of all.

The photograph looks like it was taken in winter, but it was actually almost 90 degrees and humid out there on my porch.

These little toys are so very versatile! I attached them to a styrofoam wreath with long pins,  but I can see them used in so many different ways. I wish I had time to sew some different uses, but there is only so much time in a day.

These are just a few of my ideas:
  • Attach the toys to a ready made evergreen wreath. They would only need some little plastic or metal loops sewn to the back. Bits of wire threaded through the loops would attach nicely to the evergreen branches. 
  • Using the same little loops attached up at the top of the ornaments, the little toys would be wonderful tied onto a Christmas tree with pretty bits of ribbon. 
  • What about replacing the traditional bow on a package with a cute ornament? 
  • Stocking stuffers for older children!
  • I'm even visualizing mug rugs or Christmas stockings with fusible web appliques made from the templates


The pattern contains all the details for sewing the ornaments, so I'll focus on preparing the wreath in this blog post.

The Wreath

Any size or shape of styrofoam wreath would be fine for this project.

I started with a plain white 16" styrofoam wreath. I chose one with a flat top rather than one that was rounded. First, I wrapped it in a 2" bias strip from 1/2 yard of green fabric. Then I used an entire roll of sheer 2 1/2" green ribbon to wrap over the cotton.

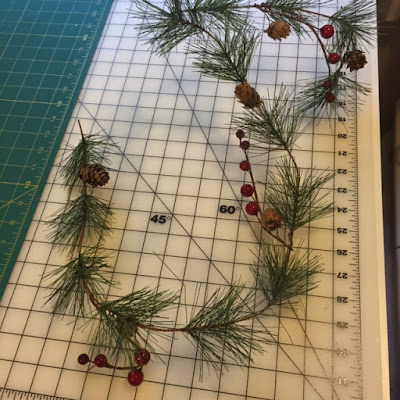
 Wire based garland sections with holly, pinecones and evergreen came next.


I placed these on the wreath and used 5/8" sheer green ribbon tied on the back side of the wreath to hold these pieces in place The ribbon allows enough flexibility to allow positions to be altered here and there as the ornaments are attached.


I added some purchased pinecone decorations and a few small glass balls to lend color and variety to the arrangement. 


The toys and additional glass ball ornaments were added last. Long pins with pearl heads worked beautifully! I hooked them into the back side of the toys and then poked them into the wreath. 


In only one week, fall will officially arrive.  
May your last week of summer be wonderful!

Friday, September 11, 2015

New Toys!! Part 1

I worked almost exclusively on this one project this past week. My sewing room is a disaster, but I'm so excited that the wreath of little stuffed toys is absolutely finished!

There are fourteen stitched pieces in all. Two stars, two hearts, two tiny presents, a pair of mittens, a pair of candy canes, one gingerbread boy, one snowman, a stocking, and Rudolph.


The pattern for all the stuffed toys will come out next week, and I'll show you more about how I made this in next week's blog. 

This weekend I plan to enjoy our first couple of autumn-like days. For the first time since June I'll turn on the oven and bake up a couple of batches of goodies. We'll have zucchini bread, peach cobbler, and blueberry muffins by Sunday. Summer isn't completely gone, but my freezer will be full of homemade snacks and desserts. 

Have a beautiful weekend!!


Thursday, July 9, 2015

Speed Skating

Ta-daa!!

The ice skate pattern is finished!

One mug rug ...

... and one table topper - or wall hanging, if you prefer.  Wait! You might use only the center section from the table topper as a block in a different quilt, or on a pillow. As I quickly discovered, this is a multi-purpose pattern.


I was almost finished with the sewing on the table topper and mug rug versions of the design when I learned about Anna's need for a way to display her skating level badges. The timing couldn't have been better! If you read last week's blog post you may remember the story of how all of this came about.

What a delight it was to help Anna design her own background for those hard won badges! The child has a mind of her own. I pulled out tons of fabric options from my stash, but Anna was adamant. Bright colors. Pink skates! She chose the fabrics and she chose to have them made into a pillow. I personalized the pillow with letters from my "Alphabet Soup" pattern that spell Anna's name.  Look how bright and joyful this pillow turned out to be. Really bright! Anna loves it.


The pillow cover fits an 18" pillow form. It requires two 19" squares of fabric that are sewn together with 1/2" seams. I added a zipper closure, but that isn't really essential. 

My first choice would have been to place the zipper on the seam at the very bottom of the pillow, but as my fabric was a bit short, the back had to be made in two sections. As a result, the zipper is oddly placed - off center in the middle of the back. I don't think Anna minds that the back of her pillow is less than perfect. 

This excellent tutorial for making a zippered pillow cover is found on the blog, "My Tiny Sidekick". 

Now I need to get to work on the next project. I wish I could make up my mind! I still haven't figured out the pumpkin pattern, and I have an idea for a small basket with matching mug rugs.  I'm imagining something to use for afternoon coffee with friends. The mug rugs could be a bit oversized, but still not as large as a regular placemat, and the basket could hold muffins or cookies. Napkins, too, maybe? In country cottage colors? Red and white, perhaps?

Eenie meenie minie mo ....

Pumpkins, table setting, pumpkins, table setting...

Didn't I just go through this?

Have a lovely weekend, everyone!!
It's July!!