Showing posts with label Tutorials. Show all posts

Friday, April 8, 2016

Summer Purse: Part 4, Zipper Choices and Preparing an Encased Zipper


The recessed zipper won't be sewn in place until the lining is complete. I like to prepare it in advance, though, because encasing the zipper is just about the right amount of work for one sewing session.

From your main fabric, cut the following:
 You will also need: 
  • one 12" x 13" piece of light to medium fusible interfacing
  • one 18" nylon zipper 

    What type of zipper should you choose for your bag? 

    I've discussed four types of nylon zippers in this post. Metal zippers have many wonderful uses and can be very decorative, but they are not my usual choice for purses and bags.


    Each of these four zippers is just right for some bags, but not the best choice for others. I'll go through them one by one starting at the top of the photo.

    1. A standard dressmaking zipper 

    These zippers are tremendously versatile and they are found in any shop that carries sewing goods. They have so many advantages. They are not very expensive, they come in every color under the sun, they can be easily cut and shortened, and you can stitch right over the top of the zipper teeth.

    A standard zipper can be used on any bag, but it isn't as sturdy or durable as the others shown. If your bag is fairly small, and the zipper isn't strained by overuse or overstuffing, the standard zipper is just fine. I use these zippers on small pouches and clutches, and for internal pockets on bags.

    2. A specialized zipper for purses

    I've shown two purse zippers in the photograph. The major difference between them is the type and number of zipper pulls. The YKK zipper has a single large zipper pull. I bought a number of these in bulk on eBay for a very reasonable price. The Coats purse zipper with two smaller zipper pulls is available in most fabric stores. Color choices for purse zippers are limited.

    Both of these zippers are very durable and will hold up through heavy use. Both zippers can be cut and shortened easily even though the teeth are larger than on a standard zipper. You can sew right over the teeth of the YKK zipper teeth just like you can on a standard zipper.  You will need to go more slowly over the Coats zipper, and your machine might skip a stitch of two over the zipper teeth. . Sometimes I'll sew right up to teeth on one side of the zipper, backstitch and cut my thread, then sew up to the zipper on the other side.

    The double pull zipper is especially nice for larger bags. You can open and close it from either end or from the middle.  It's an excellent choice when a zipper needs to go around squared or curved corners, as it might on a travel bag or a laptop case.

    3. A sports zipper

    This is the strongest of the nylon zippers, and not really needed for an everyday bag. It's wonderful for a really heavy duty bag, though. It would be the best choice for a duffle bag or a backpack. Cutting and shortening this type of zipper is not recommended. It's best to try to find the exact length of zipper you will need.

    Construction of the Encased Zipper

    Note: Although it isn't really essential, I always back my lining and zipper casing fabrics with interfacing. It adds an element of stability and strength to those pieces that I really like. Pockets are firmer and less likely to rip out, and everything seems to lie more smoothly. 

    Make the Zipper Casing

    1. Cut the interfacing into four pieces, 3" x 13" each. Iron one piece onto the wrong side of each of the casing strips. Fold the ends of the strips 1/2" under on either side and press.


    2.  Center the zipper on one section of casing. Lay the zipper on the right side of the casing strip. Align it along the edge of the fabric with the pull side facing down. Use a zipper foot to stitch close to the teeth of the zipper, but not so close that the stitching will interfere with opening and closing the zipper.  


    3. Lay the zipper, pull side down, on the right side of a second piece of casing strip exactly as you did in step 2. Take care that the folded edges of the two casing strips are exactly aligned and that the strip you attached first has been folded back out of the way. Sew close to the zipper teeth as before.


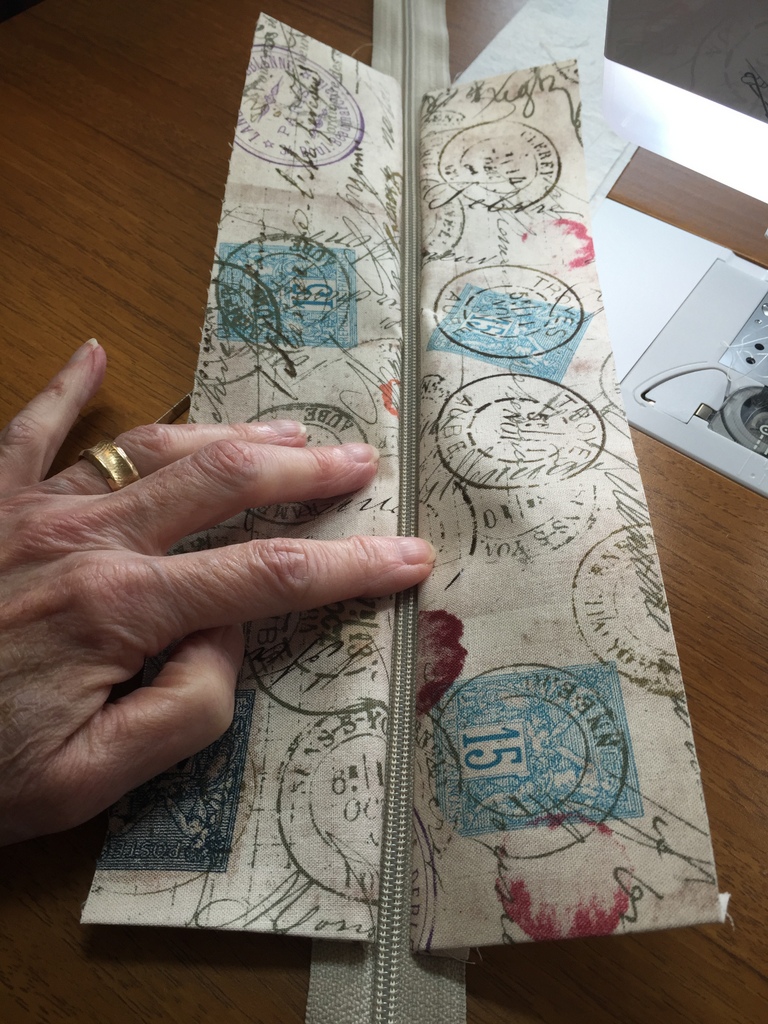
     The two casing strips will fan out to either side of the zipper. Top and bottom ends of the casing should line up perfectly with each other.

    4. Place the third zipper casing strip on one of the back sides of the zipper. The right side of the fabric will be against the back of the zipper this time. This piece will sandwich the zipper between two casing strips. Line the folded ends up with the first casing strip. Pin the two ends in place.

     5. Sew directly on the stitching line that was made when the first strip attached.


    A zipper sandwich

    6. Fold all three casing strips back out of the way. Sew the remaining strip to the opposite side of the zipper just as you did in step 5. Open the casings on both sides of the zipper and press smooth. 


     7. Line up the folds on the paired ends of the casings and top stitch together.


    8. Trim each side of the casing 2" from the seam next to the zipper.


    9. Sew the long sides of each pair of casing strips together close to the trimmed edges.

    Zipper End Pieces
    Make 2

    Note: I used heavy starch on these 3" x 4" end pieces. The creases need to be sharp and to hold their shape through several folds. This works so much better with the starch than it does without.

    1.  Fold each edge of the long (4") side in 1/2" and press .

    Note: The next step helps to determine the exact width the zipper end cover needs to be.

    2. Lay your zipper over the fabric with the folds on either end. Now, fold the raw edges over the zipper to encase it. Press


    3. Remove the zipper and press the folded fabric again so it will hold its shape.

    4. Now fold the cover in half. From the opening to the fold at the end the piece will be just over 1" long. Press.


    5. First add the end cover to the end of the zipper that does not have a zipper pull. Close the zipper. If you need to shorten it, measure about 3 1/2" from the end of the casing strips and cut the zipper off.


    6. Tuck the end into the top opening of the end piece. Slide it as far in as you can. 

    7. Fold the section firmly together. Pin to hold it in place. .


    8. Sew close to the edges around the two sides and on the top. Sew right across the zipper.


    Next you will add a cover to the end of the zipper that does have a zipper pull. 

    Note: If you need to shorten the zipper, be careful not to cut the zipper pull off! Been there and done that. Oh my goodnes what a mess! I completely destroyed my zipper and had to take it out and start from scratch. 

    9. To shorten the zipper: Open the zipper part way. Now cut about 3 1/2" from the casing as before.


    Do not close the zipper until it has been sewn in place. 

    10. If the zipper has been shortened, tuck the two open ends of the zipper into the end cover. If the zipper has not been shortened open the zipper a few inches so you can tuck the end into the cover. Pin in place and sew as you did with the other end of the zipper. Close the zipper.


    That's it! The zipper is ready install in the bag with the lining. 

    In the next session, I'll explain how to make the lining. 

    I hope you like pockets!

    I hope you like installing zippers, too, because
    there will be one more zipper - this one on the inside of the bag. 


    Sunday, April 3, 2016

    Summer Purse: Part 3

    The assembly of the bag is an exciting sewing session. All of those prepared sections come together and you can see what the finished purse will look like.


    From here on out you'll notice that some photos are of the hexi design and others are of the blue bag. I've tried to choose the best photos I have.


    Make the Handles


     Note: I continued to use Soft and Stable batting for the handles. The thickness and texture are very comfortable on my shoulder, and the material holds it shape well over time. 


    I'm most comfortable with 24" handles, and the measurements shown here are those I used. Make your handles a length that suits you.  You might measure the length of the handles on your favorite purse to determine the length you like best. You may want them longer or shorter than mine. The width measurements will likely remain the same as above, but cut the length 1" longer than you would like the finished handles to be.

    1. Starch and press the handle fabric. Fold one edge over 1/4" and press a sharp crease.


    2. Lay the batting on the fabric. Fold the segment with the crease over the top of the batting. It should come almost, but not quite, to the other edge. Press a crease.

    3. Lift the top fold of the fabric. Now fold the bottom piece of fabric up over the edge of the batting. Press. Fold the top of the fabric back down over the raw edge and press. If you are using Soft and Stable, the fabric should cling to the batting enough that you won't need to pin it.


    4. Top stitch about 1/4" in from both edges. Sew the overlapping edge down first, making sure that you are catching all layers of fabric. Stitch the other side to match.


    Set the handles aside..

    Assemble the Bag

    Note: All seams use 1/2" seam allowance unless otherwise stated. 

    1. Sew the sides of the bag to the front section. Press the seams open.


     2. Sew the back piece to the side panels. Press seams open.


    Sew the bottom of the bag in place.
    Be careful that you don't make the mistake I made on the hexi bag. When the bottom was completely sewn in place I turned the bag right side out and discovered that I'd sewn the bottom piece to the top of the bag. Gotta love that seam ripper. 

    3. Mark a dot 1/2" inch in from both sides on each corner of the bottom of the bag.  


    4. Sew a long side of the bag bottom in place first. Line the dots up so they are exactly on the center of the seams where the front of the bag joins the sides. Pin in place. Stitch from one dot to the next. Don't sew beyond the either dot. Backstitch a few stitches at each dot.


    5. Sew the other long end of the bottom to the back of the bag in the same way.

    6. Sew the short ends of the bag to the side sections. You will have to tug the corners straight and pin in place, then stitch from one dot to the next just like you did on the long sides.


    Stitched all the way around.

    7. Turn the bag right side out. 

    8. Fold on the seams of the sides and bottom of the bag, and press with steam to give them those edges sharp creases and squared corners.


    Before pressing                                                         After pressing
    Attach the Handles

    9. Start with the front of the bag. Align the outside edge of the handle with the seam of the pocket and the front side panels.

    10. Pin the front handle in place.


    Check to make sure that the handle is not twisted. I like to turn the side with the folded edge face up.That will place it on the underside of the handle.


    11. To position the back handle, align the seams of the sides and pinch the front and back of the bag together. Place the back handle exactly in line with the front handle and pin.


    12. Sew the handles in place by stitching them 1/4" in from the edge at the top of the bag opening.


    That's it for today. 

    My big Ott light hold the handles up for a photo. A light with many uses. lol
     I hope your bag is coming along beautifully. 
    The next session will be short. I'll prepare the recessed zipper for installing, but then it will have to wait for the lining.

    Happy Stitching!!


    Wednesday, March 30, 2016

    Summer Purse: Part 2, All the Pieces, and a New Pocket Design


    I am loving this bag! I like everything about it from the front pocket to the details of the inside lining.   It's a good pattern. Along with compliments I'm being asked where I bought it. Giggle...
     
    I want to share the entire construction process with you, even the recessed zipper but I didn't get every photo I needed when I made the bag. That leaves me no choice. I have to make a second purse. So I can take photos of everything along the way. Besides, there is no such thing as owning too many pretty bags.

    I'll be trying to post a new blog for each sewing session I have on the second bag. I'll try to get one or two posts up each week until the purse is finished.

    The New Pocket Design
    "Summer Swallow" - quilt block, mug rug, purse pocket
    The new purse is identical almost every way. Measurements and construction are exactly the same. The fabric is different, of course, but there's also a new design on the pocket. Now my purses will look entirely different from each other. The Summer Swallow pattern is available here, in my Craftsy pattern shop.

    In Part 1, we made the front pocket section. It was trimmed to a 10" x 10" square.

    10" x 10" Hexi pocket section                                   10" x 10" Summer Swallow pocket section
    For the Summer Swallow pocket I had to make one change. Because the quilting lines are so close together, I did the quilting before sewing on the pocket lining.


    Prepare the body of the bag, front, back, sides, and bottom.

    Cut these pieces from your fabric. Cut identical pieces from your bag batting. I prefer Soft and Stable for making bags.


    Pieces are larger than needed and will be trimmed back later.

    Note: All seam allowances are 1/2" unless otherwise specified.

    Assemble the bag front.

    1. Use quilt basting spray to hold the fabric for the front panels to the bag batting. these pieces are narrow enough that quilting won't be needed.

    2. Sew the side panels on either side of the front pocket section.

    3. Press the seams open.


    4. Trim the ends of the panels so they line up with the pocket sections. The front will be 10" x 13".

    This is a strange photo. The bag really is cut straight all across. The sides lean up, so it all looks crooked.
    Quilt the sections.

    1. Quilt the bag back, side sections, and bottom as you like.

    On the back of the hexi bag I quilted the same diamond design I had used on the pocket. On the blue bag, I stitched straight vertical lines about 5/8" apart.
    The sides and bottoms of both bags are stitched with horizontal lines about 5/8" apart.

    2. Square up and trim the back down to 10" x 13".
    3. Trim the bag sides to 4" x 10".
    4. Trim the bottom of the bag to 4" x 13"

    Prepare the bottom of the bag for a plastic canvas insert.


    Plastic canvas is the product I use for giving the bottoms of my bags strength and for maintaining their shape. I like the bottom to remain flat and squared off, even when filled and weighted down. The plastic canvas does a very nice job, but be sure to get the stiffest piece you can find. You will need a piece about 11" x 2 1/2".


    1. Cut a piece of scrap fabric 4" x 12" for the insert.
    (I used a leftover piece of my main fabric this time, but this will be hidden by the lining, so anything will do.)

    2. Turn the short ends under 1/2", press and stitch down.

    3. Center this fabric on the wrong side of the bag bottom and stitch the long sides in place. Use a 1/4" seam for this.


    That's it for today. The pieces are ready to be put together.


    Next time, we'll make the straps and assemble the bag.