Showing posts sorted by date for query home for christmas. Sort by relevance Show all posts

Sunday, January 3, 2021

New Year, New Plans

Don't be surprised if you see an abundance of house themed projects in my pattern shop and on my Facebook page this year. There will be houses on quilts, houses on mug rugs, and projects for things to use inside our new house.

I definitely have houses on my mind. There's a reason for that. My daughter is building a new house for the two of us this year. We are so excited! For well over a year, we've been working together to come up with a plan that suits us both, and now it will all come together.  We'll have shared spaces and private spaces, and I'll have a lovely sewing area.


The photo shows our little bit of Nebraska prairie. It's in a newer development on the edge of town. The trees are on a farm that lies across the street from us. We're hoping to see deer, rabbits, and goodness knows what other wildlife.

Culling the excess in my house is underway. We knew this was coming, so we had two garage sales this summer, and I took several car loads to City Mission. I worked in my sewing room this past week after Christmas. Downsizing is hard. I've lived here for 30 years, and it will take me many months to go through everything in this house and decide what to keep, what to let go, and what to replace with new.

For now, we are staying home and playing it safe as we wait for the vaccine that should help make 2021 a better year than last.  

Fingers crossed!


Monday, January 14, 2019

The Empty Chair, Part 4: A Year Gone By


This week marks a full year since my dear man has been gone. So many things have changed. I still miss him every day, but I'm gradually adjusting. I think the hardest part has been the silence. I've been running the television or playing the radio all day long, just for background noise.

Life has changed in so many ways, but this next year will be one of happier adjustments. Something is in the works.  I always knew I'd married a stubborn man, and there are moments that leave me wondering. 

I mentioned in an earlier blog that Fred was adamant that I not live alone. My grandchildren moved next door in March. Everything fell together so suddenly after his passing, that I questioned if Fred had a hand in it all. I've so enjoyed having those sweet, young people so close by. It's been wonderful, but not exactly what Fred wanted. In those last weeks, he insisted that I should live in the same house with one of our children.  He worried that I'd fall, or get sick, and no one would be here to help me. He had the same concerns for our daughter, who has been living on her own for several years. Fred thought we should be together under one roof. There was just one problem. Mandy has been living over an hour's drive from me and working in Omaha.

Then, just before Christmas, a position in Lincoln suddenly opened up. Mandy applied, and job was hers. Her transfer took effect last week, and she'll be moving back to Lincoln as soon as her house sells. It will go on the market in March when winter begins to bow out. In the meanwhile, Mandy is staying with me during the week, and going home on weekends. While she's working, I have the company of her two little dogs, Watson and Willow. They are delightful, and my house isn't quiet unless they're sleeping. Puppies during the day, a daughter in the evenings. What could be better?

After the sale of her house, Mandy will find a house in Lincoln. She says that her dad won't let her rest until she finds something with enough space for both of us and the pups. She also won't settle for anything that doesn't have well lighted studio space where she can paint and I can sew.

This is all quite exciting. I'm truly looking forward to the coming year.

Nap time for Watson and Willow
Change is inevitable, so I wish all of us a year filled with love, happiness, and only those changes that bring joy.


Monday, February 12, 2018

The Empty Chair, Part 1. The Last Gift


I came home from grocery shopping today, and I almost called out, "I'm home!" Almost, but I stopped myself. There was no one to call back a greeting.

My husband passed away in January. His squeaky green recliner sits empty, and my house is silent. I miss him every day, all day. Tears come unexpectedly, like they did this morning while I put  groceries for one in the refrigerator.

I want to tell our story, but it will come in bits and pieces, and not in any sensible order. This is the story of his last gift for me.

Fred had been unwell for several years. Over time, in addition to diabetes, he had developed the neurological and mental symptoms of Parkinson's disease. Dementia was creeping up on him, and he shuffled with tiny, exhausting steps that made going anywhere very difficult.

In October, he had emergency surgery for a kidney stone. He was so frail, that he never really recovered. In spite of it all, he remained the same kind and loving man that he had always been.

Four days before Christmas, Fred decided that he wanted to go to Von Maur to buy me a Christmas gift.  He'd only left the house a few times since last October, but he said that he felt a bit stronger that morning. I tried to convince him that a gift wasn't at all necessary, but he insisted. He was dressed and ready to leave at 10:00 A.M. The  department store is only a mile and a half from our house, so we wouldn't need much time.

When Fred was all buckled up, I began backing out of our driveway. The back of my car had barely reached the street when there we felt a jolt and heard a sickening thump. The neighbor, whose driveway was directly across the street from ours, had come zooming out like she always did. This time, she'd rammed right into the back of our car.

We both got out of our cars to see the damage. My bumper had a big, cracked dent, and her car looked even worse. The woman seemed panicked. She said she hadn't even seen a car in my driveway, then she began frantically texting someone on her phone. My man was waiting, and he was my first priority. If he wanted to go to Von Maur, I would get him there as soon as I could. 

I told the neighbor, "Look, you didn't see me, and I didn't see you. It was just a freakish accident, so let's each take care of our own damage." She continued texting, and then ran into her house without responding. We left. Fred had shopping to do.

When we walked through the big doors, Fred looked around the store. "It's all clothes," he said. He seemed disappointed.  "Don't they have any jewelry?"

They do carry a small selection of jewelry. It was in the middle of the store, so we made our way down the long, center aisle.  We found the jewelry, but except for a few tiny chains, nothing was actual gold. Fred was disappointed. Costume jewelry wouldn't do.  He looked around the store again in search of something else.  "A sweater?" I suggested. "I can always use a new sweater."

"Not clothes," he said. After a moment of thought, he asked, "Do they have perfume?"

The perfume was a bit farther down the same aisle, so we shuffled on. Fred was only interested in one fragrance, Chanel #5. It had always been his favorite, and he purchased a small bottle of it. The sales clerk couldn't help but smile at this sweet, old man buying a special Christmas gift for his wife.

He carried the bag in one hand and held my hand with the other. As we made our way back through the store and to the car, he shook his head, "I'm just like a little boy with his mommy."

Once home, he handed the bag to me and asked me to put it under the tree. On Christmas morning, our whole family came to spend the day. We gathered around the tree to open gifts. When I was handed his little bag from Von Maur, I pretended to be completely surprised. Fred laughed and made a joke about his beautiful gift wrapping. Christmas was such a happy day. Fred told stories of his youth in the afternoon, and, in the evening, we shared our traditional spaghetti dinner.  It was my hubby's last good day. 

The perfume is still unopened. I can't bring myself to break the seal quite yet, but I don't know why. I'll get there eventually, but not today.


Thursday, January 12, 2017

New Mug Rugs for Valentine's Day

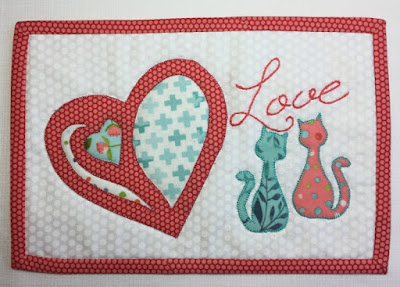
The February hearts pattern is named "Love". The design was such a struggle in the beginning, but once I got my head together, I had so much fun that I found it hard to stop making little variations. 

I do like to mix things up a bit, so I designed this pattern in a reverse style of applique. The more common method would be for the  smaller shapes to be appliqued on the top of the he heart. Here, the heart is made with cutouts that let the contrast fabrics peek through from underneath. 


From the beginning, I wanted this pattern to be versatile, and I had planned to make two mug rugs in different fabric combinations. 

I stitched up the first mug rug in red and black because it's always a striking combination. My granddaughter dropped by for lunch yesterday, and this one that went home with her.


I wondered how the pattern would look in softer colors, so I made another mug rug. My mother would have like this combination of fabrics.


And then my eyes fell on this newly purchased piece sticking out of a basket that sat on the other end of my cutting table.

 
I don't know about you, but my self control goes out the window in fabric stores. There are so many fabrics depicting items used in sewing, but I couldn't resist this piece. I may turn it into a tote, but the options are endless. It became the inspiration for a new design idea to use in the valentine pattern, one for those who love to sew. With the little sewing machine placed in the corner, it will make up beautifully in any favorite fabric.

This one is all mine!
The little sewing machine takes up quite a bit space, so I shrunk the word "love" and embroidered it by hand. I also switched up thread colors on the heart applique for a very different look.
I love how the contrasting thread "pops" against the black of the heart.

A lot of my friends have other loves. Like cats. My cat loving friends go all glassy eyed over anything showing cats.


I had to tear myself away from making more designs, but there is a B.O.M. quilt waiting for it's turn to be made. That's a first priority right now.

Oh, a little helpful hint. If you do a lot of applique, I strongly recommend that you get an applique pressing sheet. With that you can press large sections of applique pieces together before placing anything on fabric. It really does simplify things.

I'm sure there must be others, but this one by Bear Thread works beautifully for me.


I've made some progress on the goals I set last week. Four are checked off, two are left, but I still have the weekend to work on them.
 
 1. Finish the heart mug rug pattern.
       2. Design several smaller blocks and a couple of larger sections for the 2017 B.O.M.
✔  3. Give book talks introducing 10 books to four classes of fifth grade at my former school.
       4. Try a new cornbread recipe. 
✔  5. Cook up a batch of "un-stuffed" cabbage rolls. (Disappointing recipe.)
✔  6. Take down the Christmas tree.

I wouldn't mind snow, but we've been getting ice, and more is predicted over the next several days.

Stay safe!


Sunday, July 10, 2016

Christmas in July


It's July, and it may be hot and humid in Nebraska, but it really is time to start thinking about Christmas projects. I had planned to have new patterns ready by now, but life got in the way. Funny how that happens.

So, instead of showing you brand new ideas, I've placed some my favorite holiday patterns and tutorials in this blog post so they can be more quickly located. I've tried to pick patterns in a variety of styles, sizes, and color schemes. Links are included.

Most of the patterns here can also be located under the label "Christmas" on the right hand side of this page.

For other ideas, feel free to visit my pattern page on Craftsy. http://www.craftsy.com/my/pattern-store

I wish you a wonderful second half of summer! 

Patterns Available for Purchase on Craftsy

Candlelight: wall hanging or table topper

 http://www.craftsy.com/pattern/quilting/home-decor/candlelight-table-runner--bonus-mug-rug/1686
 Snow
Snow Family: wall hanging or table topper
 http://www.craftsy.com/pattern/quilting/home-decor/snow-family-holiday-wall-hanging/113625

Ice Skates: wall hanging or table topper
 http://www.craftsy.com/pattern/quilting/home-decor/ice-skates-table-topper-or-mug-rug/154260

Holiday Toys, Soft Christmas Ornaments
http://www.craftsy.com/pattern/sewing/home-decor/holiday-toys-soft-christmas-ornaments/164087


Holiday Tabletop Trio: wall hanging or table topper
http://www.craftsy.com/pattern/quilting/home-decor/holiday-tabletop-trio/123210

 Christmas Houses: wall hanging or table topper
 http://www.craftsy.com/pattern/quilting/home-decor/christmas-houses-table-runner/60384


Let's Rock: mug rugs
 http://www.craftsy.com/pattern/quilting/home-decor/lets-rock-mug-rug-trio/165562


Wrapped and Ready: mug rug
 http://www.craftsy.com/pattern/quilting/home-decor/wrapped-and-ready-mug-rug/120846

Ready for Takeoff: mug rug
 http://www.craftsy.com/pattern/quilting/home-decor/ready-for-takeoff-christmas-mug-rug/66372

Holiday Rag Doll: mug rug
 http://www.craftsy.com/pattern/quilting/home-decor/holiday-rag-doll-mug-rug/57913

Winter Romance: mug rug
 http://www.craftsy.com/pattern/quilting/home-decor/winter-romance-mug-rug/64236


Tutorials on my blog:

Holiday Gift Bags
http://klee2strings.blogspot.com/search?q=Taking+Care+of+Essentials+with+French+Braid+Oven+Mitts

French Braid Oven Mitts
 http://klee2strings.blogspot.com/search?q=Taking+Care+of+Essentials+with+French+Braid+Oven+Mitts

Home for Christmas: lap quilt
http://klee2strings.blogspot.com/search?q=home+for+christmas

New Toys, Part 2: constructing the styrofoam wreath used with "Holiday Toys"
http://klee2strings.blogspot.com/2015/09/new-toys-part-2-constructing-styrofoam.html


Wednesday, March 2, 2016

"Martha's Roses" and How to Make Fusible Bias Tape

The spring table topper is finished! . When I made that big center block, I wasn't at all sure how I'd use it, but I'm really pleased with how this table topper turned out. I've named it "Martha's Roses" after my mother.

"Martha's Roses" (21 ¾” x 21 ¾”)
Mother was an avid gardener, one of those who had plant magic in her fingers. Her garden was filled with flowers, and pink roses were her favorite. From the moment I designed the appliques, this became my mother's piece.

Last fall I worked with fusible bias tape on a stained glass quilt, "First Christmas". It made attaching the bias tape so easy! I had a particular fabric in mind for the bias tape stems on "Martha's Roses", so the commercial tape wasn't going to work at all. How hard could it be to make fusible tape from my chosen fabric?

Turns out it wasn't hard at all!

Homemade fusible bias tape on "Martha's Roses"

I rarely use commercially made bias tape anymore. It's expensive and the colors and widths available are really limited. If you have bias tape makers in various widths, the task is easy, but I prefer the flexibility of making bias tape of any size with simple tools.

Make bias tape.
No bias tape maker necessary.


You will need a hera marker, a straight quilt ruler, and a flat surface for this. Hera markers are inexpensive and readily available almost anywhere that quilting supplies are sold. I bought this one made by Clover for less than $5.00. 

1. Cut bias strips 1/2" wider than the width you need for your finished tape. The tape used on "Martha's Roses" is 1/4" wide, so I cut the strips 3/4" wide. 


2. Longer sections of tape can be made by sewing strips together exactly like you would sew strips of bias binding. 

Place strips at right angles.              Sew with a 1/4" seam. Press open.                  Clip triangle "ears".


 3. When your bias strip is ready, lay it on a flat surface (I use my cutting mat.) with the wrong side facing up. Place your ruler so that it is 1/4" in from one long side of the bias strip. Mark by sliding the round end of your hera marker firmly along the edge of the ruler. The hera marker will crease the fabric and it will fold easily along the crease. Repeat on the other long side of the strip.


4. Finger press the edges down, then take the bias strip to your ironing station. Using your thumb and a forefinger, gently fold the two edges toward each other. Press the edges in and down with a hot iron.

5. The tape is now ready to use. You can use quilt basting glue to hold it in position on your quilt top, or you can make it fusible. 

 Add fusible web to the tape.

1. Slice strips of fusible web ever so slightly narrower than your bias tape. I found that it was easier to work with short sections of fusible web. Lay the fusible web, paper side up, on the bias tape. Iron to fuse to the tape in place.


2. When the paper is removed from the fusible web, the bias tape can easily be shaped and positioned in place with an iron.

 
3. Stitch the edges of the bias tape with a narrow zigzag stitch or with a straight stitch.

Other examples of bias tape made with a hera marker: 

1/2" bias tape was used on "Spring Table Runner".

5/8" bias tape was used on the ruffle of this apron. 
(I have not made a pattern for this apron.)

Happy Stitching!!


Saturday, December 26, 2015

Fuzzy Comforts and Christmas Spaghetti with a Secret Ingredient

It's the day after Christmas and all is quiet in our house, exactly the opposite from yesterday's wonderful hustle and bustle, laughter and cookie snitching. The family began arriving around 9:30 in the morning and stayed for the entire day. We started with breakfast and ended with our famous Christmas spaghetti dinner. (The recipe is below.) We were too full of cookies and good food to have any interest in dessert. I am truly blessed.

We are in no danger of being cold this winter. My son dressed us all in matching fleece jackets, and I handed out five warm fleecy robes. Yes, they were finished, and with time to spare!


There is nothing that needs doing today. Such a luxury! I've spent the whole day lounging in my chair reading the latest Inspector Gamache novel by Louise Penny, and I have no intention of doing anything more energetic than that.

Christmas Spaghetti Sauce With Meatballs 
(and a secret ingredient)


I was so busy enjoying my family that I forgot to take photos of our dinner table. The spaghetti was served with fettuccini and accompanied by lots of fresh veggies and warm garlic bread.

This is a large recipe. There were seven of us, and I made a full crockpot of sauce so that there would be plenty left to send home with everyone.

Once again, the measurements for ingredients are close estimates, but not exact. I don't usually measure at all, but I let my taste guide the proportions. I made the sauce the day before Christmas, then reheated it and added the secret ingredient on Christmas day.

Meatballs
I don't add herbs or spices to the meatballs because they absorb their flavor from the sauce as it simmers.
  • 3 pounds ground beef
  • 2 medium onions
  • salt and pepper to taste

  1. Chop the onions in a food processor or grate them.
  2. Thoroughly mix all ingredients together. 
  3. Shape into balls. I made the meatballs about 2 inches in diameter, but smaller is fine.
  4. Brown the meatballs. 
  5. Refrigerate until needed.
Sauce
  • 1 tablespoon olive oil
  • 2 medium onions, chopped
  • 6 - 8 cloves garlic, finely diced
  • 1 bunch (about 1 cup)  of fresh parsley, chopped fine, or 2 tablespoons dried
  • 1/2 cup fresh chopped basil leaves or 2 teaspoons dried
  • 3 bay leaves
  • 3/4 teaspoon dried oregano
  • 1/2 sweet green pepper, diced
  • 1/2 sweet red pepper, diced
  • 3 or 4 baby carrots, grated
  • 4 cups cooked, chopped tomatoes (I used tomatoes that I had prepared and frozen during the summer, but canned is fine.)
  • 2 small cans of tomato sauce (8 oz)
  • salt and pepper
  • 1 can condensed cream of mushroom soup (This will add flavor and thicken the sauce at the same time.)
  • 3 or 4 cups of water 
  • salt and pepper to taste
The Secret Ingredient
  • 1 - 3 oz. Bristol Cream Sherry (Another high quality cream sherry would do, but don't use cooking sherry or dry sherry.)  
1. In a heavy skillet, fry the onions in the olive oil until they are golden brown.
2. Add the garlic, parsley, and basil to the pan. Continue frying on medium low heat until the herbs are wilted.


 3. Add the peppers grated carrots. Fry for another minute or two. 


4. Pour the contents of the pan into a crockpot. Add the tomatoes, tomato sauce, mushroom soup, salt and pepper. Stir until blended.

5. Add enough water to give the sauce a nice consistency - not too thick, but not watery.
6. Place the meatballs in the pot. Cover and cook on low for 6 hours or more. This can simmer all day if you like.
7. About ten minutes before serving pour an ounce or two of the cream sherry into the sauce. Stir and taste. More sherry can be added if you like, but be careful not to overwhelm the the other flavors with the sherry. The sherry should sweeten the sauce a bit with a unique, but subtle fragrance and flavor.

Enjoy!


Now, to get back to my book. I love this series!!


Saturday, November 21, 2015

Thanksgiving Already! Projects and a few "Bits and Pieces"

Thanksgiving is arriving in less than a week! 

We will be a small group this year so preparations are easy. The bird is thawing in the fridge and ingredients for everything are purchased. I'll be baking a lovely chocolate birthday cake instead of pumpkin pie. My son and both of my grandchildren have late November birthdays, so we always combine the birthday party with Thanksgiving. 

Thanksgiving is definitely under control, but I really wound up on the verge of panic over Christmas projects this week. I've taken on way too many sewing projects, but that's pretty typical for me.

Everything seems to be under control now, thank goodness - at least for the moment. Anything could happen, though, so my fingers are tightly crossed.  

All those robes!

I love my serger.  I don't use it very often, but when I need it I really need it. When the serger went on the fritz just as I was getting ready to sew the second of many Christmas robes, I was beside myself. The blade was cutting the fabric too closely and loose loops of thread were hanging off the edge of the seam allowance. Not only that, but the fabric was stretching as I stitched. I don't have time to take my machine it in to be serviced. I was sure I'd have to forget the robes for this Christmas, and I had no idea where I might store 20 yards of fleece for a year.

I tossed and turned and lost most of a night's sleep over my predicament. What on earth could I do instead of robes? The next morning I got out the instruction manual in hopes of a minor miracle. I should have done that in the first place, but I had panicked instead of thinking. Every single setting was off! The serger had been moved here and there while new blinds were being installed in my sewing room and the dials must all have been bumped. When in doubt, check the obvious!!

I'm back in business. Two of the goodness-knows-how-many fleece robes are ready to package up and number three is cut out and ready for me. I'll quit sewing these when I run out of time or when I run out of fleece, whichever comes first.

I love my new window blinds
Bits and Pieces 

I finished up the last three of the mug rugs for my daughter's office buddies a week or so ago.
This was such a fun challenge and the mug rugs are perfect holiday gifts for a great group of friends.

My daughter and I brainstormed ideas as we tried to come up with a unique set of bits and pieces to place on individual mug rugs. The first three mug rugs were pretty generic with basic hearts and flowers in favorite colors schemes. The flowers weren't going to be fitting for the rest of the crew, though. Interests are so varied. In the photos you'll find the ones for the man with three-year-old triplet boys, the one who loves fine food, the cat and dog owners, the musician, and even the gal who likes to play the slot machines.


Way last spring I promised to make a pattern when I had the new templates, and this week I wrote the pattern. It's all ready to download. The templates for the little shapes are free, and any letters can be used for the names. The letters I've used are from  my "Alphabet Soup" pattern.
http://www.craftsy.com/pattern/quilting/home-decor/alphabet-soup-/127129

Templates include itty bitty bicycles, wine and hamburger, music, slot machine, and pet prints.


Wishing all of you a wonderful Thanksgiving! 


May your turkey be juicy and may you be surrounded by those you love.