Friday, September 25, 2015

A Rocking Story and Another Pot of Soup


All afternoon I rode across the prairie, galloping on my trusty steed, chasing down the bad guys and singing off key. I was four-years-old living in the land of make-believe, but in the real world of grownups, the prairie was my Uncle Gail's front porch and the steed was my cousin Tom's old rocking horse with the chipped paint and the scraggly tail. It was the first time I'd met my cousin and the first rocking horse I'd ever seen. I never got over my love of that horse or my admiration for my wonderful big cousin.


From Utah we went on to view the wonders of the Grand Canyon that summer. I know I was there because somewhere downstairs I have a photo, but from that entire trip I only remember Tom and his wonderful rocking horse.

"Let's Rock"

While making this newest pattern, I relived the thrill of the front porch adventure in the form of fabric and thread. I hope you like "Let's Rock" half as much as I do.


Lentil Soup with Curry


This week I made two soups, lentil soup and chili. I must have been in the mood for beans this week - possibly due to my impatience for cooler weather. The chili is a very basic recipe, so I'll share only the lentil soup recipe with you this time. If you don't care for curry, you could use cinnamon or Worcestershire sauce to spice up the lentils.

It started with a pint of mixed, chopped carrots, celery, and onions from Trader Joe. 

Ingredients
  • 2 cups chopped carrots, celery, and onions in about equal portions
  • 2 T olive oil
  • 2 medium potatoes cut in 1/2" cubes
  • 3/4 cup lentils
  • 15 oz can of chicken broth (I used the last of my frozen homemade chicken broth)
  • 3 or 4 cloves garlic
  • 1/2 tsp turmeric
  • 1 - 2 tsp curry powder
  • salt and pepper to taste
  • 3 - 5 cups water
  • a squeeze of lemon juice (It's easier to add more than to remove too much, so add just a bit at a time, tasting to make sure it's just right for your taste buds.)

1. Lightly sauté the chopped, mixed vegetables and the garlic together in the olive oil.
2. Place all ingredients except the lemon juice into a slow cooker with 3 cups of the water.
3. Cook on high 4 hours, turn setting to low and continue to cook until the lentils and vegetables are tender. Add water as needed.

My freezer is stuffed with soups right now, but I know I'll be adding to the variety as time goes on. I'm missing some basics, like chicken noodle, and I'd like to try some new recipes, too. If you have a favorite, please send it to me and I'll publish it here on my blog. My email: klee2strings@gmail.com

Have a fabulous week! 
Happy stitching, everyone!


Saturday, September 19, 2015

Two September Recipes and a Project Photo From a Friend

First things, first. Hannah sent me a photo of her final block for this year's quilt along. Isn't it lovely? The fabrics are so cheerful and bright. Beautiful work!


I haven't done any actual stitching for the past several days, but I've made headway on some ideas. Both are inspired by the upcoming holiday, but I won't tell you much more.  No sneak previews this time around!

One project will be symbolic and very, very different from anything else I've ever made. This will be something that my grandmother would have loved. The other project is inspired by a childhood memory. That one has taken on a mind of it's own. I was going to make a mug rug, but it's turning into something else. Wish I knew where it's going.

The weather has turned cool and autumn-like again for the last couple of days, and it's put me in the mood to cook and bake whatever I can from local September harvests before warm days return for awhile. Today it was soup for lunch and cake for my afternoon snack. 

Veggie Soup


First off, I made a huge pot of vegetable soup. It's one of my usual soup recipes - raid the fridge and throw it in the slow cooker. Most of this went into the freezer in single serving containers. It will keep for several months. My hubby doesn't care much for soup, but thanks to the microwave, I can have instant soup for lunch whenever I like.


This is what went into it this time.

Ingredients:
2 tbsp olive oil
1 medium chopped onion
1 sliced zucchini
1 sliced yellow zucchini
1/2 sweet green pepper, chopped
1/2 sweet red pepper, chopped
4 cloves minced garlic
About 2 cups chopped, cooked tomatoes (fresh or canned)
8 oz canned tomato sauce
15 oz chicken broth (mine was homemade)
1/2 cup frozen corn
1/2 cup frozen baby lima beans (peas, green beans, or other vegetables would work as well)
1/4 cup chopped fresh parsley
2 T chopped fresh basil (dill, rosemary, or thyme can be substituted)
2 - 4 cups water
Salt and pepper to taste

Instructions:
1. Place tomatoes, tomato sauce, chicken broth, garlic, herbs, salt and pepper, and 2 cups of water into the slow cooker. Turn to high.
2. Fry onions in one tablespoon of the olive oil until lightly browned. Add to the slow cooker.
3. Lightly sauté zucchinis and peppers in the remaining tablespoon of oil. Add to the slow cooker.
4. Cook four to six hours, or until vegetables are tender, adding water as needed.
5.  Add the frozen vegetables to pot and cook for another half hour. 
6. Serve.


Apple Cake with Strudel Topping


This is so good - moist and filled with fresh apple goodness. I like it best warm, but it's wonderful chilled as well. I've actually combined two recipes. The cake is a variation of a recipe from King Arthur Flour, and the topping is from an old farm cookbook in my cupboard. The cake will keep for several days refrigerated, but I'm planning to wrap individual pieces in plastic wrap and freeze them in a freezer bag. Not that I have much left to freeze. I wound up sharing almost half of it with my neighbors. The rest, though, will keep for at least a month. 


Strudel Topping


1/2 cup packed brown sugar
1/2 cup uncooked rolled oats
1/3 cup flour
4 T cold unsalted butter cut into small pieces

1. In a medium size bowl, toss the first three ingredients together with a fork.
2. With you fingertips, blend in the butter pieces until small clumps form and the butter is well incorporated, about 2 minutes.
3. Refrigerate until ready to use.

Cake

2 1/3 cups flour
1 2/3 cups sugar
2 tsp baking soda
3/4 tsp salt
1 1/2 tsp Apple Pie Spice (I used 1 tsp cinnamon, 1/4 tsp cloves, and 1/4 tsp allspice)
2 large eggs
1/2 cup softened butter
4 cups peeled, cored, copped apple
3/4 cups walnut pieces

1. Preheat oven to 325 degrees. Grease and flour a 9" x 13" pan.
2. Mix all of the ingredients except the apples and walnuts together in a large bowl.
3. Beat until well combined. The mixture will be very stiff,  and possibly crumbly.
4. Add the apples and nuts, and mix until the mixture become a thick batter, somewhere between a cookie dough and a brownie batter in consistency.
5. Spread the batter in the pan, smoothing the top with wet fingers.
6. Sprinkle the strudel topping evenly over the top.
7. Bake 45 minutes or until a toothpick inserted into the center comes out clean. 


Wishing you a super September week!


Monday, September 14, 2015

New Toys, Part 2: Constructing the Styrofoam Wreath.

After two weeks of work, almost 300 photographs, and a ton of fun along the way, the wreath is finished! It turned out exactly as I had envisioned it, and that's the biggest surprise of all.

The photograph looks like it was taken in winter, but it was actually almost 90 degrees and humid out there on my porch.

These little toys are so very versatile! I attached them to a styrofoam wreath with long pins,  but I can see them used in so many different ways. I wish I had time to sew some different uses, but there is only so much time in a day.

These are just a few of my ideas:
  • Attach the toys to a ready made evergreen wreath. They would only need some little plastic or metal loops sewn to the back. Bits of wire threaded through the loops would attach nicely to the evergreen branches. 
  • Using the same little loops attached up at the top of the ornaments, the little toys would be wonderful tied onto a Christmas tree with pretty bits of ribbon. 
  • What about replacing the traditional bow on a package with a cute ornament? 
  • Stocking stuffers for older children!
  • I'm even visualizing mug rugs or Christmas stockings with fusible web appliques made from the templates


The pattern contains all the details for sewing the ornaments, so I'll focus on preparing the wreath in this blog post.

The Wreath

Any size or shape of styrofoam wreath would be fine for this project.

I started with a plain white 16" styrofoam wreath. I chose one with a flat top rather than one that was rounded. First, I wrapped it in a 2" bias strip from 1/2 yard of green fabric. Then I used an entire roll of sheer 2 1/2" green ribbon to wrap over the cotton.

 Wire based garland sections with holly, pinecones and evergreen came next.


I placed these on the wreath and used 5/8" sheer green ribbon tied on the back side of the wreath to hold these pieces in place The ribbon allows enough flexibility to allow positions to be altered here and there as the ornaments are attached.


I added some purchased pinecone decorations and a few small glass balls to lend color and variety to the arrangement. 


The toys and additional glass ball ornaments were added last. Long pins with pearl heads worked beautifully! I hooked them into the back side of the toys and then poked them into the wreath. 


In only one week, fall will officially arrive.  
May your last week of summer be wonderful!

Friday, September 11, 2015

New Toys!! Part 1

I worked almost exclusively on this one project this past week. My sewing room is a disaster, but I'm so excited that the wreath of little stuffed toys is absolutely finished!

There are fourteen stitched pieces in all. Two stars, two hearts, two tiny presents, a pair of mittens, a pair of candy canes, one gingerbread boy, one snowman, a stocking, and Rudolph.


The pattern for all the stuffed toys will come out next week, and I'll show you more about how I made this in next week's blog. 

This weekend I plan to enjoy our first couple of autumn-like days. For the first time since June I'll turn on the oven and bake up a couple of batches of goodies. We'll have zucchini bread, peach cobbler, and blueberry muffins by Sunday. Summer isn't completely gone, but my freezer will be full of homemade snacks and desserts. 

Have a beautiful weekend!!


Saturday, September 5, 2015

A Burst of Sun in Fabric

Inspiration can come from anything. Or anyone. The trigger for the Sunburst Table Topper came from the planting done by one of my neighbors. The bright golds and orange colors are absolutely perfect as summer draws to a close.

Sunburst Table Topper 

I wouldn't have thought of this design at all if the neighbor hadn't planted a long, long row of sunflowers right next to the sidewalk. They grew and they grew until they were well over 10 feet high and topped by huge golden blossoms with dark brown centers. Every day as I've walked by I been compelled to stop and see what these fascinating plants have been up to. The golden petals have faded and are now dropping as the seeds ripen into black gems.

There was also a need for a small table topper. This one is only 18" in diameter. There's a little round cabinet in our family room that desperately needs a new topper. A Christmas topper has been sitting on it all summer because I have nothing else the right size. Spilled water soaked into it sometime during the winter and ruined the wood. It went undiscovered for several days, but that by the time I found it permanent damage had been done. I'm a bit tired of looking at poinsettias for months on end, so a new topper was definitely in order. Poinsettias will get their turn again soon enough.

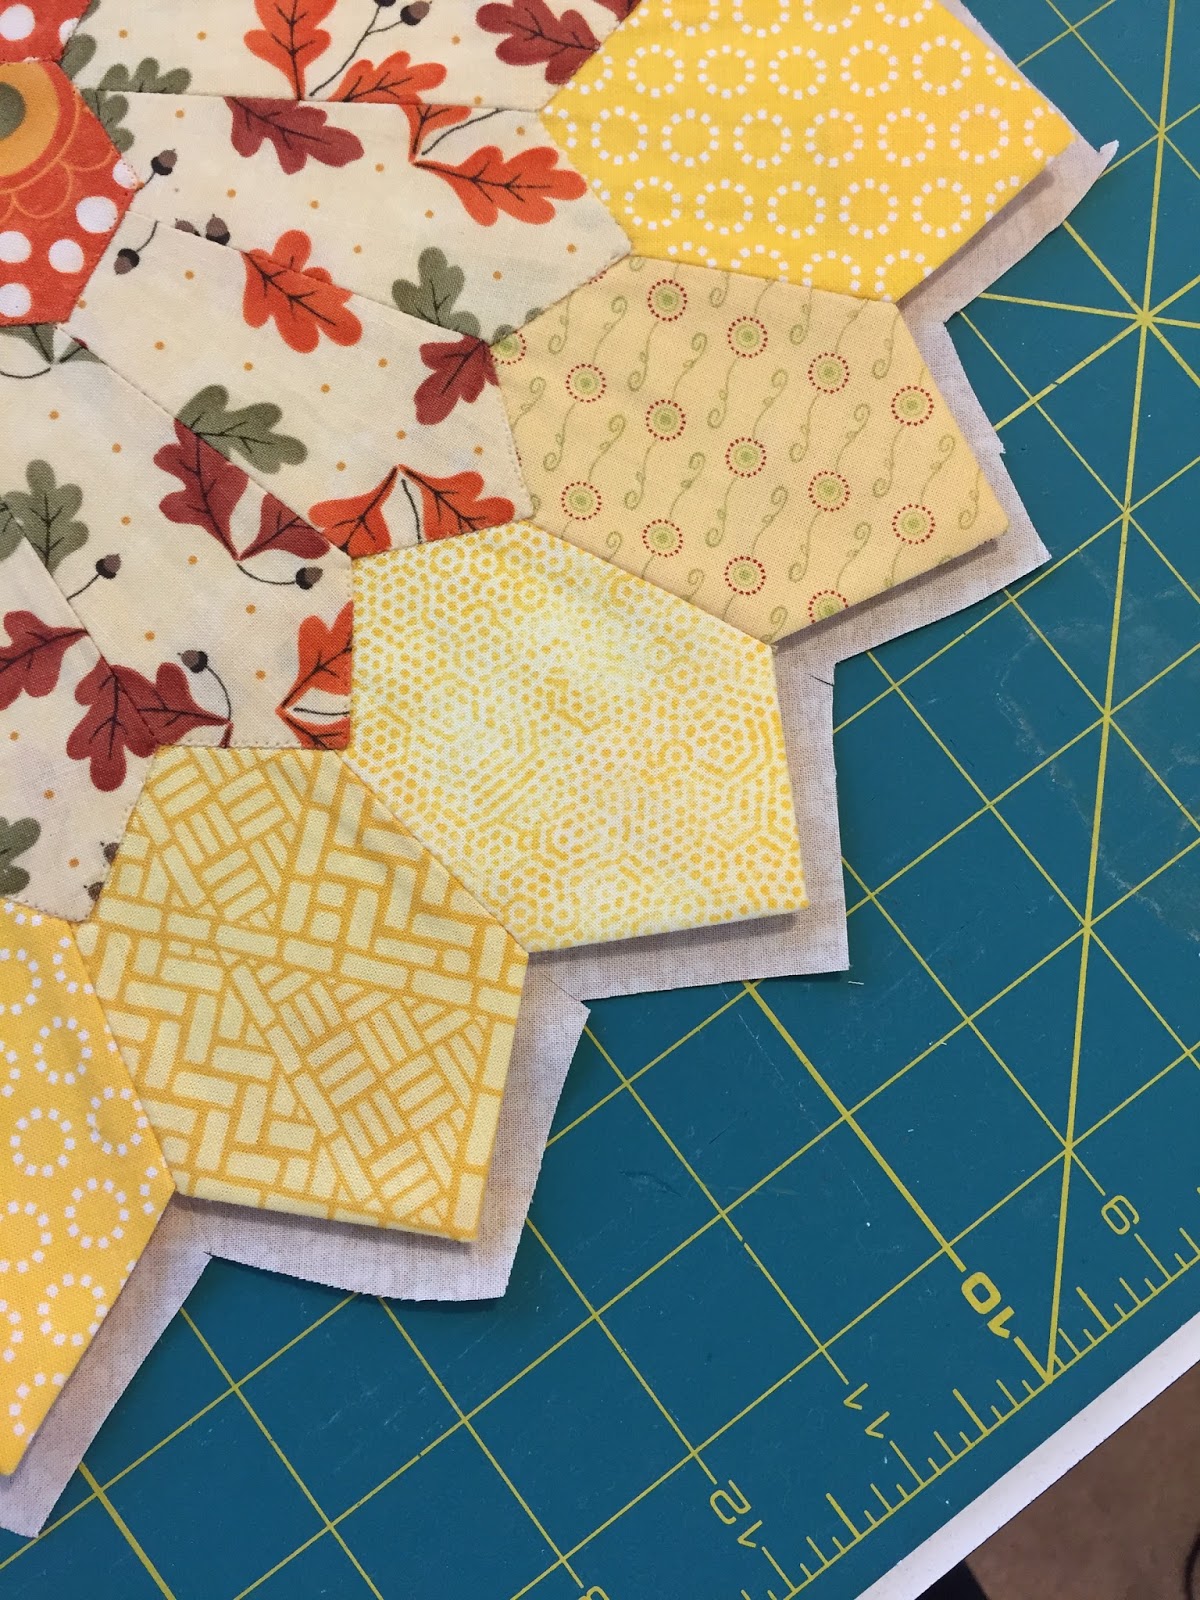
As long as I was making something new, I chose to work on some brand new techniques. I'm always up for a challenge, and I've never made Dresden plate blocks. My experience with hexagons is limited as well, but the combination of those two patterns seemed perfect for my little burst of sunshine. I had a lot to learn!

I had originally thought to make this as the top portion of a square or octagonal block. Then I discovered that the pointed ends of the Dresden plate sections are made with the edges already turned under and completely finished! This wouldn't need to go onto another piece of fabric for background. Nice!


I'm getting ahead of myself just a bit, though. Let's start with the hexies. Lovely hexies, pretty hexies. Must they be stitched together by hand? It's so tedious! So I got out my handy dandy invisible polyester thread and set my machine for a very short, very narrow zigzag stitch.


Then I pushed those little basted hexies tightly together side by side and connected them the easy way! This was fun! In on the left, in on the right and done.


I liked this so much that I skipped the hand applique, too. I connected the hexies to the inner Dresden plate in the same way I'd connected them to each other. Then I used the technique one more time to sew the inner Dresden plate to the outer one. Not totally invisible, but definitely close. A word of warning, though. If you do this, make sure you get polyester, not nylon invisible thread!


I may have made a mistake in the cutting of the pieces. I should probably have cut the outer Dresden a few inches up from the bottom of the template. As it is, there is some fabric wasted when the excess is trimmed off. I decided to leave it like that, though, because the centers of the two Dresden plates line up perfectly and it's much easier to center the inner ring on the outer one. 


Now we get to the finishing of the table topper. This is where I was getting ahead of myself. In order to have those points at the outside of the topper I needed to make some alterations in how the batting and backing were attached. 

The batting had to be cut smaller than the quilt top.


The backing was trimmed just 1/4" larger than the quilt top all the way around and the inner points were clipped back to the batting. 

Unfortunately, not all hand stitching was eliminated. But, it seemed like a great tradeoff. Stitching around the outside was nothing at all compared to all the applique I might have done by hand!


Finished!


Wishing you many golden days as the weather grows cooler. 


Friday, September 4, 2015

Just Playing Around

This really has been a week of playtime.

Yesterday was my birthday and I spent part of the day at school giving book talks to three classes of fifth graders. It's one of my favorite things to do, and made for a lovely birthday activity. The children all sang "Happy Birthday" for me, and my teacher friends gave me a lovely vase of cut flowers - which I accidentally left in the classroom! I'll run back today to pick it up. 

The kiddos wanted to know how old I am. I usually just answer, saying that I'm too old to care if people know my age, but the truth is that I've never quite grasped why that was an issue with some folks. I told them and enjoyed watching their mouths drop in surprise. Anything over 30 seems ancient to them. "You're older than my grandmother!" one child gasped. I used to tell my students that I was born the year after the Pearl Harbor attack so they could do some research and figure it out for themselves. In actuality, I was born almost nine months to the day after that event. Now, what should I make of that tidbit?

I actually have done a bit of sewing this week. Not much, but some.

The Sunburst table topper is almost finished. I hadn't worked with Dresden plates before, and they are so popular right now. It was past time to get on board and learn the ins and outs of something new, so I doubled them and put two in one design. Just for good measure, I threw in some hexis. May as well do it all in one piece, don't you think? Along the way, I most definitely learned a lesson or two! More about that later when I have the table topper completely finished. 

Here it is as it was a few days ago. 

I've been fiddling with Christmas ornaments, too. As I said, I'm just playing around right now. Something on Pinterest caught my eye and I was off.  As always. 

As for Pinterest - my goodness! I went through my boards, rearranged lots of stuff, and deleted over a thousand pins. Then I got to the cookies and candies board. Big mistake! I should have just deleted the whole board without looking! This was the result.  We used to make similar little stovetop goodies when I was a teenager. I cooked them one day, but had to give them all away to the neighborhood children the next day. Too dangerous!

Yum!! Cocoa, milk, butter, peanut butter, vanilla, and oats.  

The next day my sweet son brought me chocolate covered cranberries. Sometimes a person just can't win. I can almost see the pounds adding on. 

Back to the sewing brainstorm from Pinterest: If you've been following my facebook page, you may already know that a new batch of little stuffed ornaments will be coming soon. I'm just getting started, and this project is taking me waaaay back to when I was eight or nine years old. I tried to make little stuffed toys by hand. I hadn't quite grasped the idea that seams take up space, so they didn't come out right. It didn't really matter. Lopsided with stuffing pushing out from gaps in the seams and all, I loved them anyway.  Thank goodness it's working a whole lot better now than it did on the first go-round.


What next? A snowman? Hearts? Hmm...


 Happy September, everyone!


Thursday, August 27, 2015

A Teacher Request: Cell Phone & ID Holder Tutorial


Between gossip and school chat during a recent back to school lunch with my teacher friends, one of the gals showed us something her teenage daughters had been working on. It's a holder for a cell phone and school ID card that their mom can slip over her belt. It would be especially handy for recess duty or field trips. The girls had a super idea, but they knew it needed to be refined. The case can only be worn on a belt, and it is rather wide. I think that may have been the reason their mom showed it to me. 


The other teachers agreed that the idea was fabulous, and that was all the encouragement I needed. I so love a challenge! "Tell me more," I said, as I pulled my handy dandy pencil and scratch pad from my overstuffed purse. The five of us spent the next fifteen minutes collaborating on design elements.

The minute I got home I headed for my sewing room. Measure this, measure that, make a sketch and I was off to Hobby Lobby with a shopping list. Clear upholstery vinyl, D-rings, zippers, belt clips ... What? They had no belt clips? Okay, what could substiture?  I grabbed a package of ID card clips just in case, and headed home.

Back in my sewing room I pulled a fat quarter from my stash and got to work.  I made two pockets for the front of the case. The larger pocket holds the cell phone, and the smaller, frontmost pocket has a clear vinyl insert for an ID card or favorite photo. There is a zippered pocket on the back for cash, credit cards, driver's license, a few tissues or whatever.

I used the ID card clips that I found at Hobby Lobby for clipping the case to a belt or waistband.

Prototype

I took the prototype over to school for approval. The girls liked it a lot, but I wasn't completely satisfied. The D-ring was great for attaching the case to a lanyard, but to carry it at the waist, the ID card clip had to be clamped to either a belt or belt loop. Without those options the fabric at the waistband had to be pinched and then gripped between the  teeth of the clip. It held securely, but I wasn't completely happy. I really did want a belt clip for it that could slip easily over a waistband or pocket like my hubby's leather cell phone case does.   

I was sure I could pick a few up belt clips at Joann's, but that store is clear across town, so I called first. I was surprised to discover that they nothing at all like that.  I made a few more phone calls. There were no belt clips available at any of the fabric stores or any of the local craft stores - not even online!

The last option was eBay, the source for absolutely anything imaginable. Sure enough, I found just what I wanted.

I'm most definitely not in the business of advertising, but sometimes I feel that I really do have to share products with you. This is one of those times.

This is what I bought - 1 1/2" plastic belt clips available in sets of 10 for $ 10.35 from BuckleRUs. 
This is the eBay link:
http://www.ebay.com/itm/10-100-pcs-Plastic-Belt-Clips-1-1-2-PTC1-/151325176274?var=&hash=item68e1f6a038
I like the new and improved version of the case so much better! 


Now I'm working on stitching up a bunch of them. Four are done and there are a few to go. After all, I do have ten belt clips, endless fat quarters,  and lots of teacher friends. I'm making myself one, too, but since I don't need to carry an ID card, I'll make the smaller front pocket without a clear insert. I can use my own case around the house, when I go walking, or when I dash out on a quick trip to the store or the library.  


The Tutorial: 
Cell Phone & ID Holder

4” x 6 ½”
Fits an iPhone 6 with a bit of space to spare. 


Materials:

·       One fat quarter fabric
·       One small piece of fusible interfacing
·       One small piece of clear vinyl upholstery fabric  
·       One 5” (or larger) zipper
·       Belting, 1” wide x 2 ½” long
·       One rectangular ring, 1”
·       One belt clip, 1 ½”
·       Thread

Cutting:

From fat quarter, cut:
·       Two rectangles, 5” x 7 ½”
·       Two rectangles, 5” x 11 ½”
·       One strip, 1 ¼” x 5”
·       One strip, 2” x 5”
·       Two strips, 1 ¼” x 4”
·       One rectangle 2 ¾” x 5”
·       One rectangle 5” x 5

From fusible interfacing, cut:
·       One rectangle 4” x 7 12”

From clear vinyl, cut:

·       One piece, 3 ½” x 4”


Instructions

Make The Clear Vinyl Pocket 
Use ¼” seams on the insert.

Note: Leave the paper backing of the clear vinyl in place while sewing. Sew with the paper side down against the feed dogs to keep the vinyl from sticking to the sewing machine.  

1. With the right side of the fabric facing the vinyl, sew one 1 ¼” x 4” strip to each of  the two 4” sides of the clear vinyl. Finger press open.

2. Sew the 1 ¼” x 5” strip to the bottom of the clear vinyl. Finger press open.

3. Sew the 2” x 5” strip to the top of the clear vinyl. Finger press open.

4. Press the edge of the 2” x 5” strip of fabric back ¼”. 

5. Tear the vinyl's paper backing away and discard.

6.  Fold the fabric from step 4 down onto the back of the vinyl so that the pressed edge is even with the stitching line. Press.


7. Top stitch on the right side of the folded fabric strip.

Finish the front of the case. 

1. Lay the wrong side of the clear vinyl pocket on the right side of a 5” x 11 ½” rectangle.  Align the pocket with the bottom of the rectangle.  


2. Fold the top of the rectangle over to the back. Stay stitch. The folded piece will make the cell phone pocket.

3. Place the two pockets on the bottom edge of the right side of one of the 5” x 11 ½” rectangles.  Stay stitch. 

Make the Zippered Back Pocket.

Note: I didn't have a 5" zipper, so I used a 7" one. It will be easy to cut to size later.

1. Iron the interfacing onto the wrong side of the remaining 5” x 7 ½” rectangle. Set aside.


2. Lay the zipper on the  edge of the right side of the 2 ¾” x 5” strip of fabric. The zipper pull should face down against the fabric. Align a zipper foot along the edges of the zipper and the fabric and stitch. Fold the fabric back from the zipper and finger press. 

3. Lay the zipper and fabric piece right sides together on the 5" x 5" piece of fabric. Align the edges and stitch with the zipper foot. Finger press the fabric back from the zipper.


 4. Lay the wrong side of the zipper section on the right side of the  5” x 11 ½” rectangle that is backed with interfacing. Open the zipper a bit so the zipper pull will be inside the seams.  Stay stitch all around.

5. Trim off the excess lengths of zipper. 


Finish the case:

1. Fold the belting in half and slip the rectangular ring into the fold. Align against the top edge of the zippered pocket sections, center and stay stitch. 

2. Place the two halves of the case right sides together. The photo below shows them side by side.

3.  Sew all around the case with a ½” seam. Leave an opening at least 2  ½” wide at the bottom of the case for turning.

4. Trim the seam to about 1/4" all around the case, except for the section by the opening. Leave that area of 1/2" seam allowance in place for folding inside when the opening is sewn closed.  Trim the corners very close to the stitching.


5. Turn the case right side out. Gently push the corners out with a point turner.  I used the pointed end of a large wooden knitting needle. 

6. Press the case flat, but don't place the iron directly on the vinyl. Tuck the ends of the open section at the bottom to the inside.

7. Hand stitch the opening closed. 

8. Make a double line of machine stitching right under the belting so it won't pull out. 


9. Attach the belt clip by fitting the free side of the rectangular ring into the small space at the bottom of the belt clip. Snap the belt clip closed. 


Done!!

The last three cases.

Wishing everyone an ever "sew" happy weekend!