Thursday, January 8, 2015

Alphabet Soup for Quilting

I made a set of alphabet templates last summer, but it was only after Christmas that I found time to stitch them into some sample projects. The alphabet is sized to be just right for fitting a one or two word phrase on a mug rug, but there are other projects on which  a quilter might want to use lettering.

Letters are another a fabulous way to use scraps, and using scraps fits right into my goal of trying to buy less and use more of my fabric stash this year. I'm a happy camper today.


Just a few ideas for using lettering in quilting:

Mug rugs instead of cards: I've always liked the idea of using mug rugs as a replacement for those expensive commercial throw away cards with their canned messages. I wouldn't go through this much trouble for everyone, but I would definitely do so for special friends. It really helps that mug rugs come in many, many sizes. If the words don't fit the mug rug you can enlarge or shrink the mug rug to fit the words.

I love the flexibility of words, too. A person can be so creative in how they are used. Each project becomes something totally unique and original. Whatever you make won't look like someone else's project, and I really, truly like that aspect! It's the very reason I refuse to buy kits. I don't want to make anything that's absolutely identical to something another person has made.

What can you say in a mug rug card in only one or two words? This is only the tip of the iceberg.

  • Thank you
  • Welcome Home
  • Love
  • Best Friends
  • BFF
  • Get Well
  • Good Luck
  • Graduate
  • Wedding Bells
  • It's a Boy!
  • It's a Girl!
  • Congratulations
  • Way to Go!
  • Proud of You
  • I Miss You
  • Mom
  • Dad
  • Love My Sister
  • Keep Smiling


I began my samples with a keepsake thank you card to have on hand. Just in case. You never know when you might need to give a heartfelt "thank you" to someone near and dear. It needed a bit of something else to fill in and add balance, so I made templates for a couple of flowers and a heart to go along with the letters.


I was really pleased with this first mug rug! I was on a roll, so I made a couple of personalized mug rugs for the desks of my daughter's friends. They are so different from each other and I know her office buddies will be surprised and pleased. I'll have to make a lot more name mug rugs as time permits.


Look how different all of these projects are from one another. They use letters from the same alphabet and they contain the same flowers and heart shapes, but because of length of words, the way the letters fit on the mug rug, different fabrics, and little touches, each one of these is absolutely unique. 

On two mug rugs I used contrasting thread for outlining the letters, but I used matching thread on one. The flower in the thank you project has a contrasting center, but the centers of the flowers in the other mugs are made with spiral machine stitching.

The letters on one mug rug were made with charm square solids and they looked a bit plain. Judy is a short name, so I used only upper case letters to fill more space, but the larger letters gave me an opportunity to dress them up with embroidered running stitches. 


Ideas for using lettering are popping my head one after another! I'll need to make more little picture templates to fit some of these thoughts very soon. Flowers and hearts aren't right for everything or for everyone.

Signs! Anything can be labeled.

This is just a starter list.
  • My Sewing Room
  • Jacob's Room (substitute any name)
  • The Boss (That could be a cute mug rug, too.)
  • Do Not Disturb
  • Welcome
  •  Chores, or To Do (Great on a bulletin board.) 

Quilts.

There is no end to words you might add to quilts. You could personalize a baby quilt, put a title at the top or along the side of a quilt, or add a word or phrase in one of the blocks. If the letters are too small they can easily be enlarged to fit onto a bigger project. 

You needn't stop with my alphabet templates. There are many sets of letters of different styles to be found if you look for them. 

Happy Stitching!!


Saturday, January 3, 2015

Tutorial: A Quick Valentine Table Topper

This little Valentine project is easy and quick. It uses just one charm pack, or a small bundle of scraps from your stash, and 1/2 yard of background fabric. I resolved to use as much fabric from my stash as possible this year, so I'm off on the right foot.

22" x 22"
My sewing room was a disaster after Christmas! Not only had it been used as gift wrapping central, but I still hadn't put away the leftover fabrics and other bits and pieces from my last sewing project. I was stuck with no choice but to clean up and organize things before moving on to making new messes.

Every now and then the organizing process reveals surprises. While sorting the fabrics in my drawer of reds and pinks, I rediscovered a Valentine charm square packet tucked away and forgotten. It had been one of those gifts of fabric that I would never have chosen for myself. I love red, but something about this fabric had just never appealed to me.

The pack of five inch squares had been taking up drawer space for seven or eight years, and it was well past time to do something with it. I decided to take a second look before tossing it in the give away pile.

It was much nicer than I had remembered. Maybe I could use it. After all, I had resolved to use more of my stash this year instead of buying new fabrics, and before we can blink Valentine's Day will be here.

Wheels in my head began to turn. If I were to make a pattern at all for this holiday it would have to be soon - like now. I needed something fast. A charm pack would be just the right size for a quick project. Everything else I needed just happened to be on hand, too. Perfect! With high temperatures hovering around 10 degrees and the prairie wind blowing and blustering, it was too darn cold to go out for new fabrics, anyway!

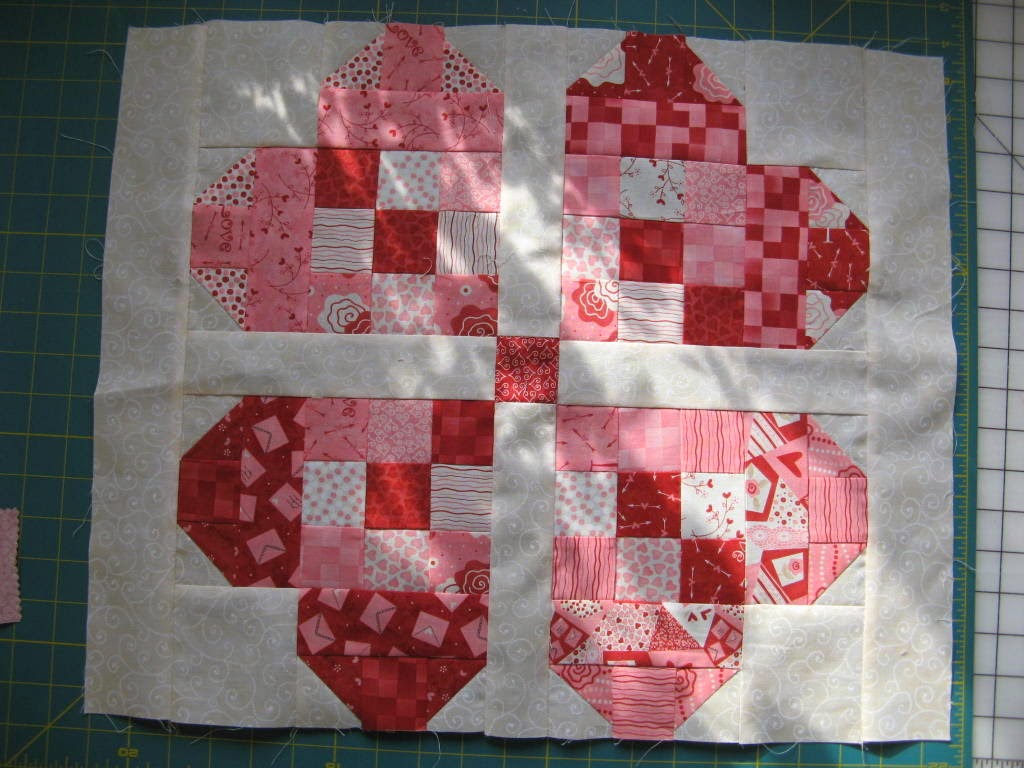
I found a photo of a traditional heart block that would stitch up into a quick little table topper. Creating the pattern and figuring out the fabric measurements didn't take long at all. The design is very simple and the size of the five inch squares limited what I could do. Each of the four blocks in my table topper uses fifteen 2" squares and two 2" x 5" cuts from the charm pack.

Fabrics Needed 
  • One 5" square charm pack or a selection of scraps of any color. There is no rule that hearts must be red or pink.
  • 1/2 yard of a neutral background fabric
  • 1/4 yard of fabric for the binding 
  • 2/3 yard of backing fabric.
Cutting

From the neutral background fabric:
  • 4 squares, 3 1/2" x 3 1/2
  • 16 squares, 2" x 2"
  • 4 strips, 2" x 8" 
  • 2 strips, 2 1/2" x 17"  
  • 2 strips, 2 1/2" x 21"
Note: The measurements given are exact, but when I cut strips for sashings and borders I try to add a smidgen extra length. I'd rather trim a bit off than come out a bit short. 

From the charm squares:
  • 8 rectangles, 2" x 5"
  • 61 squares, 2" x 2"
  • 22 rectangles, 1 1/2" x 5"
From the backing fabric:
  • One square 24" x 24"
Putting it together
Note: All seams are sewn with a 1/4" seam allowance. 

1. Start with the two sections (lobes) at the wide upper portion of each heart.

Pull sixteen colored 2" x 2" squares and the sixteen neutral 2'x 2' squares. Arrange the pink and red fabrics into sets of four matching fabrics for each of the four hearts. 


2. Draw a diagonal line from corner to corner on the wrong side of each of the neutral hearts.

3. Place one neutral square on top of each red or pink square, right sides together. Sew directly on the line. 


I always hear expert quilters say, "Just eyeball the stitching." If that works for you, by all means skip the line drawing, but for me, skipping it is always a mistake. I've tried eyeballing multiple times, and every single time I've wound up giving my seam ripper a good workout and then drawing the lines anyway.

4. Trim about 1/4" from each seam and press the squares open. Press to the dark.


5. Chose two matching squares of red and pink for each heart. I tried to keep the color values similar to the fabrics just used in making the squares from the half square triangles. Sew the wide side of a triangle to each side of the square as shown below.

Oops! 


It should look like this!


Now, here's the truth. We've all seen numerous quilting videos and tutorials showing perfect results every time. Well, the truth is that even the experts make mistakes in quilting. They simply edit them out. Just thought you'd like to know that.

6. Choose two matching 2" x 5" rectangles for each of the heart blocks. Again, fairly close color values are best. The goal is to have two identical, fairly uniform "lobes" for each heart. Sew the rectangles to the sets you made in step 5 as shown below. There will be two for each of the four hearts.


7. The next step is to make the squares that form the base of the heart. These can be randomly placed. Sew the 2" x 2" red and pink squares right sides together in rows of three. Chain piecing can really speed this process along.


8. Next, sew three strips of three squares together to make a nine-patch set for each heart block. Each nine-patch will measure 5" x 5".


9.  Sew one "lobe" of the heart to one side of the nine-patch set. Sew a 3 1/2"x 3 1/2" square of the background fabric to one end of the other "lobe". Then sew the two sections together. These seams will complete the blocks. The finished blocks will measure 8" x 8".


Since the hearts in my blocks were had either mainly pink "lobes" or mainly "red" lobes,  I chose to have the red blocks positionsed diagonally across from each other. The blocks with pinker lobes will also lie diagonally across from each other.


10. Sew one 2" x 8" rectangle of background fabric between each pair made of a red block and a pink block.  

In this photo, the lower pair of blocks have been flipped.
 It was easier for me to keep the color order straight when all four blocks were right side up. 
11. Sew the single remaining 2" x 2" square cut from the charm pack between the other two 2" x 8" rectangles of background fabric. 

12. Sew the strip you just made between the two pairs of blocks. The set of blocks should now measure 17 1/2" x 17 1/2".


Almost finished!

13.  Sew the 2 1/2" x 17" strips of background fabric to two opposite sides of the square.

Beautiful sunshine is coming in my sewing room window!
14. Sew the 2 1/2" x 21" strips of background fabric to the remaining sides of the square.


And on to the the final border! This is where I used all but a few of the remaining 5" squares from the charm pack.

15. Sew the 1 1/2" x 5" strips of charm pack fabric end to end in four sets. Two of the sets need five strips, and the other two need six strips. These strip sets will make the last border.

16. Sew a set of five strips to each of two opposite sides of the quilt top. You will have excess fabric. I trimmed some from each end.

17. Sew the other two strips sets to the remaining sides of the quilt top. Again, trim off the excess fabric.

18. Layer the quilt top, batting, and backing fabrics together, and quilt. 

There are two humongous things I learned from Cindy Neeham's free motion quilting class on Craftsy. 
  1. Always, always stitch in the ditch on every stinking seam! I hadn't even considered that before taking her class. Going over all those seams may seem like a waste of precious time, but the difference it makes in the final product is amazing. 
  2. Never,  ever will I learn to quilt so precisely - no matter how hard I try or how much I practice! Sigh..
I love my walking foot! It makes that ditch stitching so easy! And, sometimes you really don't need to do any other quilting at all. Like now. It looks just fine, and this was quick.


19. Bind. This was always meant to be a quick project, so I didn't hand stitch my binding to the back of the quilt this time. 

When I had sewn my binding strips together, I sprayed them with a good coating of starch, folded them in half lengthwise and ironed them dry. The added stiffness from the starch really became helpful later.

After the binding was sewn to the front of the quilt, I folded it to the back and ironed it in place. Since the binding had been well starched it held it's position on the quilt beautifully, allowing me to stitch in the ditch to sew it on from the right side. 


Closeup views of the binding. 
This side looks great.

It isn't perfect , but I don't suppose anyone will spend much time examining the back. 
Done in only 2 1/2 days! 

I almost never work more than four or five hours on my sewing, so from start to finish I spent a total of about 12 hours on this project. That time includes everything from designing the project and working out the measurements to stitching the last bit of binding in place.   


Now I need to move on to something else - like putting Christmas away!


Thursday, January 1, 2015

Here's to New Beginnings

"And suddenly you know...
 It's time to start something new 
and trust in the magic of new beginnings."
                                                                                             - Meister Eckhart

"...the magic of new beginnings." What a perfect description of my little quilt pattern adventure! It really was stepping out blindly into the unknown when I published my first patterns on Craftsy. I had no idea that anything would happen, and then, suddenly, out of the blue, I had a little business and so many new friends. It did feel like magic.

I hope to continue trusting in the magic as I work on my craft. I'm trying to make my New Year's resolutions reflect that intention.

1. Learn new skills.
Study new techniques in sewing and quilting.
Learn how to use a new computer program for designing quilts. I want to broaden my design base and I can use any bit of help I can get.

2. Be creative every day.
Spend at least some time every day working on a creative project or new ideas.

3. Practice brainstorming.
Write down or sketch every thought, no matter how wild or out of the box it may be. I have notebooks that I hope to fill with ideas for new crafts. Pinterest is a great place to go for helping with this.

4. Finish some of those UFOs.
I know I won't finish all of them, but I at least need to take care of some of them.

5. Surprise people with unexpected gifts I have made.
This is will be fun!

6. Use more scraps.
This will be a challenge. I do use scraps, but I need to design more entire projects that use nothing but fabrics already in my stash.

7. Purchase less new fabric just because I like it.
This may be my greatest challenge. I must stop buying those fabrics that draw my eyes and win my heart just because they're so irresistibly beautiful. As it is, my drawers of fabrics overflow!

8. Pay attention!
Beauty is everywhere. I need to keep my eyes and my mind open to everything. That's how the magic begins.

9. Publish a blog post every week.
Even when I think that I have little or nothing to say, the very act of writing will make me think harder.

10. Show gratitude.
My life is filled with blessings large and small, with people who lift me up and make me whole. There are as many was to show gratitude as there are days in a lifetime. I hope to remember that, list every way that comes to me, and act no them.

It's the dawn of a New Year. 
Step out bravely, and discover the magic!


Saturday, December 27, 2014

Gathering Ideas for 2015 and Glancing Back at 2014

I've begun a to do list for 2015's patterns, and your ideas could really help me choose the best projects to focus on. What types of projects do you want to sew during the coming year. Mug rugs? Wall hangings? Table toppers? Quilts to snuggle in? Something altogether different? What themes appeal to you? Cats have already been suggested, but some others of you may also want something specific.

Do you have a preference for applique, paper foundation piecing, or traditional piecing? Is there a new technique you'd like to learn?

The more you tell me, the more I can streamline my work and create designs that you want to see.

I've put together a quick review of the patterns that were published during this past year. I make so many that it's sometimes hard to remember exactly what has and has not been done in the past. I find that reviewing helps me to see the gaps in what could or should be.

It truly has been a very productive year. I was surprised that I've made 35 patterns! Some go much more quickly than others, but it averages out to one new design completed every ten days. That's a lot of sewing, but I have loved every minute of it!

I organized the patterns in several categories.

 Fifteen Mug Rugs:
Somehow I managed to miss a couple of them in the photo collage below. I will make more mug rugs next year, but I doubt that there will be as many as there were this year. Is there anything special you'd like to see in these quick, but practical, mini quilts?


 Two Lap Quilts:
I made only two of these this year. I'd like to remake the Snowball Fight quilt in quilting fabrics if I have time, but I'm not sure about whether or not I'll make others. What do you think? Is there a special lap quilt, baby quilt, or other small quilt that you'd really like to make?

Add caption
Twelve Quilt Along Blocks:
My goodness, but "Home" was a delight! So much fun, but very labor intensive, too. I am considering another quilt along or maybe even two, but whatever I create next year will be on a much smaller scale. What are your thoughts about quilt alongs?


Five Table Toppers and Runners:
I love making these because I use them so much in my own home. I do plan more for the next year. Shall I limit myself to seasonal or holiday themes or shall I try for more general designs. I don't know. You'll have to help me out on this.


One Tooth Fairy Pillow:


 Or was it a mug rug?


This was probably the most fun of my projects this year. I love sewing for children, but it's hard to come up with unique ideas. Can you suggest something else?

Free Patterns:
In addition to the new patterns, I added three of the older ones to my group of free patterns. I do intend to add more this coming year.


Thank you for being part of this wonderful year of stitching!

I'm making my list and checking it twice!
With your help next year will be even more exciting and fun.


Saturday, December 20, 2014

Teacher Gifts and a Recipe

Phew! I can breathe more easily today.

Christmas cards are in the mail, the tree is up, gifts are ready to go, and I can put away the cookie sheets and frosting bags for now because the baking is finally finished.

One other wonderful pre-holiday task has also been completed.

I spent Thursday at the elementary school where I used to teach. I love the opportunity to meet over lunch with my old teammates, and I love being with the children. Several times a year I round up a stack of really great books from the media center at school and give book talks to the fifth grade classes. My December book talks were timed to coincide with the student wiggles and excitement that appear at this time of year and make actual teaching all but impossible. A guest speaker is always a break from routine classwork, and students were excited to have some new ideas for holiday reading.

The teachers were dressed to compete in a holiday "ugly sweater" contest, and with only two days till winter break,  gifts for teachers had begun to appear on their desks.  Seeing the gift bags and the plates containing homemade goodies reminded me some of my very favorite gifts from those many years that I was teaching.

If you've ever wondered what to give a teacher for Christmas you should know about the gifts we cherish. These are a few from the collection of items I've kept. It's been seven years since I retired, but I can't bring myself to let any of them go.


In the photo you can see a snowman doorstop made from a brick,  a tiny, little homemade tree ornament, a crocheted dishcloth made by a student's grandmother, and all of those handmade cards that I still keep in a box. The cup was a very special gift. It was delivered years after one of my students had grown up. It has a logo of the university where he was now teaching on the front. He wrote a lovely note in silver marker on the back and hand delivered the cup to me at school the day before our winter break.

There were stacks of other gifts that became precious to me. One was the apron that a student had made for me with help from her mom. She was dancing with excitement as she told me that she'd sewn one for herself that was exactly the same as the one she made for me. The apron was child-sized, but it went straight into my apron drawer. Over time it was worn so often by my grandchildren and other tiny kitchen helpers that it became quite bedraggled.

I still have a big fleece throw which I've used until it's much the worse for wear. The student tied all of the fringe knots by himself. His mother said he spent more than a week working on it after dinner every night.

There was another gift that I'll never forget. A sweet little girl handed me a paper plate containing half a dozen rather odd looking, grayish colored cookies. "I made them all by myself!" she grinned. I looked at her grubby little hands and knew I couldn't bring myself to taste those cookies. After lunch I told her that I loved her cookies and they were so amazing that I'd taken them to the teacher's lounge where they had disappeared as fast as could be. She gave me the hugest hug. I didn't know if I should feel guilty or not, but I had told her the absolute truth.

Simple gifts from the heart are those that are most meaningful. Teachers don't remember who gave them the fancy boxes of candy, the packages of gift soap, or the dozens of "#1 teacher" cups, but I definitely remember the tiny bell a little girl brought to me. She said she chose it so that I would think of her every time it tinkled on my tree. It does tinkle now and then, and I do remember that sweet little face.

A Recipe

I am totally "cookied" out. I don't think I can face another cookie, at least not until Christmas day.. I made plenty for the cookie exchange last week, we have more than enough for our own family, and I'll be able to put a few gift plates together, too.

In spite of the overabundance of cookies, my work in the kitchen is far from finished.  On Christmas morning I cook up a big brunch for the family, and  in the evening I serve spaghetti. The simple dinner helps us to avoid the heaviness that comes from eating a turkey dinner on top of the cookies and other munchies that we've nibbled on throughout the day. In spite of that,  I thought I might add a little something extra this year.

Goodness knows, we don't need any more sugar, but I had a recipe idea, and I just had to try it out. When inspiration strikes, I have no choice but to go along for the ride!  Not every experiment is a success, but this time I'm really glad I gave in to that creative urge. The recipe turned out to be pretty yummy. It's my own version of pumpkin bread, moist and sweet, and filled with good things.

I started with a basic pumpkin bread recipe, eliminated a bit of this and added several bits of that. I know I'll be baking this one all year round, not just for holidays. I made it as a bread, but I'm pretty sure that with a shorter baking time it would make great muffins, too.

Pumpkin Cranberry Nut Bread

Makes 2 standard loaves (9' x 5' x3") or 5 mini loaves (5 3/4" x 4" x 3")
Keeps very well frozen.


Ingredients

  • 3 cups flour
  • 1 1/2 teaspoon soda
  • 1/4 teaspoon  salt
  • 2 teaspoons cinnamon
  • 1/4 teaspoon  ginger
  • 1/4 teaspoon allspice
  • 3/4 cup softened butter
  • 2 14 cups sugar
  • 3 eggs
  • 2 teaspoons vanilla extract
  • 1 teaspoon grated orange rind 
  • 1 large can pumpkin puree (15 oz)
  • 1 cup buttermilk
  • 1 cup dried cranberries
  • 1 cup chopped walnuts
Instructions
  1. Preheat the oven to 350°
  2. In a medium size bowl, sift the first 6 dry ingredients together
  3. In a large bowl, cream the butter and sugar together until light and fluffy
  4. Mix in the eggs, vanilla, and grated orange rind
  5. Add the pumpkin puree and blend
  6. Stir in half of the dry ingredients.
  7. Stir in half of the buttermilk.
  8. Stir in the rest of the dry mixture.
  9. Add the rest of the buttermilk, the cranberries, and the walnuts. Stir in gently just until combined. Do not over mix.
  10. *Bake in two loaf pans for 1 hour to 1 hour and 20 minutes or until a toothpick inserted in the center comes out clean.
  11. Set on a wire rack and allow to cool for 20 to 30 minutes in pans.
  12. Remove from pans, pour and spread glaze evenly over the top. The bread should still be warm enough that the glaze will drip slowly down the sides of the loaf.
* If using mini-loaf pans, bake for 35 to 50 minutes or until a toothpick inserted in the center comes out clean.

 Glaze

  • 3 tablespoons softened butter
  • 2 cups confectioner's sugar
  • 1 teaspoon vanilla extract
  • 3 - 6 tablespoons milk


  1. In a small bowl, place butter, sugar, vanilla, and 3 tablespoons of milk. 
  2. Mix on low till combined, then mix on high till all lumps are gone. 
  3. Add milk as needed to make a glaze thin enough to pour slowly from a spoon. 
  4. Spoon glaze over the tops of the warm bread and let it run down the sides.
  5. You can slice and eat it when it's still warm, wrap tightly and keep it refrigerated for up to a week, or freeze for up to six weeks. 

Yum!
Wishing you a very Merry Christmas!


Thursday, December 18, 2014

An Old Year Ends and a New Year Begins

Christmas is only a week off and my time is so full that I won't be able to complete one more sewing project in time for the big day. I still have Christmas cards to get out, a tree to set up, a couple of dozen sugar cookies to frost, Christmas brunch and dinner to plan, an entire house in desperate need of cleaning, and last minute gifts to purchase and wrap! I'm definitely done sewing until at least December 26th.

I hope that you are farther along than I am, but it's time to move on and think about the new year. What can you sew for January?

You might just start with my colorful, new "Celebrate" mug rug pattern that is ready just in time for New Year's Eve.

An Unplanned Mug Rug 


I truly hadn't planned on making this until I was cleaning up my sewing room and sorting some stray fabrics a few days ago. I spotted this piece of batik with splotches of bright colors on a black background. It had been a fat quarter, but it was now missing a 10 inch square making it about three quarters of a fat quarter. Not enough for anything large.

The colors reminded me of fireworks, and fireworks reminded me of New Year's Eve, and the idea exploded as a perfectly finished mug rug in my head. There was just enough fabric for a paper foundation pieced background and I had plenty of brightly colored scraps to add even more brightness. 

Other Winter Projects

If you are ready to start sewing soon after the holidays, you might choose other patterns suitable for January and February. Winter won't be for over awhile. In Nebraska it will just be getting into full swing! 

Here are just a few winter quilting ideas from my patterns.

I'll start with January. 


"Cheers"
The upcoming year is filled with days worth celebrating. You don't have to stop with the New Year.


"Mitten Weather"
Heads and fingers can still get mighty cold.


"Winter Romance"
There's just something about snow that brings out romance, and around here the winter snow is only just beginning.


"January Chill"
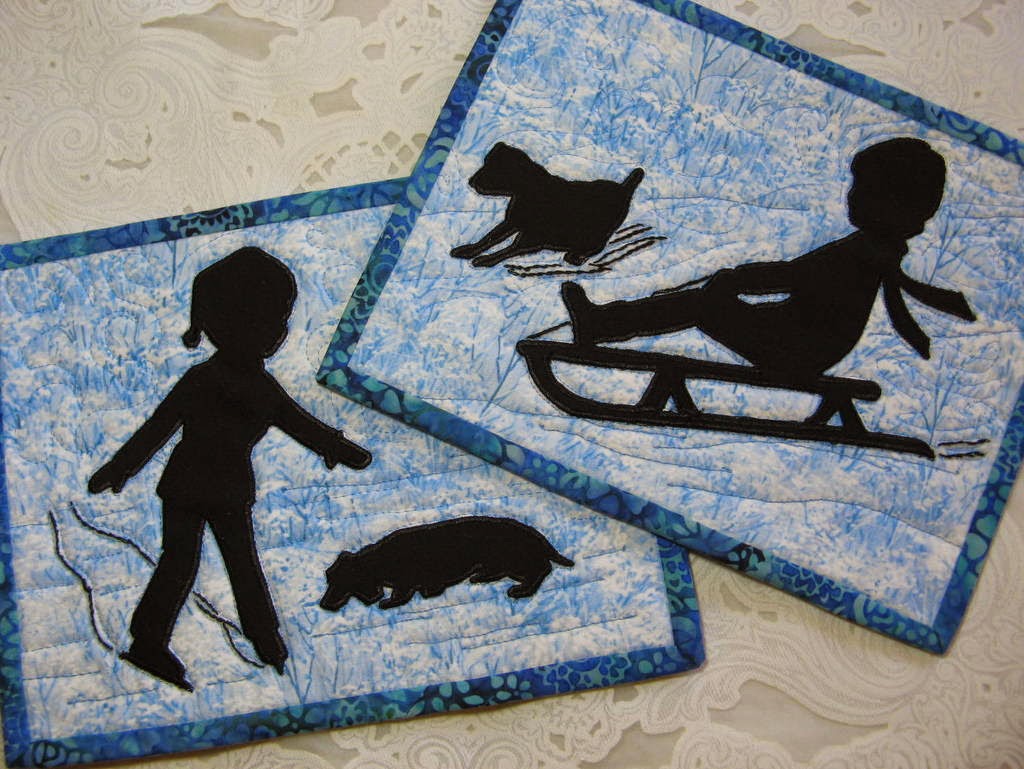
Snow is also a invitation to play! 

"Snowball Fight"
After those hours spent in the cold, playing with snow or shoveling it from walks and drives, a cup of hot cocoa and a warm flannel quilt are just what a person needs. 


"Four Seasons"
And this little set of mug rugs fits every season, winter, spring, summer, and autumn.


And for February, the month of Valentine's Day and love -  

Here is an entire collection of hearts. 


"Hearts Afloat"

"Heartthrob"

"February Valentines"

"Quartet"

Wow! I didn't realize I had so many winter patterns!!

And, now I need to go to work. I just need to decide where to start!

Happy Holidays!!