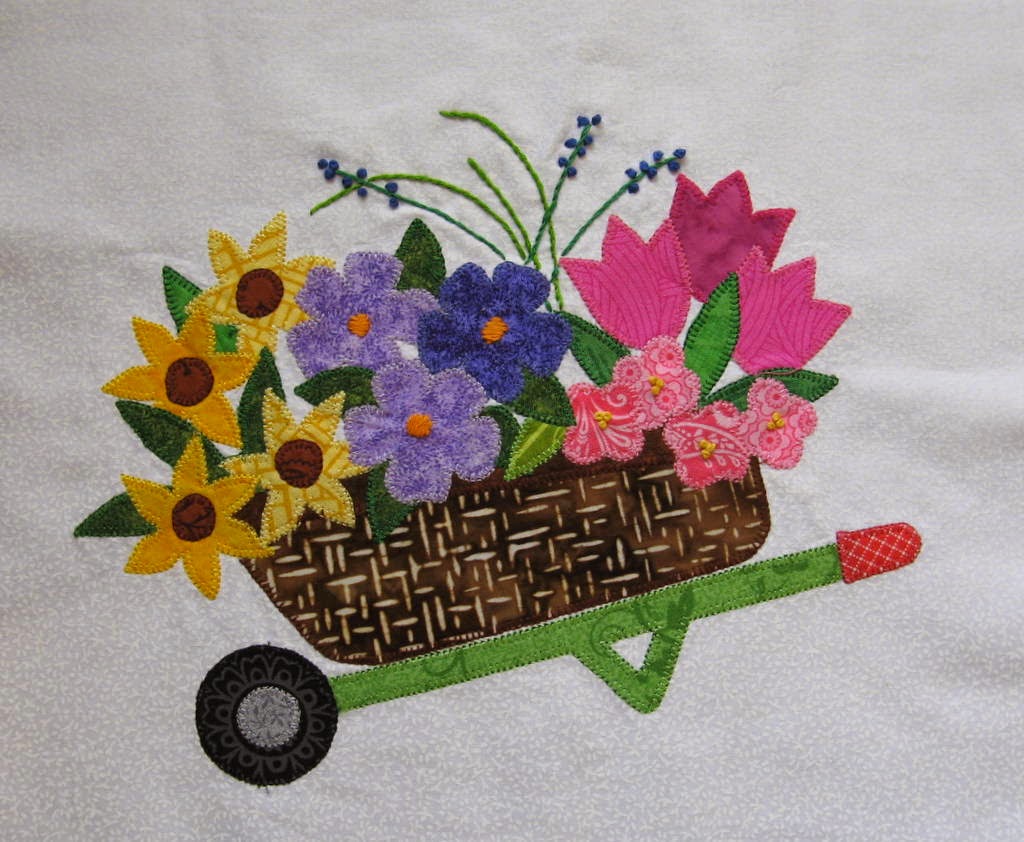
Friday, February 27, 2015

Tying Up Some Loose Ends

I love completing my projects! Not the actual work, mind you.  Planning something new is much more exciting that finishing it. It's the having it done that's so wonderful. No more nagging little thoughts to keep me awake at night, just that feeling of accomplishment and relief that the work is done and done as nicely as I know how.

Finished this week:

1. One fat quarter quilt! 
I was worried about this little quilt early on, but now that it's finished it looks great on our glass table. A quilt provides important protection for the glass and adds color to the room, too. A double win for us.

The quilt on our table.
Here it is in natural light.
Draped (sort of) on a chair.

My hubby is encouraging me to make a pattern for this design. Should I, though? Would anyone want to spend $5 for this? I'd have to make another one - minus the mistakes this time. I'd also want to use totally different fabrics - something fun and bright. That's a lot of work. Do I want another quilt in the same pattern? In the right fabrics it would definitely make a sweet quilt for a child. With additional blocks and a border going around and it could be a bed quilt. Right now I'm just thinking out loud on my computer screen (if that makes sense)  and wondering if a pattern is worth the effort.


2. The bottom section of one apron pattern.
If you missed it, the process for making bodice and neck section was described in last week's blog.
http://klee2strings.blogspot.com/2015/02/detour-starting-vintage-apron-pattern.html

Except for the pockets and waist ties, the entire vintage style apron pattern is complete.  I'll make those last pieces when I'm ready to use them. I won't have time to make the apron quite yet, but it's nice to have the pattern ready when I do have a chance to sew it up.

Step 1. Sketch the pattern and take measurements. I sketched the whole pattern, but since the bodice pattern is finished,  these measurements are only for the skirt section.


A: One half the width of the bottom of the bodice section.
B: One half the width of the skirt. I like some coverage around my hips, so I measured this generously.
C: The total length of the skirt from the bodice to the bottom of the hem. 
D: The distance from the bodice to the waist.
E: The length from the waist to the bottom of the hem. 

Step 2. Draw two rectangles on tissue paper. You may have to tape two pieces of tissue paper together. 
The small, upper rectangle will hold the section from the bodice to the waist. 
The larger, lower rectangle will hold the section from the waist to the bottom of the hem. 

Here you can see the upper box clearly. The horizontal line in the middle of the photograph is the width of the pattern.
Step 3. Shape the underarm. Another plastic pot liner was perfect for doing this. I'd never have guessed that those pot liners would come in so handy!


Step 4. Draw the final pattern with a dark marker, using dashed lines to show the fold line. Be sure to add in seam allowances and the hem allowance. I added 2 1/2" for the hem because I like the nice way a wider hem lies.


Done!!

What's next? Tote bags!

My granddaughter is going to California in ten days. She'll be visiting my sister-in-law and her son and his family for a couple of weeks. This will be her first trip on an airplane and her first visit to California. We have one very excited teenager! My daughter has crocheted some cute items for the children, and I'm sending a couple of totes for the hostesses. I haven't a clue what to do for my nephew except sending my love. He is such a sweetheart, but masculine gifts are so hard to make! I'll post pictures of the totes when all is done.


Wednesday, February 25, 2015

Fifth Block for Quilt Along 2015

Photo Gallery for Quilt Along 2015

 Hannah sent in photos of her first two blocks for this quilt along, so a gallery of photos has been started. I would love to be able to share everyone's work, so if you are taking part in this quilt along, please send your photos to me via email or on my Facebook page.

klee2strings@gmail.com
www.facebook.com/KLee2Strings

To see the gallery, visit this page, "Quilt Along 2015 Gallery of Photos", found at the top of my blog.  http://klee2strings.blogspot.com/p/quilt-along-2015-gallery.html

Th block for March: "Wheelbarrow"

I thought February's pair of blocks in this little wall hanging were my absolute favorite, and I still think the birds and the spade with those adorable, tiny garden gloves are pretty special.

But that was last month's choice.

March's wheelbarrow overflowing with blossoms has now taken the lead. Is it just because it's the newest one? Maybe, but maybe not. I suppose I'll have to wait and see how I feel in April.


It's always the detail that captivates me. When I see something that really catches my eye, I like to get close up so I can examine those little things that make it stand out from the rest.  These little add ons, while not absolutely necessary, can make the difference between something looking ordinary and something that really looks finished. Besides, I do love adding in tiny little details. They always make me smile.

This time I pulled out my embroidery floss and added a few simple stems, three little bits of orange satin stitch, and a bunch of French knots. I didn't do anything complicated with the embroidery. I worked only with the simplest, most basic of stitches, probably the first three stitches I learned.


I'm not an expert on embroidery, but I find this particular type of handwork very relaxing and enjoyable.

I'm planning the pair of 5" x 5" blocks for April, now.  I think one will be a watering can, but nothing is completely decided until it's done. I'm still debating the other one, and I'm playing around with three ideas that I like.

This is where the quilt stands now. I'm pleased with the progress so far. I hope you like it, too.


Happy Stitching!! 


Friday, February 20, 2015

Detour: Starting a Vintage Apron Pattern

This has been a rather odd week in my sewing room. I've made no progress on the fat quarter quilt. It hangs on my design wall as it was. I will definitely finish it this next week. No excuses, really. Other things simply took priority. Like choosing fabrics for the few projects I managed to finish.  Why does it take me so long to pick out the fabrics for everything?

There was a small bit of progress on the name mug rugs for my daughter's office pals. Two new ones are completed. These two ladies have pets. One of them has a dog, and the other has two dogs and a cat. You can guess which has which.


One new house block has been fused too, so now there are three in that group. I don't know why, but these house blocks make me so happy. Now I have a little red schoolhouse. The red really isn't that bright! My camera does some very strange things with colors at times.


The Detour

I've been doing a lot of cooking lately and my aprons are looking pretty pathetic. Nothing to do but make a new one. I want something really simple, but with a wide vintage neck going around the back instead of a narrow strap. Time for a new pattern. Something like this, I think, with a separate upper bodice, two fabrics, and rickrack trim for a real vintage look.

My Vintage Apron Design
So far, I only have the pattern for the bodice and neck piece finished. That's the hardest part. I'm sharing the process just in case you'd like to join me in this project and make your own apron pattern. If you're interested, let me know. 

I'm starting the pattern with a cheat. Yup. Designers sometimes cheat. Sorry about that. The bodice piece with the attached back neck section can be a bit tricky. So here goes.

Step 1. The cheat. 
Getting the curve on the shoulder and the back neckline to lie smoothly is probably the most difficult part of making the pattern. I really don't have to reinvent it all from scratch if I borrow a front and a back bodice from an old dress pattern for this step. I chose a pattern with a high neck because I don't want the back strap to droop too low.


Step 2. Lay out the bodice pieces and place tissue paper on top of them. Trace the neck and shoulders of the front and back onto tissue paper. End of cheat. Return the pattern pieces to the envelope. 


Step 3. Take some measurements on yourself.
A. Inner top of shoulder down to the depth of the neck scoop. 
B. Distance from neck scoop to the bottom of the bodice section.
C. Center of the shoulder to the bottom of the bodice section. 
D. Distance across the bottom of the bodice section. That measurement will be divided in half to make the pattern.


Step 4. Measure and draw the front neckline scoop.
Draw a line straight down from the inner neck using measurement A, the distance from the inner shoulder to the scoop. Then draw a line perpendicular to that going to the center fold line. Now you need a nice, half circle to make the scoop. I found that a plastic pot liner was exactly the right size. 


Step 5. Measure and draw the rest of the front bodice section. 
I used 2 1/2" for the width of the strap. (That measurement was missing in the original sketch.)  Start at the outside edge of the strap and draw a vertical line using measurement C. Then use 1/2 of measurement D and draw a perpendicular line for the bottom width. 

(I hope this is all making sense!)

I'm 5'3", so my measurements match my height.

Step 6. Combine the front and back patterns into one piece.
Lay the front and back pattern pieces together overlapping the shoulder seams so the stitching lines of the original pattern are directly one atop the other. Tape the pieces together and follow the curve of the neckline around the bottom of the back neck piece. Since the shoulder width for my apron will be 2 1/2", I used a ruler and measured exactly 2 1/2 inches from the neckline all the way around to make small marks for curve around the back neckline. Then I connected the marks with a pen.


Step 7. Draw the cutting lines and the center fold of the pattern. I used a fatter black marker for those lines.
I allowed a 5/8" seam allowance around the bottom of the bodice and a 1/4" seam allowance at the neckline. I also added 1 1/4" inch to the back of the neck. I'll need that extra space to make the straps overlap in the back so I can add buttons.


Step 8. Cut the pattern out and check the fit. 
This is only an apron, so I didn't need to make a muslin. Instead, I found a mirror and pinned the pattern piece to my sweater. Hmm ... a very small problem. The bodice drooped at the outer bottom corner. I needed to trim it and shape it as if there were a dart there. Without trimming the armhole would gap and everything would hang just a bit funny.


Step 9. Fine tune the pattern.
The dart has been made. I angled a line 5/8" inch up from the outer corner down to meet the bottom of the bodice.


Coming Thursday: 
The pattern for the March block for the "Summer Garden" quilt. 


 Coming next weekend:
The rest of story on designing the apron pattern - if you want it. Please let me know.

Wishing you a nice warm week!


Friday, February 13, 2015

Three Steps Forward, Two Steps Back

This is the story of my week. I'll start with the happy news - stepping forward.

I've made progress on three fronts!

1. The wheelbarrow block for the 2015 quilt along is stitched and finished!  I have only the templates to draw and a very quick pattern to write. This one will be ready to publish next weekend with time to spare! Sneak Peak!


2. Next step forward. I had started this last week, but now the latest mug rug for my daughter's office pals is completed. I'm halfway done with that project. Four down and four to go. There it is, at the bottom of the row of mug rugs next to (insert drum roll) the finally completed fat quarter quilt top on my design wall!

3.  Yes, the fat quarter quilt top is completely pieced! It's a week late, I think. Or is it two weeks late? Nothing that I'm going to fret about, though. At least it didn't get tucked away in the soon forgotten box of quilting UFOs!

The quilt top is 48" x 48" and the colors are much softer than they appear in this photo.  
And that leads me directly to the first of my backward steps this week.

Big fail!! I really messed up on the goal that I knew would be the hardest to meet. "Try to use fabrics from my stash instead of buying new fabric."  It started with the quilt top. I had thought I might use it on our dining room table. We are so very overdo for a change, and the green is an exact match to the cushions on our dining room chairs.

I thought I'd get my hubby's opinion first. I could keep it this size to fit diagonally on the table or I could easily turn it into a lap quilt by adding a border. This is what happened when he saw it.

"It's beautiful!" he said. "A perfect match for this room. Is it finished?"
"Umm, no. It still needs batting, backing and binding."
"What's backing?"
"The fabric that goes on the back of the quilt." I showed him the back of a handy quilt.
"Oh. I forgot," he said.  "I can never remember the names of all these quilt parts.  What are you putting on the back?"
I admitted that I hadn't purchased a piece from the same fabric line, but that I would probably be able find something usable in my stash.
"No," he said. "You'll ruin it. Buy something that matches."

I'm sure that my eyes positively lit up at that idea. So, I promised myself that I would buy absolutely no new fabric for at least the rest of February, and within minutes I had ordered a matching piece online!

Then my son brought a shirt over. A button had fallen off and he didn't have the right thread. I didn't have matching thread either, so I headed off to buy a single spool of gray thread. It was either that or remove all the buttons and replace them with thread of a different color.

Have you ever gone into a fabric store and come out with only one spool of thread? New spring and summer fabrics were everywhere! Shelves and shelves and shelves of beautiful newness! And the intoxicating fragrance of the fabrics... and the soft silky smoothness gliding under fingertips... the visions of new quilts that came suddenly to mind...

I was doomed from the moment I opened the door. Fail #2. Yup. That makes two mess ups in two days!

I'm done! I swear, no more new fabric for the month of February.


Wishing you a wonderful week!

Friday, February 6, 2015

Bits of Show and Tell

It was so cold and snowy for most of this week!

My backyard.

I have a walkout basement, and my sewing room is on the lower level of my house. This room enjoys a garden level window view, but it can get rather chilly down there during cold snaps like the one we had this week.

The view from my sewing room window on Monday
Instead of shivering at my sewing machine I've tried to work on things I can do upstairs, so I have tons of odds and ends to show you.

First, though, you absolutely must see this photo sent to me by a fellow quilter. It warmed me through and through. Shawn chose twelve summer mug rug patterns from my silhouette series and turned them into quilt blocks. The result is simply delightful - such a bright and cheerful, summery quilt. You can't imagine how thrilled I am whenever I see another personal interpretation of my patterns. Do send me your photos. I'll be sure to post them here on my blog.

If you look closely you'll see that all of the pets are dachshunds. So clever!


As I said, I've been staying upstairs as much as possible this week and trying to keep warm. Where better to do that than in the kitchen? My freezer is getting stocked with all kinds of goodies.

First, there was soup. I freeze it in one cup disposable plastic containers with content and date labels on the lids. I made chili, of course, and then I raided the pantry.

My attitude toward soup cooking is pretty cavalier. If I have it in the kitchen, it goes in the pot. This is what I found: fresh turkey stock, onions, carrots, celery, lentils and rice. I tossed in parsley, a bit of garlic, some curry powder, and a dash of cinnamon to spice it up. Salt and pepper of course. Super tasty! This recipe is a keeper.


Muffins on Thursday. I found a yogurt, banana, and oatmeal breakfast muffin recipe on Pinterest. These taste a lot like soft oatmeal and raisin cookies. So filling! I had one for breakfast and I was stuffed! I didn't even have a mid-morning snack. You can find the recipe here:  http://honestfare.com/yogurt-banana-oat-muffins/


I played with my little cottages, too. I couldn't help myself from making two of the cottages with fabric. I have one drawer totally filled with Civil War reproduction and French General fabrics, so I'll try to use pieces from that bit of my stash. The applique pieces are laminated to background fabric, but I won't take it any farther just yet because I have no plans about how many blocks I'll make or what I'll do with them when I decide to stop.

These are each 5" x 7". I'll keep the height of the blocks constant, but the width may vary. 

Finally, there is one addition to the name mug rugs for my daughter's office pals. Chris has triplet boys, so I had to design something special. The little bicycles are so adorable, but they are pretty tiny. I hope the blanket stitching around them goes well. It may be a bit tight, but if need be I'll remake the templates and draw them just a touch fatter.


That makes one more template to add to the alphabet soup pattern! Next, I'll move on to the pet owners. Hmm...

A warm front is blowing in from the south today. I went for a walk yesterday afternoon when the temperature was 14 degrees and the snow was squeaky crunchy. Today the temperature is in the mid 40s and the city is one big pile of slush. Such is life in Nebraska. The weather is never boring.

Since my sewing room is nice and warm and comfy now I can get back to my sewing. I have no other plans, so I'm looking forward to being able sew all day tomorrow.

Have a super week, everyone!

Happy stitching!!


Saturday, January 31, 2015

Second Pair of Blocks for Quilt Along 2015


Progress!!

With February's blocks finished, the top and bottom sections of this little wall hanging are now complete! I'm really excited about these new blocks. 

I've moved the hearts and butterflies around again. Who knows where they'll end up.
I love this stage where experiments with placement can still lead to surprises.    

I fell in love with these adorable little blue and yellow birds.  I wonder if he's singing to her or if he's singing just because he's happy. 


These little guys completely captured my imagination. In fact, I couldn't let them go. I had to play with the idea one more time. The result was the "Sun's Up" mug rug pair that I posted earlier this week. 

After making the birds I began work on the spade. I definitely wanted a spade in this spot, but, my goodness, it was plain! Downright bland and boring. What could I add to liven it up? 

I started digging through my scrap basket and my eyes landed on the polka dot fabric. There was my splash of color. Problem solved. 


Here's the truth. Much as I love the birds, it's the itty-bitty gloves that have completely stolen my heart. 

The background fabric for the quilt is white, and the background of the polka dots is also white. With my old eyes, I knew I'd run into problems when I was trying to see exactly where to place my needle for the blanket stitching. So, I pulled out my favorite marker and drew a line all around the edge of the gloves. It really made a difference. The Frixion ink disappears with the touch of an iron, so I didn't have to worry about permanent marks.


All stitched! I used a triple stitch (jean's stitch) to define the fingers and the thumb.


If I were to do this again, I would make one change. I'd use a slightly wider blanket stitch on the gloves. If I had any plans to launder this wall hanging, I'd make this block over. As it is, though, when I've finished the quilting I will likely use a bit of fray stop along that edge just to be sure nothing pulls away from the stitches. 


Now, I need to go to work on the March block. I'm debating choices. Flower pot or wheelbarrow? It will be one or the other for sure and it will most definitely be colorful!

Have a super February! 


 And, please save some of those chocolates for me!


Thursday, January 29, 2015

A Pair of Mug Rugs to Greet the Sun and a Milestone

"Sun's up, everyone! Forget sleeping in. It's a new day!"

Well, that's what the rooster is loudly crowing.


But what about the hen? Just look at that face! What on earth is she thinking?


This little poultry pair had me giggling from the time I began sketching until they were completely finished. A proud, loud rooster and a hard working hen. There was a story to tell, but I think everyone has to come up with their own interpretation.

It all began with a small block for the 2015 quilt along when I made a pair of whimsical little birds. There was just something about them that inspired a different story, the tale of a pair of barnyard fowl with a more complex relationship.

I had intended to put both the hen and the rooster on a single mug rug. That didn't work at all! The chickens are much more detailed than the bluebirds on the wall hanging, so if the size of fabric pieces was to be manageable, the birds had to grow in size. They finished as two mug rugs, 7 1/2" x 10" each,  just a bit larger than most, but still usable as such. They were also a great size to hang on a narrow bit of wall in my kitchen.

The light in this corner of the kitchen is really poor,
but you may be able to see that this piece of wall needed a bit of color. 

I'm afraid that I take the names for my mug rugs very seriously. Every now and then, a perfect name totally eludes me, and this was one of those times. Everyone saw something different in the pair.

My husband thought the hen was disgusted with the rooster for crowing so proudly when he really hadn't done any of the work involved in laying those eggs. But, "What are you crowing about when I've done all the work?" was just a bit too long for a pattern name.

A friend suggested something that was hilarious, but just a touch crude. We all roared with laughter, but it didn't quite fit my grandmotherly, former school teacher image very well.

I thought that folks should be able to make up their own minds about the story of these two. Some people might just see chickens doing their thing. Some might see something else.

So a call went out to friends on Facebook and a number of clever folks in my sewing group. I used the promise of a free pattern to the winter as an enticement to take part in the naming process. The entries covered everything imaginable:  a king and a princess, a proud pair of parents, a hen ready to trade places, a mother concerned about the rooster's racket waking the chicks, a simple "Good Morning", and more.

My hubby made the final choice. He settled on the simple, "Sun's Up!". It didn't come from my Facebook buddies, but there were a couple of runner's up, so free patterns will be going out.

As I finished this blog and publishing my pattern I realized that this is pattern my 100th Craftsy pattern! Wow! I don't know how that happened, but I guess it's something worth crowing about!


Wishing you many, many happy sunshiny days!!


Saturday, January 24, 2015

Progress and a Case of Quilting Hiccups

I began the week with high hopes for reaching my goals, but, as you know, not everything works out quite as planned. It was the nine-patch quilt that messed up my week.

I would have saved so much time if I had planned it more carefully, and I know for sure that I would have been happier with the outcome. In the end it will be fine. Not as wonderful as I had imagined, but acceptable.

I keep saying I'm going to break down and buy a good program for designing quilts. This may have to be the year I give in. Sigh...

Goal #1: Finish the nine-patch quilt top. 

I thought I had my little nine-patch quilt all figured out. The nine finished blocks looked great, but I wasn't quite ready to stitch them together.


I had this vision of doing some slicing and dicing. I wanted to add some narrow cream colored stripes to break the blocks up a bit, two down one side and two across the top. Then I would arrange the blocks into this really interesting and attractive layout. I could see it in my head, and it looked lovely.

I had planned to make four 1/2" stripes, two vertically, two horizontally. At the last minute I changed my mind and decided that wider strips of fabric would be easier to work with. I cut the fabric strips 1 1/4" wide and grew the stripes to 3/4".

That was the first hiccup in my plan.

I started by making one block to use as a my pattern for the others.  I had sliced and added three stripes to the first block when I stopped and double-checked the yardage of the fabric for the stripes. It measured just a bit too close for comfort. There was a simple fix, and I liked the fact that it would cut down on my stitching time.  I simply skipped that last stripe. The block wasn't exactly what I'd envisioned, but it was still cute.

That was hiccup number 2.


From here on, it was downhill. If anything could go wrong, it did.  I'll spare you the painful details of my non-stop hiccuping, but I'll give you a hint.

My mother was a wise woman, and when I was just a little girl she made sure to teach me two very important lesson for anyone who sews:
"Measure twice, cut once."
"Never sew when you're tired or in a hurry."

Yup.

When I finally called it quits for the week my blocks had lost 1/2" in each direction and they could only be placed this way or that way. But seams match up! I guess it could be worse.

Here they are on my design board. They still need sashing and a border to make a quilt. It isn't what I'd seen in my wonderful vision, but it will be okay. I just hope no one notices the really big "oops'! Can you find it?


Goal # 2: Complete a name mug rug each week.
I didn't exactly accomplish this, but, two new mug rugs are ready to quilt and bind. I'll be adding the musical notes to the templates and updating the pattern before too long. I'm waiting to see what other templates I may need to toss in.


Goal #3: Sketch every day.

I've done fabulously with the sketching bit. Lot's of itty-bitty 5" houses in the works. I have no idea if they'll ever turn into something, but right now I'm on a roll. So much fun! 


Goal #4: Make a new mug rug pattern by the end of the month. 
Will I finish the new pattern by the end of the month? My gosh, that only 7 days off! I might be able accomplish this, but I'm not sure. Regardless, I won't be able to do it with just one pattern. I'll have to make a pair. The theme is fowl. Giggle! (Sorry. That was a teacher joke.)

Goal #5: Write a weekend blog.
Yes!! And this is it!

Wishing you a super week!!

Still giggling. :)


Saturday, January 17, 2015

Setting Goals and Limits

I need to split into at least six people!

Once again my project must-do list is growing and growing. One idea after another hits and I want to make them all. Now!

Well, we know that won't happen, but if I don't set some goals and pace myself nothing at all will be accomplished. That's where all those years of teaching school come in handy. Teachers know how to set goals and stick with schedules and time frames. We work with lesson plans and deadlines every day in the classroom, and some of that absolutely carries over into everyday life. I do know how to get organized and I'll definitely try. No guarantees of success, but well give it a go.

For now, I have three primary goals for my sewing activities.

A. Post a weekend blog every week!
So far, so good!


B. Organize my "stuff" between projects.
Confession: I try, but organization doesn't come naturally to me. I keep the rest of the house pretty well organized, but I get so busy and so focused when creativity is flowing that I don't even notice the mess piling up in my work area. That makes this goal even more important. It's either pick it up or have no work space left.

Since I have just today completed the next pair of blocks in the garden quilt along, and the extra fabric for my 9-patch quilt is due to arrive tomorrow, I'm right between two projects. This is the moment for organizing.

I gathered up all of those leftovers that come in so handy: 10" layer cake pieces, the many little 5" charm squares, the long, 2"-3" strips of this and that, and I cut the tiny bits and pieces into usable sizes and shapes.


Where did I get so many itty bitty scraps? My word! Oh, well, it doesn't matter where they came from. The important thing is that they are all sorted and organized into ziplock bags where I can see what's what, and the bags are in my scrap basket. I think I'm ready for the next project.

At least for now.
Sigh...

C. Plan the work load one month at a time.
If the work is cut up into smaller chunks it's a whole lot easier to finish on schedule. Planning it out also helps to keep me on track so I don't jump onto ten other projects before the first one is completed.

So, these are my objectives for the last two weeks of January:

1. Finish the pattern for next pair of quilt along blocks. The blocks are made, but the pattern isn't done. I'll take care of that next week.

It's looking good on my design wall! I may shuffle the hearts and butterflies several times before it's done, but I'm liking it so far. 

2. Finish the nine-patch quilt. I'm getting excited about this one. I've been waiting for the extra fabric to arrive.  The fabric is from last year's line, so it isn't available in the usual local or online quilt shops. I had to go hunting for it. Once again, it was eBay to the rescue. My plan is to complete the quilt top next week and do the quilting and binding the following week. The pattern will wait till next month. 

Nine nine-patch blocks are ready and waiting for further action. These are going to change so much before I'm done!! I am grinning from ear to ear as I imagine how this little quilt will turn out. Fingers crossed that it doesn't do something unexpected and awful!


3. Make at least one new mug rug pattern. 

I do have an idea in mind, and that's the main thing. Actually, I have 20 ideas in mind, but I've chosen just one for now. That was hard! I'm not giving it away quite yet, though!

4. Make two new name quilts for the folks at my daughter's office. That means I'll have to make one each week. 

I've completed two of eight. Only six to go! I hope they'll be ready by the end of February. Valentine's Day would be nice, but I'm not going to push my luck. 

Focusing on January's goals right now! If not, I'll be adding in more work than I can handle.

5. Work on sketches for at least half an hour every day. 

That's easy. I pretty much do it now anyway. It fills the after dinner time so much better than television. (Except for "Downton Abbey"! That's the only show I'm following right now.)

6. Don't buy any more new fabric! 

Ouch! I might just have set myself up for failure! No, no, there are only two weeks to go. I can do this. Of course I can. I hope.

There are other goals to be accomplished as well. I've enlisted my friend, Anne, to help me keep on track. I definitely need to exercise more! A 20 minute walk every day shouldn't be all that hard, but I can't seem to get it done even though I have a treadmill for the bad weather days. I spend way too much time on the internet, too. Anne has goals as well, so we will be each other's watchdogs. Every evening we'll check in with each other by phone to quickly go over our checklists. 


And that's it for January.

Wish me luck!

And have a super duper lovely and productive week!