Thursday, January 11, 2018

When the Creative Muse Doesn't Strike, Sew Anyway!

A jillion ideas for new mug rugs and wall hangings are bouncing around in my head, but nothing is actually taking hold. It happens now and then - more frequently as time goes on. I'm sewing anyway - just not something totally original.


My daughter likes these little microwave soup bowl holders that are all over Pinterest.  There wasn't time to make some for her Christmas, but January is a good soup month. This was also a super way to use some of those 10" precuts that I keep collecting.

 I was having fun, so when the bowls were finished, I made a bread basket to match, and gave it  button-on handles that can be placed up or down. Then I added a reversible napkin for the bread basket. Playing with my favorite toys is always fun.


I haven't made a pattern for the bread basket, because it isn't all that impressive, but I will be playing with more basket ideas in the future. 

I did make an actual pattern for the soup bowl holders, though. The idea of drawing lines from corner to corner and side to side on each 10 inch square seemed a bit much. A pattern shortened the process considerably, and the measuring was finished when the pattern was done.

Make a pattern for 10" fabric squares.

1.  Cut a 5" x 10" rectangle from your paper. Draw a dotted down the center to make two 5" x 5" squares.


2. Measure 2 1/2" down from the top on the dotted line. Make a dot.

3. At the very top of the dotted line, measure 1" to either side of the line and make dots.

4. Make dots 1" up from the bottom on each side edge of the paper.

5. Make dots 2 1/2" in from each bottom side edge of the paper.


6. Connect the dots. These are the stitching lines for the darts.

7. Measure exactly 1/4" to the inside of each dotted line and cut.

 8. Two pattern sections can be taped together for a complete pattern.

Cut and sew the bowl holders:
1. Place a 10" x 10" square of fabric right side up on a piece of 100% cotton batting.


2. Pin the fabric and batting at the corners and in the center. Use the pattern to cut out the "v" shapes on each side of the square. (It took a few turns of the paper, but the half pattern worked just find for cutting darts.)


3. Mark the dots for the inside corners on the batting with a fabric marker or ball point pen. 
 

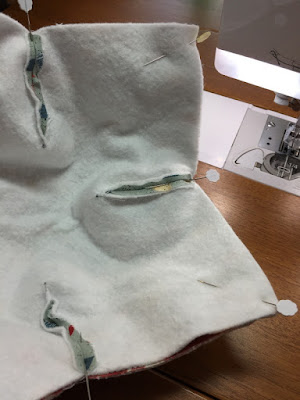
4. Fold the cut edges of the "v" together. Stitch the dart 1/4" from the edges of the cutout, ending right at the dot.


5. Snip the end of the four darts open almost to the dots and press the seams open.

6. Pin two of the fabric/batting sections right sides together. Using a 1/4" seam, stitch all the way around leaving about a 4" opening to turn the soup holder right side out.


7. Turn, stitch the opening closed, and press.


Sunday, December 24, 2017

Christmas Eve: A True Story - Honest!


Christmas Eve is always hectic at my house. There are invariably a hundred and one last last minute things to accomplish. It's bad enough now, but it was much worse when the children were young.

I published this poem several years ago, but it seems like a good time to repeat it tonight. This event described here took place in about 1982. It is absolutely true - every single word of it. I hope you enjoy reading about our totally unexpected Christmas Eve event.


A Christmas Eve Story

Christmas Eve - in the morning, I was bustling to and fro,
Stitching this, baking that, making piles of presents grow.
A needle jabbed into my thumb, clock hands were swiftly turning.
While searching for my Christmas list I smelled the cookies burning.

My kids were blasting music (not the kind that I would choose),
Their father yelled for quiet, then turned up the TV news
My head was really throbbing, but I could not slow my pace.
To leave something unfinished would have been a huge disgrace!

The telephone began to ring, my daughter raced her brother,
Not noticing that in their haste they'd nearly killed their mother.
I chased out of the kitchen to answer knocking at the door,
And I tripped upon the carpet and fell sprawling on the floor.

The florist smiled, "Good morning! Please just sign your name right here.
A poinsettia from the neighbors to bring you Christmas cheer."
I sat down on the lowest step, the flowers on my lap,
I couldn't deal with any more until I'd had a nap.

I retreated to my bedroom and stretched out on my bed.
Quiet peace flowed over me ... then my eyes flew wide with dread!
From the bathroom in the hallway, the children's, not my own,
Came a sound I'd heard before, one I wish I'd never known.

I tiptoed very slowly, till before the stool I stood,
Wishing it would go away. Praying that it would.
One gurgle. Then another. My body swayed with fright,
What I imagined underneath the lid, was a plumber's true delight.

My first thought was to flush it. Maybe it would come unplugged.
Then I visioned murky waters overflowing on my rug.
So I raised the lid so slowly, peeked to see what I had heard,
And there, splashing in the toilet, was a wet a frightened bird!

This was not what I'd expected, and I slammed the lid back down,
As I screamed so very loudly that my voice was heard downtown!
Well my husband, he came running, and the children followed suit.
"There's a bird in the toilet!" They just stood, three statues, mute.

I repeated in a softer voice, and I motioned with my hand,
But they looked upon me blankly like they didn't understand.
"There's a bird in the toilet! Do you think that I am blind?"
I heard my husband whisper, "Son, your mother's lost her mind.

"Dear, it's been a trying day," soothed my husband with a frown.
I just shouted, "Go do something - or that bird will surely drown!"
So they looked, just to humor me, and guess what they found there -
Yes, a bird, flopping desperately! Not a moment left to spare!

My son retrieved the dripping thing and wrapped it in a towel.
He placed it in a spot of sun to dry the soggy fowl.
Did it fall down the chimney? No, we had closed the flue.
Then how did it get there? I really wish we knew.

Did it swim up the sewer? That seems quite absurd,
But stranger things have happened close to Christmas. So I've heard.
After awhile we took it out, and watched it fly away.
And I thought, how very fitting as an ending to this day.

Merry Christmas, everyone!!


Saturday, December 9, 2017

A New Robe and a Family Favorite Cookie Recipe

 The Robe

I did it! I rarely sew for myself, but I actually found the time to sew a new robe. Lovely, soft, warm flannel in beautiful turquoise blue. It's roomy and warm with enough length and  fullness to wrap around my ankles at night.

It's hard to see the details with the light behind me. 


A better photo in a shorter mirror.
 The Recipe

I only bake these little morsels of delicate yumminess for very special occasions.  They are far too rich for everyday nibbling. Crunchy nuts and sweet fruit preserves contrast beautifully with a melt-in-your-mouth, buttery cookie base. It's hard to eat only one.

Jelly Filled Swedish Butter Cookies

Half are filled with sour cherry preserves, half with fig preserves.

  • 1 c. butter
  • 1/2 c. sugar
  • 1 egg, separated plus the white of a second egg
  • 1 T. cream
  • 1 t. vanilla 
  • 2 c. sifted flour
  • 1/2 t. baking powder
  • 1/2 c. chopped pecans or walnuts 

  1. Heat oven to 350ยบ F. 
  2. Cream the butter and sugar until light and fluffy. 
  3. Add the egg yolk, cream, and vanilla. Mix well
  4. Sift the flour and baking powder together. Stir into the butter mixture until smooth.
  5. Beat both egg whites lightly with a fork.
  6. Form dough into small balls, about 1" in diameter.
  7. Dip dough in the egg white, then roll in the chopped nuts.
  8. Place the balls on an ungreased cookie sheet.  (I lined the cookie sheet with parchment paper.)
  9. Make a small indentation in the center of each ball. (A finger is about the right size, but I used the rounded end of a wooden spoon.)
  10. Fill the indentations with preserves. 
  11. Bake for about 20 minutes.
  12. Allow to cool slightly on the cookie sheet before moving to a cooling rack.
  13. Handle carefully as these are very fragile when warm.
In the oven and almost baked.

YUM!!

Yikes! 
Only 16 days till Christmas! 

Still no tree, no decorations, no cards sent out and several batches of cookies yet to bake. 
I'd better get busy!


Saturday, December 2, 2017

Christmas Place Mats, Part 2: The Mat

Hooray! All eight of my Christmas place mats are finished! They really were quite easy and fast. I intentionally made them without binding for two reasons. 1) I didn't want to spend the time it would have taken to hand stitch the binding on the back side of the mats. Eight is a big bunch. 2) I wanted the outer edge to have no extra bulk in the seam.


Figuring out how to go about this process quickly became an irresistible challenge. An extra step or two had to be added in order to do the job right. Did it save time in the long run? Yes, but not as much as I'd hoped. 

The instructions shown here are for a set of four place mats. I made two sets.


 Place Mats: 14" x 18"
 Use 1/4" seam allowances.


Fabrics needed for four place mats
  • 1/2 yard inner background fabric  
  • 1/4 yard or one fat quarter contrast fabric for narrow, inner border
  • 2/3 yard coordinating or contrast fabric for wider, outer border
  • 1 yard backing
  • 1 yard batting

Cutting for four place mats

From inner background cut:
  • four rectangles, 10" x 14"
From narrow border fabric cut:
  • eight strips, 3/4" x 10"
  • eight strips, 3/4" x 14 1/2"
From outer border fabric cut:
  • eight strips, 2 1/2" x 10 1/2"
  • eight strips, 2 1/2" x 18 1/2"
From backing fabric, cut:
  • four rectangles, 15 1/2" x 19 1/2"
From batting, cut:
  • four rectangles, 15 1/2" x 19 1/2"

Sewing for each place mat

1. Position the tree from on the 14" x 10" background fabric. Fuse and stitch in place with a machine zigzag stitch.

Instructions for making the trees are found in last week's blog post. Christmas Placemats, Part 1


2. Sew a 3/4" x 10 strip of inner, narrow binding to either side of the 10" x 14" rectangle of background fabric.

3. Sew a 3/4" x 14 12" strip of narrow binding to the top and the bottom of the background fabric. Press.
Strip piecing makes the process quick.
4. Sew a 2 1/2" x 10 1/2" strip of outer border fabric to each side of the quilt top. Press seams to the border.

5. Sew a 2 1/2" x 18 1/2" strip of outer border fabric to the top and to the bottom of the quilt top. Press seams to the border.


To make place mats with binding, add the batting and backing at this point, quilt, and bind.

The following instructions are for making the place mats without binding.

1. With a removable fabric marker and a ruler, draw a line all around the outer border of the place mat top. Make the line 5/8" in from the edge of the border.

2. Center the place mat top right side up on a 15" x 19" piece of batting. Pin in place.

3. Stitch in the ditch on one side of the narrow, inner border. This will hold the batting securely in place under the place mat top.


3. Stitch on the line with a very long machine stitch to baste the place mat top to the batting.

4. Trim the batting to 1/4" beyond the edge of the basting stitch.

The edge of a cutting ruler can be used to flip the edge over so that the batting can easily be trimmed to 1/4"
5. Trim the corners of the batting.

6. Place the quilt top right sides together with the backing fabric. Center and pin together.

7. Stitch together, 1/4" from the edge of the place mat top. Leave an opening of about 4" on one side of the place mat for turning.

 8. Trim off the excess lining and pull through the opening to turn the place mat right sides out.

I use a large knitting needle to poke the corners out, then I smooth the seam open with the needle, pressing it flat as I go.
9. Tuck the edges along the opening inside, press, and pin in place.


10. Sew very close to the edge all around the place mat enclosing the opening at the same time.


11. Remove basting stitches. Quilt as desired. I kept the quilting very plain and simple to complement the minimalistic design of the place mat.


Simple, straight line stitching on the outer border.


Quilting around the tree with a walking foot.

Drawing the quilting lines with my removable marker.


I'm so ready to move on to other things. The last two months have been so disrupted with health issues that I decided not to try sewing Christmas gifts this year. I've ordered everything online, instead.

The place mats were the first thing I'd made just for myself in quite awhile. It felt good to be sewing for me. I think I'll sew myself something else. Let's see .... I need a new robe, a pretty spring table cloth, everyday place mats, a cozy lap quilt ...  Well, maybe not all at once.


Wishing you a very happy December!

Monday, November 27, 2017

Christmas Tree Place Mats, Part 1: The Tree

Eight Christmas Tree place mats are in the works. So far, I have four of them almost finished and waiting for the inner panel to be quilted.


I'll have instructions for the actual place mats ready in a few days, but today, while my leftover turkey stew is simmering on the stove, I'll focus on just the tree.


This is such a sweet little tree, and it's a super stash buster to use up some of those leftover bits of green fabrics. Not too large, not too small, just right for either a place mat or for a really quick batch of mug rugs.

The scrappy strips finish at 1" each. Templates for the trees are traced onto the paper side of fusible web, fused to a rectangle of pieced fabric strips, then appliqued to a background fabric. Fast and so easy.

A. Make a template for the tree.

1. On a piece of stiff paper like card stock, draw or cut out a rectangle 3" x 5 3/4".
2. On the top of the 3" side of the rectangle, make a mark 1 1/2" in from the side. This will mark the center point for the top of the tree.
3. Use a ruler to draw straight lines from the mark at the top of the template to each corner at the bottom of the rectangle.
4. Cut the template on the lines.

B. Make a layout to use with fusible web. 
 
The layout shows the position of the trees on the pieced strips. Dotted red lines show the direction and number of the fabric strips.

1. Either start with a rectangle of paper to trace onto a piece of fusible web, or draw directly onto the paper side of the fusible web.

  • For two trees, make the rectangle 4" wide and 6 3/4" tall. 
  • For four trees, make the rectangle 7 1/2" wide and 6 3/4" tall. 
  • For eight trees, choose one of two sizes for the rectangle as described below.
If making eight trees, determine the size of the rectangles by the way you want to place the trees.
  • To place the two sets of four trees one above the other, make the rectangle 7 1/2" wide and 13" tall. (Many of my scraps were short, so this is the layout I used.) 
  • To place the two sets of four trees side by side, make the rectangle 15" wide, by 6 3/4" tall.
2. To draw the first tree, line the template up with one one long side parallel with the edge of the rectangle. Align other trees with side edges together as show in the photo above.

3. Set the layout on the fusible web aside.

 C. Make the strips sets of green scraps.

Six strips of green may be enough, but I cut seven just to be sure.

1. Cut green fabrics into strips 1 1/2" wide.
  • For two trees, cut six or seven strips, each 1 1/2" x 4 1/2
  • For four trees, cut six or seven strips, each 1 1/2" x 8".
  • For eight trees placed with one set of four above the other, cut thirteen strips, each 1 1/2" x 8". 
  • For eight trees placed with two sets of four laid side by side cut six or seven strips, each 1 1/2' x 15 1/2". 
2. Sew the strip set together with 1/4" seams. Press all seams to one side.


3. Lay your fusible web cutting layout on top of the wrong side of the strip set, paper side up. Press to fuse.


 4. Use a quilting ruler to cut the trees out on lines drawn on the paper side of the fusible web.

5 Make the tree trunks. Fuse a small piece of fusible web to the wrong side of brown fabric. Cut each trunk 1/2" x 1 1/4".

6. Remove the paper backing from the trees and trunks. Position them on your background fabrics and stitch in place with your favorite zigzag stitch. I used the blanket stitch. As usual.

Done!

And my stew is done, too! Oh, yum! It smells so good!

Oven roasted carrots, celery, onions, and potatoes, leftover turkey, leftover broth from the turkey, parsley, rosemary, and thyme, salt and pepper - dumped in a pan and simmered slowly.


Wishing you a lovely week!