Thursday, December 31, 2015

New Beginnings, a Few Goals, and Quilt Along Ideas

Where does the time go? Another new year is about to begin and I am so not ready!

New Beginnings

I'm especially not ready for the idea that my granddaughter is getting married in June! My sweet little baby girl who loved dolls, princess dresses, my purses, and my red shoes is getting married?

Somebody pinch me, please.
Yesterday

I only blinked!

My sewing goals for 2016

1. I hope to make a wedding quilt. 
"Hope" is the key word here. If I don't have it finished in June, I really hope to have something made by next Christmas. It wouldn't really have to be a bed quilt, would it?

2. I'll be working on a new quilt along - this one with cats. More about that in a minute.

3. My brain is numb right now, but I can surely come up with a few new mug rug and table runner patterns this year.

4. Once again, I'm going to try to use my stash as much as possible. Technically, new purchases are part of the stash, aren't they?

The 2016 Quilt Along 

One of these years I'll surprise myself and everyone else by making a full size quilt for the quilt along. This year it will be another wall hanging. The plan is to make it 28" x 36" before adding the border.


I'm planning to place cats in five large blocks. The cats will be engaged in a different activities in each block.

I haven't decided if they should be silhouette cats or not. What are your thoughts on that?

The smaller blocks will be pieced. I'm thinking of simple basic blocks - stars, flying geese, log cabins, and such. Since they are so small, I'll likely use paper piecing or a mix of paper and traditional piecing. 

I'd really like to hear your opinions about this plan. Yes? No? Maybe? Anything but cats? Tell me your thoughts.

I'd also like your thoughts on a quilt for the newlyweds. I haven't clue what I might sew. 

Wishing you a wonderfully happy and creative New Year!!


Saturday, December 26, 2015

Fuzzy Comforts and Christmas Spaghetti with a Secret Ingredient

It's the day after Christmas and all is quiet in our house, exactly the opposite from yesterday's wonderful hustle and bustle, laughter and cookie snitching. The family began arriving around 9:30 in the morning and stayed for the entire day. We started with breakfast and ended with our famous Christmas spaghetti dinner. (The recipe is below.) We were too full of cookies and good food to have any interest in dessert. I am truly blessed.

We are in no danger of being cold this winter. My son dressed us all in matching fleece jackets, and I handed out five warm fleecy robes. Yes, they were finished, and with time to spare!


There is nothing that needs doing today. Such a luxury! I've spent the whole day lounging in my chair reading the latest Inspector Gamache novel by Louise Penny, and I have no intention of doing anything more energetic than that.

Christmas Spaghetti Sauce With Meatballs 
(and a secret ingredient)


I was so busy enjoying my family that I forgot to take photos of our dinner table. The spaghetti was served with fettuccini and accompanied by lots of fresh veggies and warm garlic bread.

This is a large recipe. There were seven of us, and I made a full crockpot of sauce so that there would be plenty left to send home with everyone.

Once again, the measurements for ingredients are close estimates, but not exact. I don't usually measure at all, but I let my taste guide the proportions. I made the sauce the day before Christmas, then reheated it and added the secret ingredient on Christmas day.

Meatballs
I don't add herbs or spices to the meatballs because they absorb their flavor from the sauce as it simmers.
  • 3 pounds ground beef
  • 2 medium onions
  • salt and pepper to taste

  1. Chop the onions in a food processor or grate them.
  2. Thoroughly mix all ingredients together. 
  3. Shape into balls. I made the meatballs about 2 inches in diameter, but smaller is fine.
  4. Brown the meatballs. 
  5. Refrigerate until needed.
Sauce
  • 1 tablespoon olive oil
  • 2 medium onions, chopped
  • 6 - 8 cloves garlic, finely diced
  • 1 bunch (about 1 cup)  of fresh parsley, chopped fine, or 2 tablespoons dried
  • 1/2 cup fresh chopped basil leaves or 2 teaspoons dried
  • 3 bay leaves
  • 3/4 teaspoon dried oregano
  • 1/2 sweet green pepper, diced
  • 1/2 sweet red pepper, diced
  • 3 or 4 baby carrots, grated
  • 4 cups cooked, chopped tomatoes (I used tomatoes that I had prepared and frozen during the summer, but canned is fine.)
  • 2 small cans of tomato sauce (8 oz)
  • salt and pepper
  • 1 can condensed cream of mushroom soup (This will add flavor and thicken the sauce at the same time.)
  • 3 or 4 cups of water 
  • salt and pepper to taste
The Secret Ingredient
  • 1 - 3 oz. Bristol Cream Sherry (Another high quality cream sherry would do, but don't use cooking sherry or dry sherry.)  
1. In a heavy skillet, fry the onions in the olive oil until they are golden brown.
2. Add the garlic, parsley, and basil to the pan. Continue frying on medium low heat until the herbs are wilted.


 3. Add the peppers grated carrots. Fry for another minute or two. 


4. Pour the contents of the pan into a crockpot. Add the tomatoes, tomato sauce, mushroom soup, salt and pepper. Stir until blended.

5. Add enough water to give the sauce a nice consistency - not too thick, but not watery.
6. Place the meatballs in the pot. Cover and cook on low for 6 hours or more. This can simmer all day if you like.
7. About ten minutes before serving pour an ounce or two of the cream sherry into the sauce. Stir and taste. More sherry can be added if you like, but be careful not to overwhelm the the other flavors with the sherry. The sherry should sweeten the sauce a bit with a unique, but subtle fragrance and flavor.

Enjoy!


Now, to get back to my book. I love this series!!


Tuesday, December 22, 2015

A Pinterest Cookie Fail

I'm almost ready for Christmas. Not quite, but almost.

I don't do a lot of decorating anymore since the children are only here for one day, but the tree is up. Nothing is underneath it yet, although all five fleece robes are ready to wrap. I'll show photos after Christmas.

What a dark photo! My little phone did its best, but the day is dark and dreary, and the tree is against the window.

My baking is finished, too. The snowballs, orange walnut cookies with yummy orange buttercream, gingerbread, and fudge were ready in plenty of time for Friday night's cookie exchange. This weekend the sugar cookies were the only ones left.

I was exhausted from all the baking and sewing, and I wanted something simple for this very last batch. Something that didn't require rolling out dough and cutting lots of shapes. Something that I could do with only one color of frosting.

I found these on Pinterest. I love these pretty snowflakes in delicate ice blue and white! They look easy enough, too.


I knew the design would be just fine on a circle, and I could accomplish that quickly by rolling the dough into a log and making refrigerator cookies from my recipe. So that's what I did. The shiny icing and the gel food coloring were new to me, so I added just a little of food coloring. Only a drop of two.


Whoa! 


Too much food coloring, maybe? Too large a decorator tip, perhaps?

Oh, well. They taste just fine, and don't stand out quite so much when mixed in with other things on the gift plates. They make me laugh, too. Maybe I'll try again next year.


Next up, Christmas spaghetti!!


Merry Christmas!!


Monday, December 7, 2015

'Tis the Season: Scrap Busting Gift Bags Tutorial

I'm working on my final holiday shopping list.  Gift bags for little stocking stuffer items are on my list, but they seem like such a waste of money. However, I already have a drawer filled to overflowing with leftover fabric from Christmases past. This super quick pattern was just what I needed to bust my stash and to have reusable gift bags at absolutely no cost.

Sunday night, while watching a silly holiday movie, I chose the fabrics and cut out the pieces I'd need for these six little bags.  Monday, in under three hours, I completely finished all of them. The sewing, ribbon and all took less than half an hour per bag.


Finished Measurements

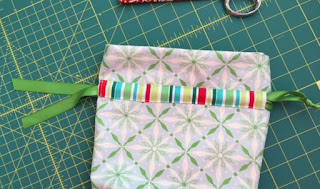
These bags are 9 1/2" wide and 10" tall. The base is 4" x 5". They are large enough to hold a large mug and assorted goodies, a scarf or a pair of gloves, a mini loaf of pumpkin bread, or an assortment of all sorts of other goodies. The top can be left open for larger items or pulled snuggly together for smaller items.
The white mug is a standard 12 oz size, 4 inches tall and 3 1/2" in diameter at the top.

Fabrics and Materials
  • For the outside of bag: Either one fat quarter of fabric or two rectangles 9 1/2" x 13"
  • For the lining: Either one fat quarter of contrast fabric or two rectangles 9 1/2" x 13"
  • Two 28" lengths of ribbon for the drawstrings, 5/8" or 3/4" wide. (With a satin or other smooth surfaced ribbon in the drawstring carrier the bag will slide open and closed easily. A textured ribbon like a grosgrain will tend to make opening and closing the bag a little bit harder.)
  • Thread
  • Fray Check (A half and half mixture of Elmer's glue and water can be substituted for Fray Check

Cutting

  •  Cut two rectangles, 9 1/2" x 13", from the main fabric and two of the same size from the lining fabric.
  • Cut two strips of contrast fabric, 1 1/2" x 9".
  • Cut and remove a 2"x 2" square from each corner of the bottom end of each rectangle.


Sewing Instructions
Sew all seams with a 1/4" seam allowance.

1. Fold the long edges of the 1 1/2" x 9" contrast fabric strip in 1/4". Press. Fold the two ends in 1/4". Press and stitch the two ends down.


2.  Align the top edge of a prepared contrast strip 2 1/4" down from the top of each piece of the main fabric. Center the strip 1/2" in from each side. Topstitch the long sides of the strips down with a narrow edge seam. Leave the ends open. These two strips make the carriers for the drawstrings.


3. With right sides together, sew the side seams and the seam at the bottom of the bag.

4. Sew the lining fabric in the same way, but leave a 2" space open along one side seam. This opening will be used to turn the bag when it's finished.  


5. Press all seams open. Press the edges of the opening in the lining back so they are even with the seam allowance.


6. Bring the side seams and the bottom seam of the 2" x 2" squares at the bottom of the bag together. Stitch straight across to make the boxed corners.


7. Turn the lining right side out and fit it inside the main bag. Line the seams up, and sew the bag and the lining together at the top.


8. Turn the bag right side out by pulling the entire piece through the opening in the side seam of the lining.

9. Close the opening with hand stitching, or machine sew it together with a narrow edge stitch.


10. Fold the lining to the outside of the bag and press the top seam flat. I pressed the lining to lie just barely below the main fabric.


11. From the front of the bag, topstitch right next to the upper edge of the carrier. Stitch all the way around the bag in one continuous seam.


12. Turn the bag right side out.

Inserting the ribbon for the drawstrings

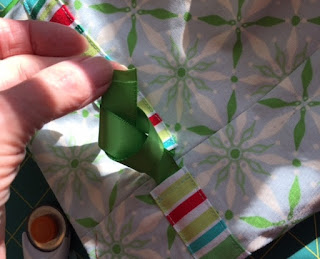
1. Attach a safety pin to an end of one of the ribbon pieces. Begin on one of the carrier side openings. Insert the safety pin and pull the ribbon through. Cross to the next carrier and continue pulling the ribbon through that one, bringing the ribbon out on the same side that it went in.


2. Pull the two ends of the ribbon so the ends are even. Hold the ribbon ends together, make a loop and pull the ends through to tie in a knot.


3. Insert the second ribbon exactly like the first, but start on the other side of the bag.


4. Trim the ends of ribbon close to the knots and dab with a bit of Fray Check to prevent fraying.

5. Pull on the ends of the ribbons to close the bag.


Enjoy!!