Pages

Thursday, July 24, 2014

Quilt Along Block #9, Clothesline

Finally finished! The clothesline block has always been part of the plan, and I do think it turned out awfully cute, but oh my goodness! What a headache in the making! More about that later.

If I had to choose what I like best about this block it would be the pink and green mini-quilt. It's a real quilt! Pieced and everything! I only cheated on the border. It's satin stitched. The little blocks are just 1/2" square, and I loved making it!

But on to the problems. Sigh...

It isn't that the block is hard to sew. Even though it has so many little bits and pieces of laundry, it goes together just like the others. Or, at least it should go together just like the others. Not for me, though. Not this time.

It all began when I ran out of stabilizer for my applique. I was in a bit of a hurry, so I grabbed something inexpensive from a nearby craft store. I thought it was similar to a more expensive stabilizer I'd used before, but when I opened the container, it was altogether different. Not in a good way, either! Word of warning - do not get the water soluble stabilizer that feels like a plastic bag! It sticks to the bed of the sewing machine and totally messes up the length of zigzag stitches!

I stopped everything and went out to the quilt shop to buy some good stuff. More expensive, but so worth it. This one is a tear-away and works beautifully.

Stabilizer, though, was only the first of my problems. Next came the thread issue. I have thread in every color imaginable.

Ha!
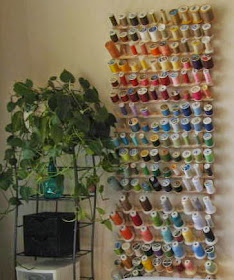
Only one portion of my thread collection. 
I matched something up with the jeans fabric and appliqued away. This was the first mistake. the thread was very, very old, and rather poor quality to start with. I should have thrown it out long ago!  It broke after sewing just a couple of inches and the tension was all off. So, I finally tossed it and decided to use something different - maybe not quite so close a match. Of course I had to do a bit of stitch ripping, but I hadn't got very far, so it wasn't a horribly big deal. That might have been okay, but the new thread didn't show up at all for showing the pockets and seams on the pants. The next best thread I had was navy blue.

It wasn't till I had done all of this sewing with a very short triple stitch, that I realized how awful it looked!


What a mess!

An hour and a half later I had it all unstitched, but the jeans are looking a bit the worse for wear. I might have been better off drawing those lines with a permanent marker in the first place. I definitely would have been better off simply starting over!

Well, it's too late to do any of that now. The block is finished and it stays as it is! A small imperfect piece won't ever be noticed in such a busy quilt. Will it? Nope. Not going there at all. It's fine. So there!

Truth be told, my sigh of relief at having it finished was huge. The block is done, the pattern made, and aside from the mishaps and mixups it really was loads of fun.

This quilt is really coming along!! I may move blocks around, but it's not looking half bad! What shall we add? We only need one large block and one or two small ones, depending on the size of the larger one.


There is only one little niggling worry about the clothesline block.
That other yellow sock ...
         the one not on the clothesline ...

It had better be in here somewhere!

Unless the washing machine ate it.


Monday, July 21, 2014

Tutorial: Create Flying Geese Paper Pieced Patterns

I love using paper foundation piecing for flying geese blocks. The blocks make up so quickly, and they always finish with perfect points.

When a pattern shows other techniques that don't work quite as well for me, I always sketch out my own paper foundation pieced block patterns, and photocopy them.

You can draw your own paper pieced flying geese blocks,  too - in any size you need. It's easy, and there's very, very little math involved. Most flying geese blocks are twice as tall as they are wide, so you basically need to multiply the width of your block by 2 to get the height.

Start with a rectangle. Make it twice as tall as it is wide.

The most commonly used flying geese block sizes for quilts are:
1" x 2"
1 1/2" x 3"
2" x 4"
2 1/2" x 5"
3" x 6"

Size doesn't make any difference in the process for making the blocks. My examples are for making 2" x 4" blocks. This is a great size for practice, but you can adjust when you are making other sizes you might need for your quilts.

Now, get a ruler, a sharp pencil, and some graph paper. 
And, away we go! 


Make a single block
Step 1:  


  • Draw a rectangle twice as tall as it is wide on your graph paper. Mine is 2" x 4", but the same formula works for all sizes.
  • Measure halfway down the right hand side of the rectangle and make a mark. This is the same measurement as is the width of your rectangle.
  • Draw lines from the mark you just made to either corner on the left hand side of the paper. The lines you have drawn are the lines that you will sew on when sewing the block and assembling the quilt.
Step 2:

  • Add 1/4" seam allowance all around.  This outer line will be the line you cut on when you trim the block down for sewing into your quilt.
  • Write in numbers to show the order of adding fabrics. The large triangle, usually made with a darker color of fabric, is number 1. The smaller triangles made with background fabrics will be numbers 2 and 3. It makes no difference which of the smaller pieces is attached first.

But what if you want to put two blocks into a set so you can sew two at the same time? 

Make a set of two blocks

Step 1: 
  • Draw a single block just like you did before. 
  • Now attach another block right next to it. Each block will be twice as tall as it is wide.
Step 2: 

  • Add 1/4" seam allowance all around.  Once again, the outer line will be the line you cut on when you trim the set of blocks down for sewing into your quilt, and the inner lines are the lines you stitch on.
  • Write in numbers. The larger triangles for each block are always added first, the smaller triangles next. Number the first block with numbers 1, 2, and 3, and the second block with numbers 4, 5, and 6.

Longer Sets 

Sets of three or more blocks

Follow the same procedure that you used to draw two blocks to make sets of three blocks, 6 blocks, or as many as you can fit on your graph paper.


  • Start with side by side blocks, then add 1/4" seam allowance around the entire set.
  • Write numbers in sequential order, block by block. Make sure that the large triangle is always given the first number in its block.

That's it!  Photocopy as many copies as you need and begin sewing! 

How to measure the fabric pieces for your block sections.

There is always some unavoidable waste with paper foundation piecing, but if the fabric pieces are cut relatively close to the finished size and shape, the waste can be minimal. 

Whether sides are cut on the bias or not is relatively unimportant with paper foundation piecing. I've tried to make the measuring for fabric pieces as easy as possible by cutting the large triangles as quarter square triangles and the background triangles as half square triangles. 

Photo A: half square triangles for small background segments


Photo B: Quarter square triangles for larger segments of the block


The Formula

Yes, there is a formula, but it's pretty easy to follow. 

For the smaller triangles (photo A above) :
  • Begin with a square 1 1/4" longer than the width of the block.
  • For a 2" x 4" block, you would add 1 1/4" to 2", the shorter measurement of the block. 
1 1/4" + 2" = 3 1/4"
  • The square should be cut 3 1/4" on either side. 
  • Cut in half once diagonally. You will have two triangles, enough for one block.

For the larger triangles (photo B above) :
  • Begin with a square 1 5/8" larger than the height of the block. 
  • For a 2" x 4" flying geese block, add 1 5/8" to 4", the longer measurement of the block. 
1 5/8" + 4" = 5 5/8"
  • The square should be cut 5 5/8" on either side. 
  • Cut in half diagonally, and then cut in half diagonally again. You will have four triangles, enough for four blocks.

I've made a chart to simplify it even more.


Chart for cutting common size triangles for paper foundation pieced flying geese blocks.


Size of Block     Cut square for               Cut square for
                           two, small, half             four, large, quarter
                           square triangles:           square triangles:
                          

1 ½” x 3”            2 ¾” x 2 ¾”                 4 5/8” x 4 5/8” 
2” x 4”                3 ¼” x 3 ¼”                  5 5/8” x 5 5/8” 
2 ½” x 5”            3 ¾” x 3 ¾”                 6 5/8” x 6 5/8”
3” x 6”                4 ¼” x 4 ¼”                  7 5/8” x 7 5/8” 
4” x 8”                5 ¼ x 5 ¼”                    9 5/8” x 9 5/8”


And that's everything you need to know! Make all the paper foundation pieced flying geese blocks you like, in any size you like.