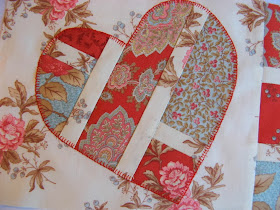
However, this same friend is just learning free-motion quilting on a sewing machine and how to applique with fusible web. The other night when my sewing friends over, she had brought a Valentine's Day table runner to share. We always have a bit of "show and tell". She had appliqued the hearts with raw edge straight stitching. The runner was lovely, but she would have preferred a blanket stitch. She asked me what the secret was to going around an applique with a machine blanket stitch. She says that her blanket stitch doesn't look good at all, especially on corners like the point at the bottom of a heart and the "v" point in the center of the top of a heart.
Time for a tutorial. There may be others out there in Quilt-land who have the same issues.
How the Machine Blanket Stitch is Made
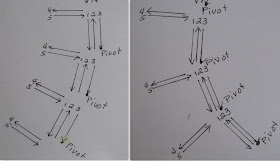
First of all, let's take a look at how the stitch is made. There are five motions of the needle for each single stitch forward. These are the steps:
 |
| Five steps on paper and in reality. |
It reminds me of a five count dance step. Forward, back, forward, left, right. One, two three, four, five. Repeat... When I'm applying this stitch I am very aware of which step I'm on at all times.
I would definitely recommend memorizing the steps. Do a bit of practice stitching - very slowly, and count on each step until you are thoroughly familiar with the rhythm and the count.
Now on to stitching a heart. The corners are the tricks. I'm working on one of my "Patched With Love" mug rugs for this.
First: Set your stitch width and length. I like narrow and short for this kind of applique. On my machine the width is set at 2.5 and the length is 2.2.
Second: Insert the needle, pull up the bobbin thread, and begin stitching. The first stitch will be a forward stitch - number one in our dance step count.
As long as you are sewing on a straight line, the main thing you need to do is keep that outside trio of stitches (numbers one, two, and three) right up against the edge of your applique.
I always sew applique stitches very slowly so I can be precise. Rushed stitches don't often turn out well.
This is what your row of stitching will look like from the back.
Outer Corner Turns
Here we are at the corner at the bottom of the heart.
Stop on step three of the dance step with the needle down. In fact, almost every time you want to turn your applique you will need to stop on this step.
Number three - the bottom of the last forward stitch before going left and right is your stopping point!
Now, pivot the fabric.
This turn should line up your row of stitching with the edge of the applique.
Next come steps four and five. Left, right.
Then back to the five count and straight ahead.
The point at the bottom of the heart will be neatly and securely boxed in.
Looks beautiful, doesn't it?
Onward and forward. One, two, three, left, right ...
As you go around the curve at the widest portion of the heart you'll need to adjust your stitching. More on that later.
Inner Corner Turns
Here we are approaching the next tricky corner turn.
Stop with your needle down after the count of - three!
And pivot the fabric.
I lined this up so that the next two stitches, left then right, will go straight into the center of that inner "v".
Left, right, needle down, (4, 5) and pivot the fabric again. This is one of the rare moments when you pivot after the count of five. When the presser foot and direction of your stitching are lined up with the edge of the applique, continue stitching.
Once again, it looks perfect!
Continue on around to the beginning, backstitch, and snip the thread. The blanket stitching around the heart is finished.
Going Around Curves - Inner and Outer
Large, softly rounded curves aren't too difficult, but those tighter curves are the ones that can cause problems.
You expect your blanket stitch to look smooth just like it does when you sew along in a straight line. But instead, you wind up with something that looks more like this.
Hmm... Not exactly what you had in mind.
Why?
The most common mistake is due to stitching too fast and simply turning the fabric as a person would if they were stitching a straight line of stitching. A blanket stitch must be handled differently.
Slow down!
Remember those five steps in the blanket stitch dance? This is just like dancing. If you aren't aware of which step you're on, you wind up stumbling and tripping up your partner.
But why does the stitching look less than wonderful?
The answer goes back to those five steps in the blanket stitch dance.
Stop and Pivot.
Pay attention to the step count. When turning a curve, either an inner or an outer curve, you must stop with the needle down at the end of the third step, lift the presser foot, and pivot the fabric just enough to line everything up again.
Here you see what happens if you forget to stop and pivot on the right step.
If you pivot now to get back on track the forward stitch you just made will dangle out there beside the edge of the applique. If you just try to turn back in you'll have some uneven stitching that isn't tight against the edge for a few stitches.
The time to stop and pivot on either an inner curve or an outer curve, is at the end of step three. This is the step just before the left, right combination that goes in and over the applique.
A sketch might help you see what happens with the pivot and turn on step three.
 |
| Outside Curve Inside Curve |
If you have any questions or any ideas for a future tutorial, please tell me in a comment to this blog post, on my facebook page, or in an email.
Happy stitching, everyone!!
And I have some mug rugs to finish.
 |
| Ooh! Love! |


Thank you. I used the blanket stitch for the first time on my Home block and I did have issues. Will try this method next time!!
ReplyDeleteI do hope you find it helpful, Diane. Please let me know how it works for you.
DeleteGreat tutorial. Thanks for sharing.
ReplyDeleteThanks, Denise. I do hope it's helpful to you.
DeleteGREAT Machine Buttonhole Applique Edging TUTE!!! Never really thought of these Buttonhole Stitch Steps as Dance Steps. LUV it. Easily understandable. I really love your way of explaining and since I am a visual person, I love the photo examples of the stitch-steps that you are explaining. Yes. I LOVE IT!!! "Thanks" Karen. Pat H. in Bremerton, WA
ReplyDeleteSo glad this is helpful! Sometimes a different approach is exactly what we all need. Pat, I left a reply on your other comment on the Spring tulips post, but I accidentally added it as another comment instead of dropping it into the reply box. Sorry about that. :)
DeleteThank you so much for this great tutorial! You are so kind to share your talents with us!
ReplyDeleteSo glad to hear it was helpful. Retired teachers can't help teaching.
ReplyDeleteThanks Karen for this wonderful tute....I could never figure out why my blanket stitch wasn't that great. I love how you say to slow down and count the "dance steps". I will try it this way. Your instructions were spot on and very easy to understand! You must have been a wonderful teacher!!
ReplyDeleteFrom another Karin.....
I'm so glad this might be helpful to you! The stitch can be a bit tricky until you figure out the pivots and adjustments in direction. After using it for a bit it will become automatic, but slowing down on turns will be with you to stay.
DeleteKaren, this is the best Tutorial on the blanket stitch. I've seen! I recently joined an on line quilting group and everyone's blanket stitch looked perfect except mine! Thank you so, so much! This was exactly what I needed!
ReplyDeleteWonderful! I'm so happy that this is helpful to you.
DeleteDo you vary the settings for your blanket stitch depending on the size o the object you are appliqueing? I am working on your kittens in the sewing room wall hanging and found that the default blanket stitch settings worked great for the large items but hot so good for the pencils and thread spools. I have been using the blanket stitch with 3 steps instead of 5 since I am a beginner and not sure I want my stitches to show as much. Also do you use a special thread? In particular weight?
ReplyDeleteThese are excellent questions, Patti. Yes, I do vary the size of the stitches. Smaller thins, like the pencils and such, will be better if the stitch is shorter than standard. Sometimes the width also needs to be adjusted so the stitches on opposite sides of the applique piece don't meet in the middle. Any weight of thread will work. If I want the stitching to show up strongly, I'll often use a 40 weight in a rayon or other thread that has a sheen. Usually, though, I use a 50 weight in 100% cotton. I prefer to use Aurifil or Superior Threads because they are smooth and strong, and they blend in very well. Unfortunately, they are expensive and hard to find in stores. I really try to avoid the standard cotton wrapped polyester. I don't like the texture, and it isn't good for my sewing machine. 100% cotton by Gutterman is a good alternative, and their rayon threads are excellent.
Delete