
 |
| 22" x 22" |
Every now and then the organizing process reveals surprises. While sorting the fabrics in my drawer of reds and pinks, I rediscovered a Valentine charm square packet tucked away and forgotten. It had been one of those gifts of fabric that I would never have chosen for myself. I love red, but something about this fabric had just never appealed to me.
The pack of five inch squares had been taking up drawer space for seven or eight years, and it was well past time to do something with it. I decided to take a second look before tossing it in the give away pile.
It was much nicer than I had remembered. Maybe I could use it. After all, I had resolved to use more of my stash this year instead of buying new fabrics, and before we can blink Valentine's Day will be here.
Wheels in my head began to turn. If I were to make a pattern at all for this holiday it would have to be soon - like now. I needed something fast. A charm pack would be just the right size for a quick project. Everything else I needed just happened to be on hand, too. Perfect! With high temperatures hovering around 10 degrees and the prairie wind blowing and blustering, it was too darn cold to go out for new fabrics, anyway!
I found a photo of a traditional heart block that would stitch up into a quick little table topper. Creating the pattern and figuring out the fabric measurements didn't take long at all. The design is very simple and the size of the five inch squares limited what I could do. Each of the four blocks in my table topper uses fifteen 2" squares and two 2" x 5" cuts from the charm pack.
Fabrics Needed


- One 5" square charm pack or a selection of scraps of any color. There is no rule that hearts must be red or pink.
- 1/2 yard of a neutral background fabric
- 1/4 yard of fabric for the binding
- 2/3 yard of backing fabric.
Cutting
From the neutral background fabric:
- 4 squares, 3 1/2" x 3 1/2
- 16 squares, 2" x 2"
- 4 strips, 2" x 8"
- 2 strips, 2 1/2" x 17"
- 2 strips, 2 1/2" x 21"
Note: The measurements given are exact, but when I cut strips for sashings and borders I try to add a smidgen extra length. I'd rather trim a bit off than come out a bit short.
From the charm squares:
- 8 rectangles, 2" x 5"
- 61 squares, 2" x 2"
- 22 rectangles, 1 1/2" x 5"
From the backing fabric:
- One square 24" x 24"
Putting it together
Note: All seams are sewn with a 1/4" seam allowance.
Note: All seams are sewn with a 1/4" seam allowance.
1. Start with the two sections (lobes) at the wide upper portion of each heart.
Pull sixteen colored 2" x 2" squares and the sixteen neutral 2'x 2' squares. Arrange the pink and red fabrics into sets of four matching fabrics for each of the four hearts.
2. Draw a diagonal line from corner to corner on the wrong side of each of the neutral hearts.
3. Place one neutral square on top of each red or pink square, right sides together. Sew directly on the line.
I always hear expert quilters say, "Just eyeball the stitching." If that works for you, by all means skip the line drawing, but for me, skipping it is always a mistake. I've tried eyeballing multiple times, and every single time I've wound up giving my seam ripper a good workout and then drawing the lines anyway.
4. Trim about 1/4" from each seam and press the squares open. Press to the dark.
5. Chose two matching squares of red and pink for each heart. I tried to keep the color values similar to the fabrics just used in making the squares from the half square triangles. Sew the wide side of a triangle to each side of the square as shown below.

Now, here's the truth. We've all seen numerous quilting videos and tutorials showing perfect results every time. Well, the truth is that even the experts make mistakes in quilting. They simply edit them out. Just thought you'd like to know that.
6. Choose two matching 2" x 5" rectangles for each of the heart blocks. Again, fairly close color values are best. The goal is to have two identical, fairly uniform "lobes" for each heart. Sew the rectangles to the sets you made in step 5 as shown below. There will be two for each of the four hearts.

7. The next step is to make the squares that form the base of the heart. These can be randomly placed. Sew the 2" x 2" red and pink squares right sides together in rows of three. Chain piecing can really speed this process along.

8. Next, sew three strips of three squares together to make a nine-patch set for each heart block. Each nine-patch will measure 5" x 5".

 |
| Oops! |
It should look like this!
Now, here's the truth. We've all seen numerous quilting videos and tutorials showing perfect results every time. Well, the truth is that even the experts make mistakes in quilting. They simply edit them out. Just thought you'd like to know that.
6. Choose two matching 2" x 5" rectangles for each of the heart blocks. Again, fairly close color values are best. The goal is to have two identical, fairly uniform "lobes" for each heart. Sew the rectangles to the sets you made in step 5 as shown below. There will be two for each of the four hearts.
7. The next step is to make the squares that form the base of the heart. These can be randomly placed. Sew the 2" x 2" red and pink squares right sides together in rows of three. Chain piecing can really speed this process along.
8. Next, sew three strips of three squares together to make a nine-patch set for each heart block. Each nine-patch will measure 5" x 5".
9. Sew one "lobe" of the heart to one side of the nine-patch set. Sew a 3 1/2"x 3 1/2" square of the background fabric to one end of the other "lobe". Then sew the two sections together. These seams will complete the blocks. The finished blocks will measure 8" x 8".


12. Sew the strip you just made between the two pairs of blocks. The set of blocks should now measure 17 1/2" x 17 1/2".
13. Sew the 2 1/2" x 17" strips of background fabric to two opposite sides of the square.
14. Sew the 2 1/2" x 21" strips of background fabric to the remaining sides of the square.
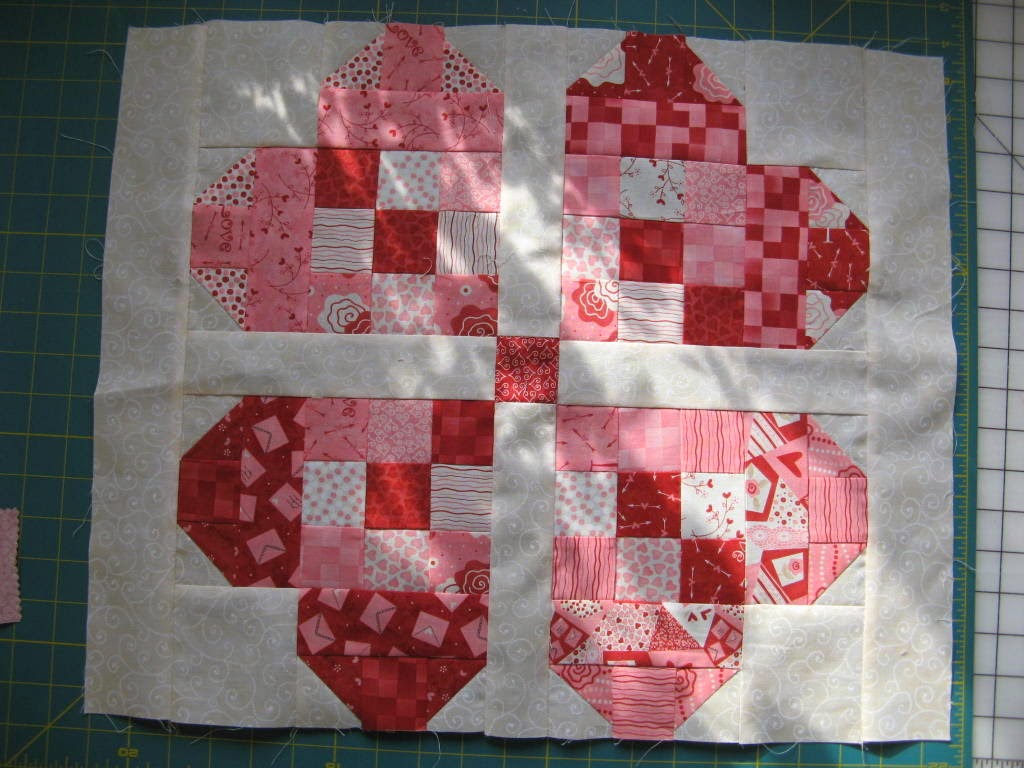
Since the hearts in my blocks were had either mainly pink "lobes" or mainly "red" lobes, I chose to have the red blocks positionsed diagonally across from each other. The blocks with pinker lobes will also lie diagonally across from each other.
10. Sew one 2" x 8" rectangle of background fabric between each pair made of a red block and a pink block.
 |
| In this photo, the lower pair of blocks have been flipped. It was easier for me to keep the color order straight when all four blocks were right side up. |
11. Sew the single remaining 2" x 2" square cut from the charm pack between the other two 2" x 8" rectangles of background fabric.
 |
Almost finished! |
 |
| Beautiful sunshine is coming in my sewing room window! |

And on to the the final border! This is where I used all but a few of the remaining 5" squares from the charm pack.
15. Sew the 1 1/2" x 5" strips of charm pack fabric end to end in four sets. Two of the sets need five strips, and the other two need six strips. These strip sets will make the last border.
16. Sew a set of five strips to each of two opposite sides of the quilt top. You will have excess fabric. I trimmed some from each end.


18. Layer the quilt top, batting, and backing fabrics together, and quilt.
There are two humongous things I learned from Cindy Neeham's free motion quilting class on Craftsy.
- Always, always stitch in the ditch on every stinking seam! I hadn't even considered that before taking her class. Going over all those seams may seem like a waste of precious time, but the difference it makes in the final product is amazing.
- Never, ever will I learn to quilt so precisely - no matter how hard I try or how much I practice! Sigh..
I love my walking foot! It makes that ditch stitching so easy! And, sometimes you really don't need to do any other quilting at all. Like now. It looks just fine, and this was quick.

19. Bind. This was always meant to be a quick project, so I didn't hand stitch my binding to the back of the quilt this time.
When I had sewn my binding strips together, I sprayed them with a good coating of starch, folded them in half lengthwise and ironed them dry. The added stiffness from the starch really became helpful later.
After the binding was sewn to the front of the quilt, I folded it to the back and ironed it in place. Since the binding had been well starched it held it's position on the quilt beautifully, allowing me to stitch in the ditch to sew it on from the right side.

Closeup views of the binding.
 |
| This side looks great. |
 |
| It isn't perfect , but I don't suppose anyone will spend much time examining the back. |
I almost never work more than four or five hours on my sewing, so from start to finish I spent a total of about 12 hours on this project. That time includes everything from designing the project and working out the measurements to stitching the last bit of binding in place.

Now I need to move on to something else - like putting Christmas away!
