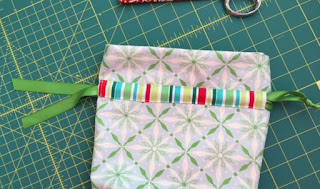
Sunday night, while watching a silly holiday movie, I chose the fabrics and cut out the pieces I'd need for these six little bags. Monday, in under three hours, I completely finished all of them. The sewing, ribbon and all took less than half an hour per bag.
These bags are 9 1/2" wide and 10" tall. The base is 4" x 5". They are large enough to hold a large mug and assorted goodies, a scarf or a pair of gloves, a mini loaf of pumpkin bread, or an assortment of all sorts of other goodies. The top can be left open for larger items or pulled snuggly together for smaller items.
 |
| The white mug is a standard 12 oz size, 4 inches tall and 3 1/2" in diameter at the top. |
Fabrics and Materials
- For the outside of bag: Either one fat quarter of fabric or two rectangles 9 1/2" x 13"
- For the lining: Either one fat quarter of contrast fabric or two rectangles 9 1/2" x 13"
- Two 28" lengths of ribbon for the drawstrings, 5/8" or 3/4" wide. (With a satin or other smooth surfaced ribbon in the drawstring carrier the bag will slide open and closed easily. A textured ribbon like a grosgrain will tend to make opening and closing the bag a little bit harder.)
- Thread
- Fray Check (A half and half mixture of Elmer's glue and water can be substituted for Fray Check
Cutting
- Cut two rectangles, 9 1/2" x 13", from the main fabric and two of the same size from the lining fabric.
- Cut two strips of contrast fabric, 1 1/2" x 9".
- Cut and remove a 2"x 2" square from each corner of the bottom end of each rectangle.
Sewing Instructions
Sew all seams with a 1/4" seam allowance.
1. Fold the long edges of the 1 1/2" x 9" contrast fabric strip in 1/4". Press. Fold the two ends in 1/4". Press and stitch the two ends down.

2. Align the top edge of a prepared contrast strip 2 1/4" down from the top of each piece of the main fabric. Center the strip 1/2" in from each side. Topstitch the long sides of the strips down with a narrow edge seam. Leave the ends open. These two strips make the carriers for the drawstrings.

3. With right sides together, sew the side seams and the seam at the bottom of the bag.
4. Sew the lining fabric in the same way, but leave a 2" space open along one side seam. This opening will be used to turn the bag when it's finished.

5. Press all seams open. Press the edges of the opening in the lining back so they are even with the seam allowance.

6. Bring the side seams and the bottom seam of the 2" x 2" squares at the bottom of the bag together. Stitch straight across to make the boxed corners.


7. Turn the lining right side out and fit it inside the main bag. Line the seams up, and sew the bag and the lining together at the top.

8. Turn the bag right side out by pulling the entire piece through the opening in the side seam of the lining.
9. Close the opening with hand stitching, or machine sew it together with a narrow edge stitch.


10. Fold the lining to the outside of the bag and press the top seam flat. I pressed the lining to lie just barely below the main fabric.

11. From the front of the bag, topstitch right next to the upper edge of the carrier. Stitch all the way around the bag in one continuous seam.

12. Turn the bag right side out.
Inserting the ribbon for the drawstrings
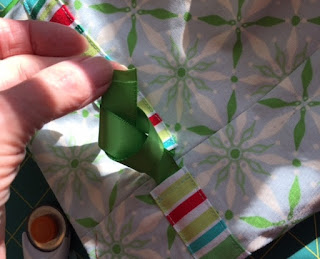
1. Attach a safety pin to an end of one of the ribbon pieces. Begin on one of the carrier side openings. Insert the safety pin and pull the ribbon through. Cross to the next carrier and continue pulling the ribbon through that one, bringing the ribbon out on the same side that it went in.


2. Pull the two ends of the ribbon so the ends are even. Hold the ribbon ends together, make a loop and pull the ends through to tie in a knot.


3. Insert the second ribbon exactly like the first, but start on the other side of the bag.


4. Trim the ends of ribbon close to the knots and dab with a bit of Fray Check to prevent fraying.
5. Pull on the ends of the ribbons to close the bag.
Enjoy!!


