Monday, December 7, 2015

'Tis the Season: Scrap Busting Gift Bags Tutorial

I'm working on my final holiday shopping list.  Gift bags for little stocking stuffer items are on my list, but they seem like such a waste of money. However, I already have a drawer filled to overflowing with leftover fabric from Christmases past. This super quick pattern was just what I needed to bust my stash and to have reusable gift bags at absolutely no cost.

Sunday night, while watching a silly holiday movie, I chose the fabrics and cut out the pieces I'd need for these six little bags.  Monday, in under three hours, I completely finished all of them. The sewing, ribbon and all took less than half an hour per bag.


Finished Measurements

These bags are 9 1/2" wide and 10" tall. The base is 4" x 5". They are large enough to hold a large mug and assorted goodies, a scarf or a pair of gloves, a mini loaf of pumpkin bread, or an assortment of all sorts of other goodies. The top can be left open for larger items or pulled snuggly together for smaller items.
The white mug is a standard 12 oz size, 4 inches tall and 3 1/2" in diameter at the top.

Fabrics and Materials
  • For the outside of bag: Either one fat quarter of fabric or two rectangles 9 1/2" x 13"
  • For the lining: Either one fat quarter of contrast fabric or two rectangles 9 1/2" x 13"
  • Two 28" lengths of ribbon for the drawstrings, 5/8" or 3/4" wide. (With a satin or other smooth surfaced ribbon in the drawstring carrier the bag will slide open and closed easily. A textured ribbon like a grosgrain will tend to make opening and closing the bag a little bit harder.)
  • Thread
  • Fray Check (A half and half mixture of Elmer's glue and water can be substituted for Fray Check

Cutting

  •  Cut two rectangles, 9 1/2" x 13", from the main fabric and two of the same size from the lining fabric.
  • Cut two strips of contrast fabric, 1 1/2" x 9".
  • Cut and remove a 2"x 2" square from each corner of the bottom end of each rectangle.


Sewing Instructions
Sew all seams with a 1/4" seam allowance.

1. Fold the long edges of the 1 1/2" x 9" contrast fabric strip in 1/4". Press. Fold the two ends in 1/4". Press and stitch the two ends down.


2.  Align the top edge of a prepared contrast strip 2 1/4" down from the top of each piece of the main fabric. Center the strip 1/2" in from each side. Topstitch the long sides of the strips down with a narrow edge seam. Leave the ends open. These two strips make the carriers for the drawstrings.


3. With right sides together, sew the side seams and the seam at the bottom of the bag.

4. Sew the lining fabric in the same way, but leave a 2" space open along one side seam. This opening will be used to turn the bag when it's finished.  


5. Press all seams open. Press the edges of the opening in the lining back so they are even with the seam allowance.


6. Bring the side seams and the bottom seam of the 2" x 2" squares at the bottom of the bag together. Stitch straight across to make the boxed corners.


7. Turn the lining right side out and fit it inside the main bag. Line the seams up, and sew the bag and the lining together at the top.


8. Turn the bag right side out by pulling the entire piece through the opening in the side seam of the lining.

9. Close the opening with hand stitching, or machine sew it together with a narrow edge stitch.


10. Fold the lining to the outside of the bag and press the top seam flat. I pressed the lining to lie just barely below the main fabric.


11. From the front of the bag, topstitch right next to the upper edge of the carrier. Stitch all the way around the bag in one continuous seam.


12. Turn the bag right side out.

Inserting the ribbon for the drawstrings

1. Attach a safety pin to an end of one of the ribbon pieces. Begin on one of the carrier side openings. Insert the safety pin and pull the ribbon through. Cross to the next carrier and continue pulling the ribbon through that one, bringing the ribbon out on the same side that it went in.


2. Pull the two ends of the ribbon so the ends are even. Hold the ribbon ends together, make a loop and pull the ends through to tie in a knot.
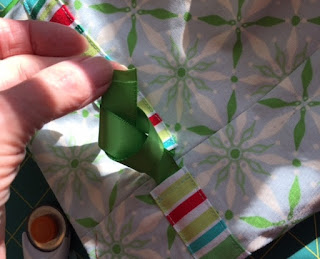
  

3. Insert the second ribbon exactly like the first, but start on the other side of the bag.
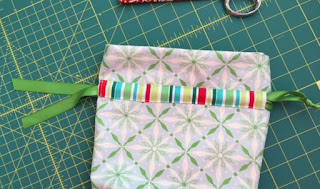
  

4. Trim the ends of ribbon close to the knots and dab with a bit of Fray Check to prevent fraying.

5. Pull on the ends of the ribbons to close the bag.


Enjoy!!

Friday, December 4, 2015

Last Minute Gifts: Coasters to Potholders in One Pattern

I love easy, peasy projects.

I love quick and easy best when holidays are coming and time is running short. Like now.

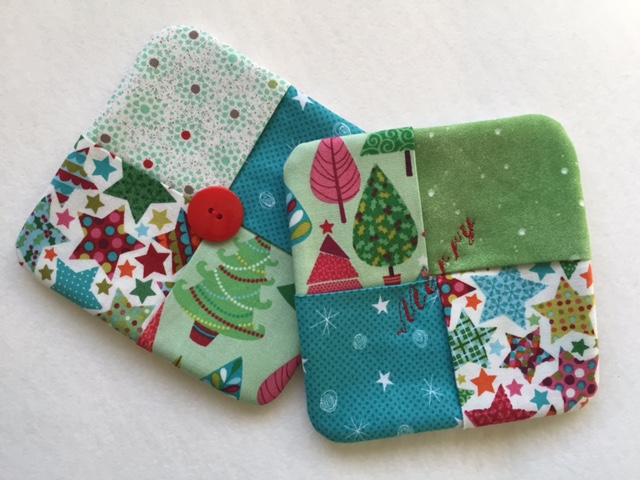
That's why I got so excited when my friend, Anne, dropped by with this little coaster. She made in no time, using only five charm squares and a bit of batting. I envisioned so many different uses for this idea.

The button isn't necessary, but it adds interest.
Scrap busters, stocking stuffers, little gifts for friends and neighbors, are all rolled up in one very quick and easy pattern. This is my kind of pattern!! I love the versatility, too, as these can be made any size you like. Each piece is made from five squares of fabric and a piece of batting The finished project will be 1/2" smaller than the size of the fabric squares. Anne's gift is 4 1/2" square.

I started with 5 1/2" squares of leftover holiday fabric, and made 5" coasters . These went so fast, that I made two sets of four in one short afternoon. It wasn't necessary at all, but I sewed flat buttons onto one set so as not to throw a cup off balance. I wrote "Merry" on the other with my sewing machine's alphabet setting.


A larger set came next. These finished at 6 1/2" square and I lined them with Insul Bright instead of batting. They make great mug rugs or small hot pads. 


Finally I made a potholder. 
Zip, zip, and done. 

Tutorial for the Potholder:
(To make coasters or mug rugs use only one layer of either batting or Insul Bright, and leave out the loop for hanging.)

Materials: 
Five 8 1/2" squares of fabric
One 1 1/2" x 6" rectangle of fabric
One 8 1/2" square if batting
One 8 1/2" square of Insul Bright

Fold four of these squares in half with the right sides facing out, and press. The unfolded piece will be on the back of your potholder.


Make the loop for hanging the potholder.

Fold the small rectangle of fabric in half lengthwise. Press. 

Fold one long side of the rectangle in to the center fold. Press.

Fold the other long side over the top.


Press and tuck it under the first fold.


Stitch along the outside fold.


Fold the loop in half and stay stitch to a corner of the unfolded 8 1/2" square of fabric. 


Layer the fabrics for sewing.

Layer the fabrics in this order from bottom to top: Batting, Insul Bright, the unfolded square of fabric. The fabric should face right side up. 
Arrange the folded squares out, one on each side of the square. Make sure the folded edge faces in toward the center. 
Lay the folded bottom square onto the layered batting and fabric. Line it up with the edges. 
Lay the folded square on the right hand side onto the layered squares. Half of the bottom square will be covered.

Lay the folded square at the top onto the layered squares next, covering half of the square on the right. 

Lay the folded square on the left onto to the layered squares covering half of the square on the top. 
The folded square on the bottom is now completely covered. Lift up the portion under the folded square on the left and lay it over the top of that one. 


Double check to make sure all the folds are at the center and all the sides are lined up carefully. Pin together.

Sew the potholder together.
For best results, sew with a walking foot. 

Sew all around the layered fabric square using a 1/4" seam allowance. Stitch a curve going around each corner to reduce bulk. You could draw the curve or just wing it.

Trim the fabric back to 1/8" to 3/16" all around. 

Slip your fingers under the layers at the center to turn the potholder inside out. 
Use a tool to push out and smooth the corners. I used a knitting needle - carefully so as not to poke a hole in anything.
Press.

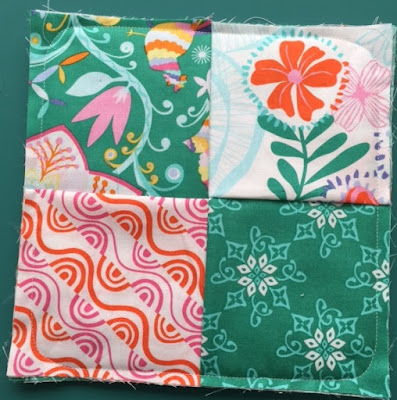
The back of the potholder

It isn't really necessary, but I secured the squares of fabric in the center of the potholder with a bit of embroidery floss tied in a knot. 

There you have it. To make other sizes, simply cut things smaller or larger. There's nothing quite like quick and easy gifts all ready to go. 


Friday, November 27, 2015

A Thanksgiving Day Birthday Cake

If you love chocolate and if you love cake, I have the link to a perfect recipe for you.

Every Thanksgiving Day, after turkey and all the fixings have had time to settle, I bring out dessert. I don't serve pumpkin pie or any other kind of pie. For us it's a chocolate birthday cake and a celebration of the three family birthdays that fall within a few days of Thanksgiving.

The cake is always our favorite chocolate truffle cake - the downright decadent, drown yourself in chocolate heaven, once a year only cake that we share on Thanksgiving. It's become our own family tradition.

The recipe is from "Good Housekeeping Illustrated Book of Desserts". I bought it years ago, but now the entire book is now available online. This is the link:
 https://books.google.com/books?id=4kGDCeDcxaoC&pg=PA94&dq=good+housekeeping+chocolate+truffle+cake&hl=en&sa=X&ved=0ahUKEwjW6t_97KzJAhXMRyYKHaseC8EQ6AEIOzAB#v=onepage&q=good%20housekeeping%20chocolate%20truffle%20cake&f=false


I always bake the cake well ahead of time.
It will keep for a two or three days in the fridge, and it freezes well. 

I need to get back to my fleece! 
There's work to do!!


Only 28 days till Christmas!


Wishing you a beautiful week as December comes marching in!!

Saturday, November 21, 2015

Thanksgiving Already! Projects and a few "Bits and Pieces"

Thanksgiving is arriving in less than a week! 

We will be a small group this year so preparations are easy. The bird is thawing in the fridge and ingredients for everything are purchased. I'll be baking a lovely chocolate birthday cake instead of pumpkin pie. My son and both of my grandchildren have late November birthdays, so we always combine the birthday party with Thanksgiving. 

Thanksgiving is definitely under control, but I really wound up on the verge of panic over Christmas projects this week. I've taken on way too many sewing projects, but that's pretty typical for me.

Everything seems to be under control now, thank goodness - at least for the moment. Anything could happen, though, so my fingers are tightly crossed.  

All those robes!

I love my serger.  I don't use it very often, but when I need it I really need it. When the serger went on the fritz just as I was getting ready to sew the second of many Christmas robes, I was beside myself. The blade was cutting the fabric too closely and loose loops of thread were hanging off the edge of the seam allowance. Not only that, but the fabric was stretching as I stitched. I don't have time to take my machine it in to be serviced. I was sure I'd have to forget the robes for this Christmas, and I had no idea where I might store 20 yards of fleece for a year.

I tossed and turned and lost most of a night's sleep over my predicament. What on earth could I do instead of robes? The next morning I got out the instruction manual in hopes of a minor miracle. I should have done that in the first place, but I had panicked instead of thinking. Every single setting was off! The serger had been moved here and there while new blinds were being installed in my sewing room and the dials must all have been bumped. When in doubt, check the obvious!!

I'm back in business. Two of the goodness-knows-how-many fleece robes are ready to package up and number three is cut out and ready for me. I'll quit sewing these when I run out of time or when I run out of fleece, whichever comes first.

I love my new window blinds
Bits and Pieces 

I finished up the last three of the mug rugs for my daughter's office buddies a week or so ago.
This was such a fun challenge and the mug rugs are perfect holiday gifts for a great group of friends.

My daughter and I brainstormed ideas as we tried to come up with a unique set of bits and pieces to place on individual mug rugs. The first three mug rugs were pretty generic with basic hearts and flowers in favorite colors schemes. The flowers weren't going to be fitting for the rest of the crew, though. Interests are so varied. In the photos you'll find the ones for the man with three-year-old triplet boys, the one who loves fine food, the cat and dog owners, the musician, and even the gal who likes to play the slot machines.


Way last spring I promised to make a pattern when I had the new templates, and this week I wrote the pattern. It's all ready to download. The templates for the little shapes are free, and any letters can be used for the names. The letters I've used are from  my "Alphabet Soup" pattern.
http://www.craftsy.com/pattern/quilting/home-decor/alphabet-soup-/127129

Templates include itty bitty bicycles, wine and hamburger, music, slot machine, and pet prints.


Wishing all of you a wonderful Thanksgiving! 


May your turkey be juicy and may you be surrounded by those you love.