Friday, April 3, 2015

The Offer That Wasn't

One of my friends posted this on facebook the other day. She headed it, "That moment when you know you're doing the right thing.."


I am so blessed to have found exactly the right career - twice!

I began teaching in 1965 and I retired in 2007.  I didn't rationally and intentionally choose to be a teacher. When I started college, teaching, right along with nursing and secretarial work, was on my list of "women's" jobs that I absolutely refused to consider. Then, in my second year of college, teaching found me. It really was like a calling that I couldn't avoid following. I wouldn't trade those years of working with children for a different career anymore than I would trade my own children for those of someone else.

Then came retirement. For the first year or two I just played around with my quilting and my sewing. Then Craftsy came along and I signed up. Little could I have imagined at the time that this website would lead me on to a new and totally unplanned career. I had always designed my own patterns and drawing had been a favorite hobby from the time I was old enough to hold a pencil. It was a perfect match, a hobby that I love and a small business that comes in very handy in these retirement years. 

And that leads me to the offer that turned out not be. 

The Offer 

Back in early January I received an interesting offer. At least it seemed interesting at first glance.

I had an email from a buyer for a very well known quilt catalog. She had seen my patterns on Craftsy and thought they might sell well through this company with it's international sales and millions of customers worldwide. She enclosed a PDF of frequently asked questions and offered to send me a contract should I be interested.

She didn't have to tell me that this is a big company. I knew that. I've been getting their quilting email for years.

It all sounded rather intriguing and I thought about the advantages. 1. I might pick up lots of sales this way and expand my customer base. 2. Customers who chose not to join Craftsy wouldn't have to become members in order to purchase my designs. 3. Those who don't use PayPal could pay another way.

I was curious, but not convinced that this would be a good idea, so I read the FAQ page. I was surprised to see that they wanted to take a 70% commission on the sale price of any patterns they sold. On second reading, it appeared that there might be room for negotiation. I had other reservations, but I responded anyway.

I sent a pattern to the buyer and explained that she might want to look it over before making an offer. My patterns are a bit different from most in that all of the templates are all drawn by hand. I don't know how to use a computer drawing program, I've not needed to learn this yet, and not a single customer has ever complained, so I'm happy. Her company might feel that this takes away from the "professional" look of the pattern, but I'm not interested in redoing templates or changing anything else about the patterns, for that matter.

Next, I told her that I'm an old grandmother, so I've no intention of trying to build an thriving business.  I'm just playing and having fun with my retirement hobby. I enjoy making these patterns at my leisure.  If my patterns pay for my materials and a give me a bit of extra spending money I'm happy.

Then I explained the most important aspect of my little business, the part that means more to me than any amount of money I can earn. By selling through Craftsy, I am able to communicate directly with my customers. I am easily accessible, always available to answer questions, able to guide beginners to the information they need, and excited to share in the joy of their successes. I know many of them by name, and we have a relationship that goes well beyond that of customer and seller.

I would never, ever give up these close relationships. I'm a retired school teacher, for goodness sake. I like people. I like being helpful. I get goose bumps when a customer learns something new or turns my pattern into something special. I thrill over photos of projects that are sent to me - even if the patterns used come from a different source.

I wrote that she could contact me if she wanted to discuss selling my patterns in more detail. Needless to say, there's been no response.

That's fine by me.

My patterns don't have to look "professional".  They may look amateur, but that's because they're made by an amateur.

On any given day, I can choose when I work, what I work on, how I go about my designing, and whether I work at all.

If I really wanted more customers, I could sell on Etsy, too, but I'm quite content with only one set of procedures for posting patterns.

I love spending my retirement doing something that gives me an enormous feeling of accomplishment and a heartwarming connection to others.

What I'm doing now is exactly the "right thing" for me!

Now, let's all go sew stuff! 

The frog pattern will be out in just a few more days!!


Wednesday, April 1, 2015

A Finished Wall Hanging!!

Yes! Yes! Yes!

The last block is completed, the last stitch has been sewn, templates have been drawn, and the pattern has been written! The 2015 Summer Garden quilt along is altogether finished, and it's done way ahead of schedule! This feels so good!


I must have taken 20 photographs, but this was my favorite. 

I've included the fabric requirement and instructions for assembling the quilt in this last block pattern. It's done very simply with 1" sashing and a border of the same size. 

The creation of a trellis block came as a complete and total surprise to me, but it was a very welcome surprise. It completes the quilt and it is unique. I've searched the web, but nowhere have I found another trellis block on a quilt. I'm sure that others exist out there, but I wasn't able to locate one. I do detest creating something and finding that it looks very similar to another designers quilt. 


Originally I had planned to use primary colors to make this quilt. Red, blue, yellow with a bit of green sounded happy. Somehow, though, that didn't happen. Without intending to at all, I slipped back into my comfortable pastels. The wheelbarrow and trellis blocks with shades of pink and purple changed everything, so I had to remake two of the small blocks. The dark blue butterfly was exchanged for a brighter, paler blue, and a red heart was replaced with one in yellow and pink. 

But, I know that I like this much, much more than I would have liked the original color scheme. Best of all, my hubby enjoys looking at it. "Beautiful," he says. I'm such a happy camper today.

I may make a combined pattern for all of the blocks eventually, but for now the patterns for separate blocks will have to do. With all of the full size templates and layout plans the combined pattern would have so many pages! The main advantage to this is that people can purchase and download one pattern at a time as they are ready to work on each new block. For me it's a time issue more than anything. I have so many projects in the works right now, and that's a really wonderful thing!

Hope your weekend is filled with glorious sunshine, both in the sky and in your heart! 


Happy Stitching!!


Saturday, March 28, 2015

A Photo from a New Quilter and a Glimpse into my Week

It's been a crazy, busy week, but before I say any more about that I want you to take a look at this photo from Jane.


Jane made this little table runner from my "Spring Table Runner" pattern. It was her first experience with fusible web applique and her first try at free motion quilting. Isn't this lovely for spring? I love the matching bunnies for Easter, too. As she worked on this, Jane asked lots of questions. It was so delightful to visit with her and cheer her on from the sidelines of cyberspace. 

Unfortunately, there is very little to actually show you about my own week. The big accomplishment was finishing up the sewing on the garden quilt. It's totally, absolutely, completely finished - fmq, binding, everything - done!

I do worry when these quilt alongs are in the process of being designed as I go and shared with you before I know what the finished product will look like. What if things go wrong late in the process? What it people who've already bought blocks are disappointed? What if? 

Now it's finished and I'm so relieved that I really do like it! Truly! It's one of my very favorites and, best of all, my husband has declared it a work of art. He's a little biased, I admit, but his opinion still counts for a lot with me.

Now I'm working on writing up the pattern for this last block and the instructions for assembling the quilt.


This morning I worked on the layout sketch. I'll make the page of templates next, and then I need to write the pattern up. That will take a week or two because I'm working on other things as well.

I've been asked to put all of the blocks in one pattern as an alternative for those who want buy the entire quilt at once. The option to purchase it block by block would still remain. Next week I'll be looking into how and if I can make the big pattern happen. There are so many pages of templates and layouts! The total price would be the same, $10 total, so those who have some of the blocks and want the rest won't be affected.

This is what the wall hanging looked like prior to quilting. The photo of the finished quilt will come out when the pattern has been completed and is available on Craftsy.


What else? 


I'm designing a frog mug rug. It's very much in the sketching stage as yet, but once I get the design figured out, it will go quickly. I hope to publish this pattern next week. Fingers crossed.


Wishing you a fabulous spring weekend and a gorgeous, happy week ahead. 


Saturday, March 21, 2015

Quilting Patterns to Help You Spruce Up for Spring

Birds are everywhere, bits of green are beginning to show here and there in treetops, and small green shoots are pushing up from the bare, brown earth. Spring is just beginning to smile down on my little corner of the world. I'm ready to banish the dark, warm tones of winter and brighten my home with the cheerful colors and symbols of the new season.

I've been going through my patterns and projects and pulled some of the best spring ideas for you to peruse.

April
Easter is coming up quickly, and with sunshine and rain the first flowers will prepare to bloom. You might want to try one of these mug rugs for April.


April House

Bluebird

Lily

Spring Tulips

April Showers

QA 2015 Bunny and Basket

May
Mother's Day is the big holiday in May, but the month is also known for its abundance of flowers. I'll start with Mother's Day.

Baskets for Mom


Mom

May Mischief

If you want something larger, this table runner and pair of mug rugs may be just the thing.
Spring Table Runner

I already have the table runner on display and several of the mug rugs are scattered around on my table tops. When I finish the 2015 "Summer Garden" wall hanging, it will be the first thing to go on my wall.

I Love Spring!!
Hope you have a good one!


Friday, March 20, 2015

Choosing Applique Thread, and Switching Fabric Colors

Choosing Thread


I've had much more experience with machine applique in the past two years than I had during all the previous years of quilting.  I no longer grab the nearest thread of the right color, but I've learned to choose from a variety of thread types to attach applique pieces. The thread choice depends on the effect I want to create.

If I want the edges of the applique to blend in or disappear, I will use a matching 60 weight polyester thread. This thread is so fine that it becomes nearly unnoticeable.


Here it is on my Spring Table Runner. With any zigzag stitch, this thread will come closest to looking like hand applique.

If I want the applique to have the old fashioned appearance of a blanket stitch made by hand, I'll opt for black in a 50 weight cotton thread.


This is how it looks on the Elephant Walk bib and in this mug rug from Alphabet Soup.


Lately, I've been using a 40 weight rayon thread more and more. Sometimes I want the stitching in matching thread to stand out and be noticed. This heavier weight thread with it's lovely, silky shimmer does the trick.


This is a section of the trellis block I'm working on for this year's quilt along.  To make the trellis recede into the background, I stitched that piece with 50 weight cotton in an exact color match to the fabric. In contrast, the thicker rayon in the flowers and leaves gives texture and dimension to them making them pop out from the background trellis.  

Color Switches

When I made the wheelbarrow for the 2015 Garden quilt along I found myself using pink and purple fabrics. It totally changed the appearance of the whole quilt.  As you can see in the closeup photo of the trellis block above, I've added another large block in pink and purple. Now a couple of the first pair of blocks seem to clash. I think I will likely need to remake one butterfly and one heart so the colors are better balanced.

That's what happens when I design as I go, and it's the way I usually work. I'm very often surprised by my finished project, but for me, that's one of the most exciting elements in designing. I love discovering something lovely that was completely unexpected. It does call for a redo of some parts now and then, but if it makes a positive difference in the outcome, I don't mind reworking things at all.


The color clash is much more evident in real life than it is in the photo. Can you see which two blocks may need to be remade?

I'm determined to finish this little quilt completely before I start something new or work on any of the other projects in progress.  I have way too many irons in the fire right now, and that can be stressful. I'm retired! I can set my own goal and deadlines. And, who could possible want to create more stress in their life?


Today is the first day of spring!!


Wishing you a 
VeryHappy Spring!
(in purple, of course)


Friday, March 13, 2015

Forsaken Goals

There are weeks when I look at my goals and ask, "What happened?". This was one of those weeks.

I made no new name quilts for my daughter's office buddies. No cute little house blocks have been added to the pile. I spent money on fabric, too.

I could beat my head agains the wall, or I could remind myself that goals are just that. Something one would strive to achieve, but they aren't self made laws that must not be broken. Plus, there is no one demanding that I put in a certain number of hours a week before I can get a paycheck. I do this all for fun. It's a hobby, not a job.

I did accomplish some things, so all is not lost. I made the April quilt along blocks and the Easter mug rug, wrote up the pattern and posted it so everyone who wanted to would have time to make something for Easter. That was totally unplanned and spontaneous, brought on by a sudden flash of an idea, and it used up several days of my week.

I've also put some time into developing a pattern for that fat quarter quilt. There have been enough requests for it on Craftsy that I decided to go ahead and make the pattern. This kind of pattern takes a lot of time to write, and of course, that means stitching up another one in different fabrics. That explains the fabric purchase. I happened upon this fat quarter set, "Wildflower Meadow" by Riley Blake, and I couldn't resist these cheerful colors and cute little critters. I also got enough of the dark blue for the sashings and back of the new quilt. The switch from white to dark blue should give the quilt a totally different look. Then folks will have choices. I may add another row of blocks at the bottom as well to make it large enough for a lap quilt.


Then, this morning I hung a new thread rack and organized my thread. I had totally run out of space for all of my thread. I have old thread, new thread, double spools of the same thread, and threads of different weights and fiber content. Now I have a bit of breathing room.


So, all in all, it wasn't such a non productive week.

And now I'm going for a walk in this glorious, unprecedented summer weather. We Nebraskans are all in shock at the temperatures in the seventies and the brilliant sunshine. We also know that this is not to be trusted. I can't recall a year when we didn't have a snowfall in March or early April. Summer is just playing with us. Winter will return.

I hope your weather is fabulous, too! Have a lovely weekend.


Thursday, March 12, 2015

Early Quilt Along Block for April

Whew! It's done!!

I've been hurrying to get Blocks 6 and 7 for the 2015 quilt along finished up and published this week. If you recall, there are two little 5"x5" blocks that fit above the wheelbarrow in this little quilt. I'd originally planned to put a watering can in one of them, but I had no idea what might fit in the other.

Then I looked out of my window a few days ago. A brazen bunny was looking in at me! What am I? An exhibit for the entertainment of cute lagomorphs? (Not rodents. I had to look it up to be sure.)

Well, that was it. My garden has no shortage of bunnies. There are bunnies hopping through my yard in any of the four seasons. In fact, I finally gave up on planting strawberries because I couldn't keep the bunnies out of them. Between the bunnies and the birds there were never any berries left for the people.

Well, then, that finalized the choice for the second of the pair of blocks. Strawberries! There are two watering cans in last year's quilt along, so I've already done that. I put my strawberries into a basket. I like baskets filled with yummies, don't you?


So this is where the 2015 quilt is now.


And then, it connected. Bunnies, baskets ... Easter on the way ...

That explains the rush to get this pattern out early. Someone may want to sew up something cute for Easter. Like a mug rug.

So there are two baskets. Mix and match at will. Make a mug rug, make the blocks, make both.


I have to admit it. I adore these new bunnies!!

Do I have a new favorite block this time around, too.
You bet! Move over wheelbarrow. It's all about bunnies and baskets today!


Happy stitching!!


Friday, March 6, 2015

The Bag Lady Week

This week I was the bag lady - as in stitching up bags. I finished the two totes for my granddaughter to take with her to California. That was all I accomplished in sewing this week. I had hoped to do more, but each bag took two full days to design and sew, and daily "stuff" ate up the rest of my time. There are weeks like that.

My daughter and I have joined together to send gifts for all of the relatives who will be hosting this 18-year-old who's never been on an airplane and never traveled far from Nebraska. I've made totes for the ladies, my daughter has crocheted darling little outfits for the little girls, aged one and two and a half. The guys, my nephew and the 12-year-old get Nebraska Husker gear.

Here's the tote for my sister-in-law.

And the one for her daughter-in-law.  Could I call her my niece-in-law? That would be so much easier than anything else I can think of. 


Both bags are made from medium weight upholstery fabric to give them endurance. I used Stiff Stuff for the interfacings. It's a good weight that adds body to the bags and helps them retain their shape. The black bag looks larger than the gray one, but aside from the scoop taken out of the front on the black, they are identical in size. The ties on the gray bag pull the sides in and make the bag look narrower.

Once again, I had fun with the details.

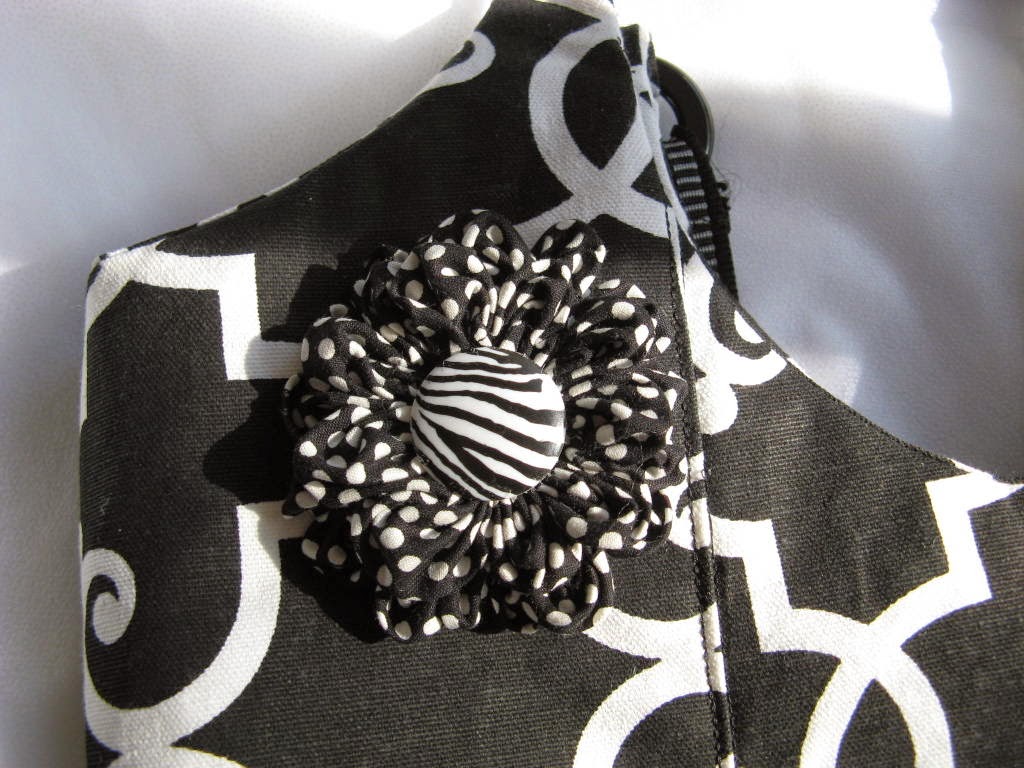
First off, I learned how to make a ruched flower from a tutorial on Pinterest. I LOVE Pinterest! It took me two tries to figure it out, but in the end it turned out just fine. I just happened to have the button lying in my button box. Wasn't that a lucky find?


The top-stitched straps and the side ties on the gray give it a tailored look. Matching up the pattern of the pocket and the body of the bag also help with the tailored appearance.


I inserted my favorite lining in both bags. A zipper on one side, pleated pockets on the other side. 

In this photo you can see how deep the side folds are. They bag can be widened easily by loosening the ties. 

The pattern for the black tote was an absolute nightmare to design and get right. It has those angled side panels that didn't want to fit well on the scooped front. I won't show you that pattern, but the pattern for the gray is the simplest box design possible and the shape I used for most of my purses and totes.

This body shape is so versatile! With just a few little changes in pockets, closures, and details, dozens of totally different designs can be made. This one measures 15" wide at the base, 13" high and 5" deep. That's a good size for a tote, larger than I like my purses, but not gigantic. 

The straps are 1 1/4" wide, and the pocket and side ties are stitched into the straps. Sorry, I forgot to show the side ties in the sketch below. They are 1/2" wide and 15" long. I lined them up with the top of the pocket.The straps that are attached to the body of the bag are 1 3/4" longer than the bag itself to allow enough length to fold them under twice and sew them to the rectangular rings.


Next week I need to get back on track with finishing up the name mug rugs for my daughter's office mates and working out the next pair of blocks for the garden quilt-along.

The sun is shining, temperatures are climbing, and the snow has all melted!!
I hope the days are beautiful, wherever you are. 

Have a beautiful week, everyone!


Friday, February 27, 2015

Tying Up Some Loose Ends

I love completing my projects! Not the actual work, mind you.  Planning something new is much more exciting that finishing it. It's the having it done that's so wonderful. No more nagging little thoughts to keep me awake at night, just that feeling of accomplishment and relief that the work is done and done as nicely as I know how.

Finished this week:

1. One fat quarter quilt! 
I was worried about this little quilt early on, but now that it's finished it looks great on our glass table. A quilt provides important protection for the glass and adds color to the room, too. A double win for us.

The quilt on our table.
Here it is in natural light.
Draped (sort of) on a chair.

My hubby is encouraging me to make a pattern for this design. Should I, though? Would anyone want to spend $5 for this? I'd have to make another one - minus the mistakes this time. I'd also want to use totally different fabrics - something fun and bright. That's a lot of work. Do I want another quilt in the same pattern? In the right fabrics it would definitely make a sweet quilt for a child. With additional blocks and a border going around and it could be a bed quilt. Right now I'm just thinking out loud on my computer screen (if that makes sense)  and wondering if a pattern is worth the effort.


2. The bottom section of one apron pattern.
If you missed it, the process for making bodice and neck section was described in last week's blog.
http://klee2strings.blogspot.com/2015/02/detour-starting-vintage-apron-pattern.html

Except for the pockets and waist ties, the entire vintage style apron pattern is complete.  I'll make those last pieces when I'm ready to use them. I won't have time to make the apron quite yet, but it's nice to have the pattern ready when I do have a chance to sew it up.

Step 1. Sketch the pattern and take measurements. I sketched the whole pattern, but since the bodice pattern is finished,  these measurements are only for the skirt section.


A: One half the width of the bottom of the bodice section.
B: One half the width of the skirt. I like some coverage around my hips, so I measured this generously.
C: The total length of the skirt from the bodice to the bottom of the hem. 
D: The distance from the bodice to the waist.
E: The length from the waist to the bottom of the hem. 

Step 2. Draw two rectangles on tissue paper. You may have to tape two pieces of tissue paper together. 
The small, upper rectangle will hold the section from the bodice to the waist. 
The larger, lower rectangle will hold the section from the waist to the bottom of the hem. 

Here you can see the upper box clearly. The horizontal line in the middle of the photograph is the width of the pattern.
Step 3. Shape the underarm. Another plastic pot liner was perfect for doing this. I'd never have guessed that those pot liners would come in so handy!


Step 4. Draw the final pattern with a dark marker, using dashed lines to show the fold line. Be sure to add in seam allowances and the hem allowance. I added 2 1/2" for the hem because I like the nice way a wider hem lies.


Done!!

What's next? Tote bags!

My granddaughter is going to California in ten days. She'll be visiting my sister-in-law and her son and his family for a couple of weeks. This will be her first trip on an airplane and her first visit to California. We have one very excited teenager! My daughter has crocheted some cute items for the children, and I'm sending a couple of totes for the hostesses. I haven't a clue what to do for my nephew except sending my love. He is such a sweetheart, but masculine gifts are so hard to make! I'll post pictures of the totes when all is done.


Wednesday, February 25, 2015

Fifth Block for Quilt Along 2015

Photo Gallery for Quilt Along 2015

 Hannah sent in photos of her first two blocks for this quilt along, so a gallery of photos has been started. I would love to be able to share everyone's work, so if you are taking part in this quilt along, please send your photos to me via email or on my Facebook page.

klee2strings@gmail.com
www.facebook.com/KLee2Strings

To see the gallery, visit this page, "Quilt Along 2015 Gallery of Photos", found at the top of my blog.  http://klee2strings.blogspot.com/p/quilt-along-2015-gallery.html

Th block for March: "Wheelbarrow"

I thought February's pair of blocks in this little wall hanging were my absolute favorite, and I still think the birds and the spade with those adorable, tiny garden gloves are pretty special.

But that was last month's choice.

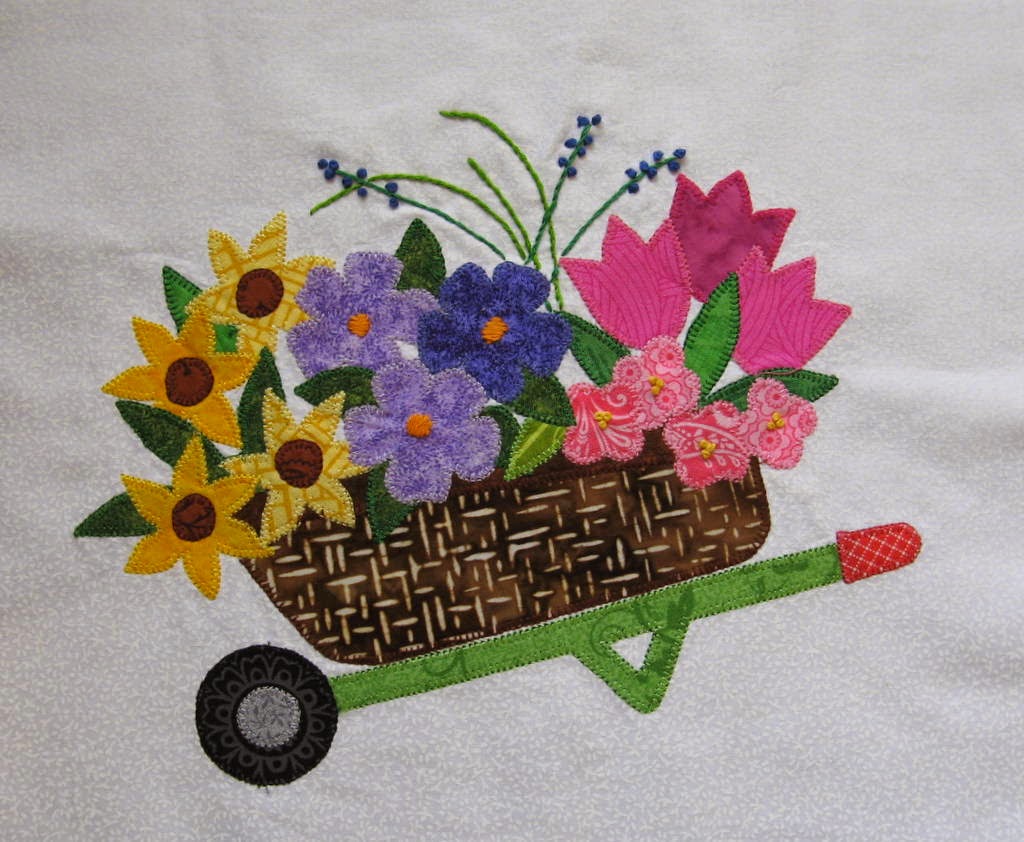
March's wheelbarrow overflowing with blossoms has now taken the lead. Is it just because it's the newest one? Maybe, but maybe not. I suppose I'll have to wait and see how I feel in April.


It's always the detail that captivates me. When I see something that really catches my eye, I like to get close up so I can examine those little things that make it stand out from the rest.  These little add ons, while not absolutely necessary, can make the difference between something looking ordinary and something that really looks finished. Besides, I do love adding in tiny little details. They always make me smile.

This time I pulled out my embroidery floss and added a few simple stems, three little bits of orange satin stitch, and a bunch of French knots. I didn't do anything complicated with the embroidery. I worked only with the simplest, most basic of stitches, probably the first three stitches I learned.


I'm not an expert on embroidery, but I find this particular type of handwork very relaxing and enjoyable.

I'm planning the pair of 5" x 5" blocks for April, now.  I think one will be a watering can, but nothing is completely decided until it's done. I'm still debating the other one, and I'm playing around with three ideas that I like.

This is where the quilt stands now. I'm pleased with the progress so far. I hope you like it, too.


Happy Stitching!!