Showing posts sorted by date for query home for christmas. Sort by relevance Show all posts

Saturday, December 26, 2015

Fuzzy Comforts and Christmas Spaghetti with a Secret Ingredient

It's the day after Christmas and all is quiet in our house, exactly the opposite from yesterday's wonderful hustle and bustle, laughter and cookie snitching. The family began arriving around 9:30 in the morning and stayed for the entire day. We started with breakfast and ended with our famous Christmas spaghetti dinner. (The recipe is below.) We were too full of cookies and good food to have any interest in dessert. I am truly blessed.

We are in no danger of being cold this winter. My son dressed us all in matching fleece jackets, and I handed out five warm fleecy robes. Yes, they were finished, and with time to spare!


There is nothing that needs doing today. Such a luxury! I've spent the whole day lounging in my chair reading the latest Inspector Gamache novel by Louise Penny, and I have no intention of doing anything more energetic than that.

Christmas Spaghetti Sauce With Meatballs 
(and a secret ingredient)


I was so busy enjoying my family that I forgot to take photos of our dinner table. The spaghetti was served with fettuccini and accompanied by lots of fresh veggies and warm garlic bread.

This is a large recipe. There were seven of us, and I made a full crockpot of sauce so that there would be plenty left to send home with everyone.

Once again, the measurements for ingredients are close estimates, but not exact. I don't usually measure at all, but I let my taste guide the proportions. I made the sauce the day before Christmas, then reheated it and added the secret ingredient on Christmas day.

Meatballs
I don't add herbs or spices to the meatballs because they absorb their flavor from the sauce as it simmers.
  • 3 pounds ground beef
  • 2 medium onions
  • salt and pepper to taste

  1. Chop the onions in a food processor or grate them.
  2. Thoroughly mix all ingredients together. 
  3. Shape into balls. I made the meatballs about 2 inches in diameter, but smaller is fine.
  4. Brown the meatballs. 
  5. Refrigerate until needed.
Sauce
  • 1 tablespoon olive oil
  • 2 medium onions, chopped
  • 6 - 8 cloves garlic, finely diced
  • 1 bunch (about 1 cup)  of fresh parsley, chopped fine, or 2 tablespoons dried
  • 1/2 cup fresh chopped basil leaves or 2 teaspoons dried
  • 3 bay leaves
  • 3/4 teaspoon dried oregano
  • 1/2 sweet green pepper, diced
  • 1/2 sweet red pepper, diced
  • 3 or 4 baby carrots, grated
  • 4 cups cooked, chopped tomatoes (I used tomatoes that I had prepared and frozen during the summer, but canned is fine.)
  • 2 small cans of tomato sauce (8 oz)
  • salt and pepper
  • 1 can condensed cream of mushroom soup (This will add flavor and thicken the sauce at the same time.)
  • 3 or 4 cups of water 
  • salt and pepper to taste
The Secret Ingredient
  • 1 - 3 oz. Bristol Cream Sherry (Another high quality cream sherry would do, but don't use cooking sherry or dry sherry.)  
1. In a heavy skillet, fry the onions in the olive oil until they are golden brown.
2. Add the garlic, parsley, and basil to the pan. Continue frying on medium low heat until the herbs are wilted.


 3. Add the peppers grated carrots. Fry for another minute or two. 


4. Pour the contents of the pan into a crockpot. Add the tomatoes, tomato sauce, mushroom soup, salt and pepper. Stir until blended.

5. Add enough water to give the sauce a nice consistency - not too thick, but not watery.
6. Place the meatballs in the pot. Cover and cook on low for 6 hours or more. This can simmer all day if you like.
7. About ten minutes before serving pour an ounce or two of the cream sherry into the sauce. Stir and taste. More sherry can be added if you like, but be careful not to overwhelm the the other flavors with the sherry. The sherry should sweeten the sauce a bit with a unique, but subtle fragrance and flavor.

Enjoy!


Now, to get back to my book. I love this series!!


Saturday, November 21, 2015

Thanksgiving Already! Projects and a few "Bits and Pieces"

Thanksgiving is arriving in less than a week! 

We will be a small group this year so preparations are easy. The bird is thawing in the fridge and ingredients for everything are purchased. I'll be baking a lovely chocolate birthday cake instead of pumpkin pie. My son and both of my grandchildren have late November birthdays, so we always combine the birthday party with Thanksgiving. 

Thanksgiving is definitely under control, but I really wound up on the verge of panic over Christmas projects this week. I've taken on way too many sewing projects, but that's pretty typical for me.

Everything seems to be under control now, thank goodness - at least for the moment. Anything could happen, though, so my fingers are tightly crossed.  

All those robes!

I love my serger.  I don't use it very often, but when I need it I really need it. When the serger went on the fritz just as I was getting ready to sew the second of many Christmas robes, I was beside myself. The blade was cutting the fabric too closely and loose loops of thread were hanging off the edge of the seam allowance. Not only that, but the fabric was stretching as I stitched. I don't have time to take my machine it in to be serviced. I was sure I'd have to forget the robes for this Christmas, and I had no idea where I might store 20 yards of fleece for a year.

I tossed and turned and lost most of a night's sleep over my predicament. What on earth could I do instead of robes? The next morning I got out the instruction manual in hopes of a minor miracle. I should have done that in the first place, but I had panicked instead of thinking. Every single setting was off! The serger had been moved here and there while new blinds were being installed in my sewing room and the dials must all have been bumped. When in doubt, check the obvious!!

I'm back in business. Two of the goodness-knows-how-many fleece robes are ready to package up and number three is cut out and ready for me. I'll quit sewing these when I run out of time or when I run out of fleece, whichever comes first.

I love my new window blinds
Bits and Pieces 

I finished up the last three of the mug rugs for my daughter's office buddies a week or so ago.
This was such a fun challenge and the mug rugs are perfect holiday gifts for a great group of friends.

My daughter and I brainstormed ideas as we tried to come up with a unique set of bits and pieces to place on individual mug rugs. The first three mug rugs were pretty generic with basic hearts and flowers in favorite colors schemes. The flowers weren't going to be fitting for the rest of the crew, though. Interests are so varied. In the photos you'll find the ones for the man with three-year-old triplet boys, the one who loves fine food, the cat and dog owners, the musician, and even the gal who likes to play the slot machines.


Way last spring I promised to make a pattern when I had the new templates, and this week I wrote the pattern. It's all ready to download. The templates for the little shapes are free, and any letters can be used for the names. The letters I've used are from  my "Alphabet Soup" pattern.
http://www.craftsy.com/pattern/quilting/home-decor/alphabet-soup-/127129

Templates include itty bitty bicycles, wine and hamburger, music, slot machine, and pet prints.


Wishing all of you a wonderful Thanksgiving! 


May your turkey be juicy and may you be surrounded by those you love.


Wednesday, October 14, 2015

A Pair of Projects With Candles

The warm light of glowing candles creates feelings of home, comfort, and love. I'm sure that's why candles are symbolic of both Christmas and romantic love. I find myself particularly drawn to them as the holiday season approaches. I had planned to make a candle mug rug this year, but the table runner absolutely insisted on getting itself made at the same time. I'm so glad it did. I had the perfect batiks for the table runner in my stash, and this pair of patterns turned out to be among my all time favorites.

"Candle" mug rug.

"Candlelight" table runner.
I loved using white for candles, but the darker background fabrics were showing through on both projects. The easiest solution was to line each candle with a layer of lightweight muslin. I used fusible web between the muslin and the main white fabric to hold the two together. Then I added another layer of fusible web to the back of the muslin. It does make for a stiffer piece, so I wouldn't want to double the layers like this on a lap quilt or a bed quilt.


Quilting doesn't show up very much on the the background fabric in the table runner, so I had a perfect opportunity to practice some FMQ. Feathers and swirls went smoothly, but pebbles are beyond me! No matter how many pebbles I stitch or what size I make them, they come out disconnected and less than round. I'll keep plugging away though. I love beautifully stitched pebbles, and I've never been able to resist a challenge.


I think the candles may be my last Christmas patterns for the year. There are loads of other patterns begging to be made, but even those will wait a week or so.

Next week I'll be cooking and doing some essential fall housecleaning. A person can only squeeze so many hours from a day.

Wishing you a beautiful weekend!

And, Happy Stitching!


Friday, July 17, 2015

Christmas in July 2015

It's the middle of July, the weather is hot and sultry, but Christmas fabrics are filling the shelves in all of the fabric stores. Those fabrics are flying off the shelves faster than they are coming in, too!

My favorite winter holiday is five months in the future, but sewing panic is already beginning to set in. Will I be ready? How many projects do I really need to make this year? What do I need for gifts? How shall I decorate? What on earth can I sew that's at least a little bit different from everything else I've done?

I'm working on new ideas for patterns that will come out later, but some of you may want to get started now. A number of my projects are new since this time last year, and I hope one of these might help you with your holiday quilting plans.

Mug Rugs: 

For easy gifts or handy table decorations, nothing beats mug rugs. They are small enough that they don't take very long to stitch, and your scrap basket will likely already contain all the scraps you will need. They can also be popped into an envelope and mailed for special greeting cards.

If you are really pressed for time, "Mitten Weather" is a perfect choice. There's no need to spend long hours sewing or shopping for fabrics. This one whips together so quickly that you can make a bunch, one for everyone using favorite color combinations.

Find 'Mitten Weather" here:
http://www.craftsy.com/pattern/quilting/home-decor/mitten-weather-mug-rug/117179


"Wrapped and Ready" is one of my favorites. If you love Santa and his elves, this is a perfect project. This whimsical little elf resting after wrapping bunches of Christmas packages is sure to delight any child - or the child in any adult.

Get "Wrapped and Ready" here:
http://www.craftsy.com/pattern/quilting/home-decor/wrapped-and-ready-mug-rug/120846


I've blogged about the "Ice Skates" pattern twice in the past couple of weeks. This is the newest of my patterns and one of the most versatile. The pattern can be used to make a mug rug, a table topper or wall hanging, or even a pillow. Anyone who loves figure skating will appreciate this design.

Get "Ice Skates" here:
http://www.craftsy.com/pattern/quilting/home-decor/ice-skates-table-topper-or-mug-rug/154260

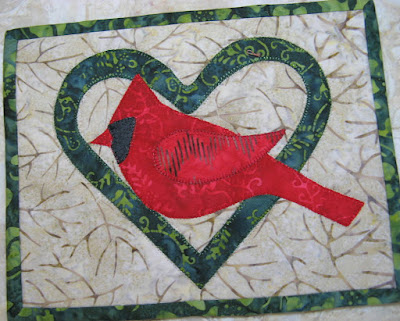
A couple of cardinal families live in the trees in my yard. They are so beautiful that I become mesmerized watching them. It's harder to see them when the trees are thick with leaves, but in the winter they stand out beautifully against the bare trees and the white snow.  A while back I made a pattern, "Four Seasons", to showcase my birds, and cardinals were on the mug rug symbolizing winter. This isn't a new pattern, but it is one of my favorites.

"Four Seasons" is found here:
http://www.craftsy.com/pattern/quilting/home-decor/four-seasons-mug-rug-set/68227


Table Toppers:

Table decor can have a huge impact on the overall look of a room. Table toppers are small enough, too, that they make wonderful gifts that will be appreciated for years to come. 

This square table topper is entirely pieced and contains no applique.  "Shining Star" is easy for a beginner to piece, and since it would look fabulous in any number of color combinations, it doesn't have to be made specifically for a holiday. 

Find "Shining Star" here:
http://www.craftsy.com/pattern/quilting/home-decor/shining-star-table-topper/119907


"Holiday Tabletop Trio" is the most traditional of my table decor patterns. I can't imagine preparing for Christmas without decking my house with poinsettias. Last year, in fact, I didn't have much time at all for decorating, so I put up the tree and filled the house with poinsettia plants. Nothing else seemed necessary. I used this table runner and matching place mats, and everything came together as a theme.  The pattern is actually three patterns in one: a table runner, place mats, and a small table topper.

"Holiday Tabletop Trio" can be found here:
http://www.craftsy.com/pattern/quilting/home-decor/holiday-tabletop-trio/123210


"Snow Family Holiday" is another pattern that works on a tabletop, but I hung it on a wall. There is something warm and wonderful about a family preparing for Christmas together, but a family of snow people is both magical and fun. 

"Snow Family Holiday" is available her:
 http://www.craftsy.com/pattern/quilting/home-decor/snow-family-holiday-wall-hanging/113625


Lap Quilt: 

If you want something to snuggle up under on and cold and snowy day, "Snowball Fight" is just the thing. It can be made either in cotton quilting fabric or in flannel for extra warmth. Mine is flannel, and it's so warm and cuddly. Traditional snowball blocks make the pieced center, and colorful, wooly mittens are strung around the border like Christmas lights.

"Snowball Fight" is found here:
http://www.craftsy.com/pattern/quilting/home-decor/snowball-fight-lap-quilt/10810


Wishing you wonderful early holiday sewing successes!


Thursday, June 4, 2015

July Table Topper Tutorial. Variation of Disappearing Nine-Patch


Fabric requirements, templates, and layouts for various sizes of quilts from this pattern can be found in this free patttern on my Craftsy pattern page. 
http://www.craftsy.com/pattern/quilting/home-decor/july-table-topper/148120

I'm all ready for July with this super quick 26" x 26" table topper. It was so much fun to whip up, and I absolutely love that bright red, white, and blue palette.

There aren't many designs as versatile as a disappearing nine-patch, but with just a bit of careful fabric placement this one begs for applique. I can see it in so many color schemes and absolutely any applique template can be used: autumn leaves, cat silhouettes, flowers, hearts, Christmas stocking ... anything at all that suits you.


Instructions:
Use 1/4" seam allowances throughout. 

Make four blocks.

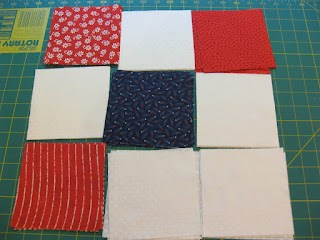
1. For each block, arrange three 5" x 5" red squares, four 5" x 5" white squares, and one 5" x 5" blue square as shown here. Sew into three rows of three. 


2. Measure 2 1/4" in from the seams of the center rows. Cut straight down the middle. Then straight across the middle horizontally, again measuring 2 1/4" from the seams of the center rows.


3.  Rearrange the four segments of the block as shown, and sew together. 


4. Arrange the blocks as shown below. Sew together.


In this photo the quilt shows a quarter turn clockwise. 


 Appliqued Stars

Make four large stars and five small stars.
Large stars are approximately 5" tall and the small stars are 3".

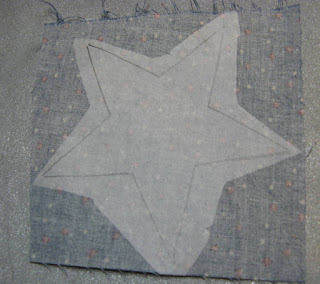
1. Trace the star templates onto the paper side of the fusible web. Cut around the template leaving about 1/4" margin. 

2. Place the fusible web onto the wrong side of the blue star fabric and iron onto the fabric according to the instructions for your fusible web.

3. Cut the applique out, remove the paper from the fusible web and arrange onto the quilt top. Press to fuse onto the fabric.


4. Stitch the applique to the quilt top by hand or with a machine zig-zag stitch. I used a machine blanket stitch.

Finish
Make a quilt sandwich of the quilt top, batting, and backing. Quilt as desired. Bind, and it's done.


Happy Stitching!


Thursday, January 8, 2015

Alphabet Soup for Quilting

I made a set of alphabet templates last summer, but it was only after Christmas that I found time to stitch them into some sample projects. The alphabet is sized to be just right for fitting a one or two word phrase on a mug rug, but there are other projects on which  a quilter might want to use lettering.

Letters are another a fabulous way to use scraps, and using scraps fits right into my goal of trying to buy less and use more of my fabric stash this year. I'm a happy camper today.


Just a few ideas for using lettering in quilting:

Mug rugs instead of cards: I've always liked the idea of using mug rugs as a replacement for those expensive commercial throw away cards with their canned messages. I wouldn't go through this much trouble for everyone, but I would definitely do so for special friends. It really helps that mug rugs come in many, many sizes. If the words don't fit the mug rug you can enlarge or shrink the mug rug to fit the words.

I love the flexibility of words, too. A person can be so creative in how they are used. Each project becomes something totally unique and original. Whatever you make won't look like someone else's project, and I really, truly like that aspect! It's the very reason I refuse to buy kits. I don't want to make anything that's absolutely identical to something another person has made.

What can you say in a mug rug card in only one or two words? This is only the tip of the iceberg.

  • Thank you
  • Welcome Home
  • Love
  • Best Friends
  • BFF
  • Get Well
  • Good Luck
  • Graduate
  • Wedding Bells
  • It's a Boy!
  • It's a Girl!
  • Congratulations
  • Way to Go!
  • Proud of You
  • I Miss You
  • Mom
  • Dad
  • Love My Sister
  • Keep Smiling


I began my samples with a keepsake thank you card to have on hand. Just in case. You never know when you might need to give a heartfelt "thank you" to someone near and dear. It needed a bit of something else to fill in and add balance, so I made templates for a couple of flowers and a heart to go along with the letters.


I was really pleased with this first mug rug! I was on a roll, so I made a couple of personalized mug rugs for the desks of my daughter's friends. They are so different from each other and I know her office buddies will be surprised and pleased. I'll have to make a lot more name mug rugs as time permits.


Look how different all of these projects are from one another. They use letters from the same alphabet and they contain the same flowers and heart shapes, but because of length of words, the way the letters fit on the mug rug, different fabrics, and little touches, each one of these is absolutely unique. 

On two mug rugs I used contrasting thread for outlining the letters, but I used matching thread on one. The flower in the thank you project has a contrasting center, but the centers of the flowers in the other mugs are made with spiral machine stitching.

The letters on one mug rug were made with charm square solids and they looked a bit plain. Judy is a short name, so I used only upper case letters to fill more space, but the larger letters gave me an opportunity to dress them up with embroidered running stitches. 


Ideas for using lettering are popping my head one after another! I'll need to make more little picture templates to fit some of these thoughts very soon. Flowers and hearts aren't right for everything or for everyone.

Signs! Anything can be labeled.

This is just a starter list.
  • My Sewing Room
  • Jacob's Room (substitute any name)
  • The Boss (That could be a cute mug rug, too.)
  • Do Not Disturb
  • Welcome
  •  Chores, or To Do (Great on a bulletin board.) 

Quilts.

There is no end to words you might add to quilts. You could personalize a baby quilt, put a title at the top or along the side of a quilt, or add a word or phrase in one of the blocks. If the letters are too small they can easily be enlarged to fit onto a bigger project. 

You needn't stop with my alphabet templates. There are many sets of letters of different styles to be found if you look for them. 

Happy Stitching!!


Saturday, October 11, 2014

The "Home" Quilt Along quilt top is done!

I am really excited about the way this little mystery wall hanging has turned out!  I do hope you like it as much as I do.

Thank you, everyone, for contributing your ideas as we designed and made this together!


This project was more than a bit scary for me!  I was as much in the dark about the finished product as the brave, faithful folks who bought the block patterns and stitched them up without knowing what the end result would be.

What if it turned out to be a disaster? What if everyone hated it?

What if... what if... what if ....


What ifs counted for more than one sleepless night. But now it's done!
Well, except for the finishing, but that will come later.

The Layout

The final layout that I settled on uses narrow (3/8") dark borders around the blocks to make them pop and wider soft green sashing to pull all of my colors together. Any two colors that bring out the best in your blocks will be wonderful.

I arranged and rearranged the blocks at least a dozen times. In the end, I balanced shapes, sizes, and colors in the best way I could. If you are making this, your block arrangement may be very different, and that is just fine! Who wants a quilt that's identical to everyone else's?

Then came the math. Oh my goodness!
All of those fractions!


Measure, measure, calculate, calculate.
Sew, write, check for errors - I thought I'd never get it right!
Thank goodness that part is done!

I've posted the layout pattern on Craftsy as a free pattern. If you like the layout, you could also use it with any other blocks of the sizes in this quilt. You might use some of my blocks and toss in some of your favorite blocks from here and there. Why not? We quilters are all creators of art, and art is definitely personal.

I said that the finishing will come later. I need to sandwich the top, batting, and backing, then quilt and bind. Sometimes waiting is a good thing! Do you see me smiling?

This quilt is pretty large for quilting on my little sewing machine, but I plan to get a new machine with a wider throat space within the next couple of months. Not a long arm or anything that fancy, but a machine with a 16" throat space so my quilts won't be quite so squished when I work on them. If all goes as planned, this will be my Christmas gift!

That's why I'm smiling!

When I have the new machine set up "Home" will be the very first quilting project.

Wishing all of you happy stitching and a very happy home!

And, please send me photos! I'll add them to the Quilt Along Photos page at the top of this blog. Can't wait to see what you do with this!


Thursday, December 26, 2013

"Come Into My Parlor"


"Will you walk into my parlour? said the Spider to the Fly,
'tis the prettiest little parlour that ever you did spy;
The way into my parlour is up a winding stair,
And I've many curious things to shew when you are there."

from "The Spider and the Fly" by Mary Howitt


My daughter likes spiders.
Honestly.
She really does like spiders!

When she was a little girl she was afraid of all kinds of flying and crawling "bugs", spiders included. I really tried to teach her that most of these critters were completely harmless, but after the experience of sitting on a bee when she climbed into a small tree, it was pretty much a lost cause.  It didn't help that she has a severe reaction to mosquito bites, as well.

Somehow, though, she could appreciate a spider as an artist. She was fascinated by the symmetry and beauty of delicately spun webs. She also liked the idea that spiders got rid of creepy, scary insects.


And then came the experience with wolf spiders. 
Scary looking creatures, aren't they?

Wolf spiders sometimes come indoor as weather turns cold. As autumn approached we noticed that our house had absolutely no insects anywhere - nothing. Not a fly, not a cricket, not even the little spiders that like to hide their webs in corners and on ceilings. Nice! 

And then we found the wolf spiders. A pair of them had found a home in our basement. They were calm, and pretty much harmless as long as you didn't try to pick one up, so we kept them as pets. They lived in our basement for over a year, rarely seen, but working hard for their keep. 

So, my daughter likes spiders. That's why I made this mug rug for her for Christmas. 


Oh, do come into my parlor!

Happy Stitching!!


Tuesday, December 24, 2013

Home For Christmas - Tutorial

It's Christmas Eve at my house and all is calm and peaceful. Christmas chores complete, no noisy children underfoot, only soft holiday music in the background, and no wet birds, thank goodness.

I pulled out this Christmas quilt a few days ago and settled it on my couch by the fireplace. Of all my quilts, this one may be my favorite.


I love the log cabin pattern and the fabrics, but most of all I love how it reminds me of my mother. It was made to remember her. She was so heartbroken after my father died and wanted only to join him. Less than two years later, on December 15, 2005, in a house beautifully decorated for the holidays, she passed away. Her prayers were answered and she had truly gone home for Christmas. That's how the quilt got it's name.

People often ask me what I did to make the flowers look like they are dancing around vines. I'm sharing the trick with you. You might consider it a Christmas gift.


The finished log cabin blocks are 9" squares. This quilt is rather long and narrow, 4 blocks wide and 6 blocks long. If I were to make it again I think I'd either make it 4 blocks by 5 blocks or 5 blocks square. There are 3 borders, 1/2", 1 1/2", and 2".

The finished dimensions are 44" x 62".

It's all about the fabric choices. It begins with a very large floral background on a light or white background. The petals have to stand out individually with lots of light colored spaces in between. Then, a green leaf print. Again, the leaves should be rather prominent, though the light background isn't required. The rest of the fabrics in the log cabin blocks should be light or rather neutral.

The fabrics I used.
Only this one block is used, throughout the quilt. The numbers on this diagram show the order in which the strips are added.

Cutting measurements for one block. Multiply the number of strips of each fabric you will need for one block by the number of blocks you choose to use.
Strip 1: 1 1/2" x 1 1/2"
Strip 2: 1 1/2" x 1 1/2"
Strip 3: 1 1/2" x 2 1/2"
Strip 4: 1 1/2" x 2 1/2"
Strip 5: 1 1/2" x 3 1/2" 
Strip 6: 1 1/2" x 3 1/2"
Strip 7: 1 1/2" x 4 1/2"
Strip 8: 1 1/2" x 4 1/2"
Strip 9: 1 1/2" x 5 1/2"
Strip 10: 1 1/2" x 5 1/2"
Strip 11: 1 1/2" x 6 1/2"
Strip 12: 1 1/2" x 6 1/2"
Strip 13: 1 1/2" x 7 1/2"
Strip 14 1 1/2" x 7 1/2"
Strip 15: 1 1/2" x 8 1/2"
Strip 16: 1 1/2" x 8 1/2"
Strip 17: 1 1/2" x 9 1/2"

This diagram shows how to assemble  the blocks. They are turned in only two directions for this quilt pattern. 


The finished layout of the blocks after being sewn together. The dancing petals don't show up in this diagram at all. The main reason is that I couldn't find a picture of poinsettia fabric that had leaves as large and a background as light as it needed to be.  The inner green computerized design is also too solid. It should have a very light background with little green showing at all - more like the fabric I actually used. 


This photo shows the borders. The red is 1/2" wide, the floral is 1 1/2" wide, and the green is 2" wide. 


Merry Christmas from my house to yours. Whether home or away from home, may your holiday be filled with joy.