Friday, March 25, 2016

Summer Purse: Part 1, The Front Pocket

Finished size: 12" x 9" x 3".

It's been a three day marathon, but the new purse is finally finished.

I've had requests for a pattern, and I'm going to give it a bit of a try on this blog. I've never produced a pattern for a bag because it's always seemed overwhelming. Unfortunately, I sew a bit like I make soup. I start out with a vague idea and a few basic measurements - sort of. Then I toss things together as I go and wait to see what happens.

I'm warning you now. This is a learning experience. I hope it won't be a huge disaster!

Please, please tell me if any part of this tutorial needs to be corrected or clarified!

I'll give instructions for the entire outside of the bag, but I'm not quite sure how, or even if, I'll deal with the inside details.  You see, I was so focused on finishing the bag that I forgot to take important photos for the recessed zipper and the pockets in the lining. I have measurements for a basic lining with no recessed zipper, so that may have to do. Unfortunately, my hubby's right about me. I can be a total scatter brain. But, the lining and zipper are tales to be told much later. Or not. Or, then again, I just might have to make a second purse. Oh, dear. That's so sad. (said the lady with a grin)

Today, it's all about the front pocket.


The Front Pocket

Fabric & Materials Requirements
(These measurements are generous. It's better to have extra fabric for your stash than is is to run short.)


  • 1 1/2 yard of lining. This will be used for the handles and sides of the bag as well as the inside lining. 
  • 3/4 yard contrasting fabric for the recessed zipper and for the front and back sections of the bag.
  • A 11" x 11" square of a third fabric for the pocket insert.
  • Scraps for hexagons.
  • 3/4 yard of bag batting such as Soft and Stable.
  • An 9" x 12" piece of lightweight batting such as Warm and Natural.
  • One small magnetic snap.
  • One  18" nylon zipper for top of the bag. (Nylon zippers can be cut if they are too long.)
  • One  9" zipper for the lining.
  • 1 yard medium weight fusible interfacing. (This is to add stability to the lining.)
  • Thread
  • (optional) Invisible polyester thread.


Cutting measurements for the pocket back, front, and lining are 1" larger than needed to allow for trimming after quilting. 

Note: Seam allowances are 1/2" unless otherwise specified. 

Make the Hexagons

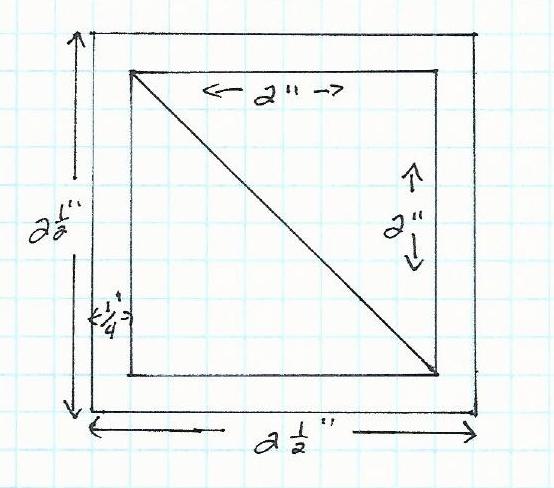
Make three hexagon that finish at  2 1/2" wide . I used a hexagon ruler to make a template. The hexagon that finishes 2" in height is perfect, but only if you use the 2 1/2" high cutting lines for the finished size.

You can sew the hexagons on any way you like. Fusible web applique would be fine. That's my usual approach. This time, though I wanted my purse to be a bit special, so  I experimented with a quick technique that is supposed to look like hand applique. It was scary, but it worked perfectly, so that's the method I've shown here.

1. Make three templates from freezer paper.


2.. Starch the fabric to make it very stiff before cutting it. I used an inexpensive spray starch from the supermarket.

3. Lay the freezer paper shiny side up on the wrong side of the fabric. I put a dot of quilt basting glue between the freezer paper and the fabric to hold it all in place temporarily.

4. If you're planning to turn edges under, cut the fabric 1/4" larger than the freezer paper template on all six sides.

5. Fold the edges down against the template one side at a time, and iron onto the shiny side of the freezer paper.


6. Carefully remove the freezer paper, then give the hexagon a really good press. When you do, press straight down and give it a good burst of steam! Flip to the other side and press again. Moving the iron back and forth will distort the shape. I know because I've lived to regret it. More than once. We scatterbrains do things like that.


7. Cut out an 8 1/2" x 11" rectangle of fabric for the pocket front.

8. Center the hexagons with their top edges  1 1/2" below the top edge of the pocket front. Line the hexagons up in a row with the side points just touching. Use pins or quilt basting glue to hold them in place for sewing. I used a dab of glue stick on each corner and in the center of each hexagon.


9. Stitch the hexagons in place. This was the new part for me.  I used invisible polyester thread and a shell tuck stitch. A very narrow zigzag stitch would work just as well, but I only recently discovered this stitch on my machine. I did have to reverse it. Love this new Babylock!


The second photo shows the stitch length and width. My choice was for short and narrow.


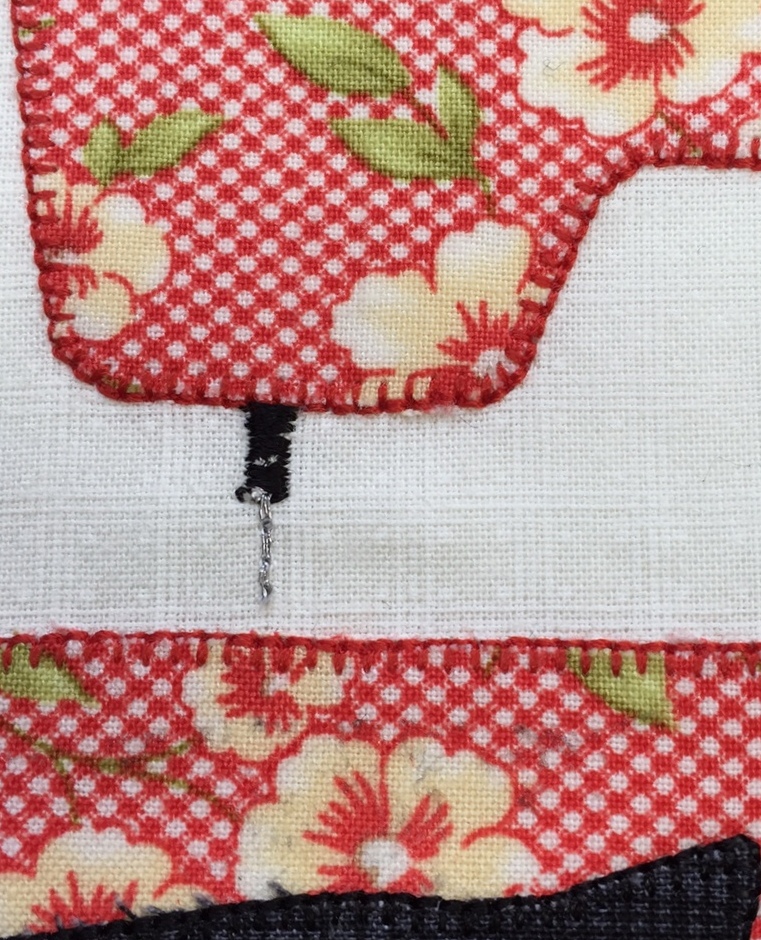
I stitched right along the edge of the hexagon. The straight stitches are just outside the applique, and the little inward stitches barely catch the edge. I was surprised that this really went so smoothly. Zip-zip, and done.


Look how clean that edge is! You have to get very close to tell that it hasn't been hand stitched in place. Giggle!


Make the Pocket Front.

1. Cut a 10" x 11" rectangle of fabric for the pocket lining.

2. Cut a piece of batting 8 1/2" x 11".
A heavier batting such as Soft and Stable is great for most of the bag, but the pocket needs a thinner batting, like Warm and Natural. Cut a piece of your thin batting to fit the pocket. Attach it to the wrong side of the pocket with quilt basting spray.

Note: I used a quilt basting spray and a quilt marking pen. These are my standbys - June Taylor spray and a Frixion pen.  The spray holds things together lightly so you can reposition everything easily. My lovely pen erases with the touch of a hot iron. 


3. Place the pocket front and the lining right sides together. Use a 1/4" seam allowance to sew along the top of the pocket through all three layers. Press the seam up to the lining.

4. I added the first half of a magnetic snap next. With the pocket sections open, mark a point in the exact center of the lining and 1 3/4" down from the seam.  Attach the magnetic snap to the right side of the lining at this mark. Push the prongs through the right side of the lining and then through a scrap of folded fabric on the wrong side of the lining.

5. Fold the lining over the batting and to the back of the pocket front. Do not fold the batting down. The 1/2" strip of lining that remains on the top of the pocket looks like binding, but is much easier to make than binding would be. (Photos found below will be helpful in seeing this.)

6. Baste around the outside edges of the layers pocket front, batting, and binding. Stitch right against the seam where the lining meets the front of the pocket.

7. Quilt however you like.
I used a diamond design that lined up with the hexagons. A 60 degree triangle ruler helped to keep the lines straight and even.


8. Square up and trim the pocket to 10 " wide and 7 1/2" high.

Right Side

Lining Side
Prepare the pocket back.  
The center insert forms the back of the pocket.  Later the entire pocket section will be inserted between side pieces on the front of the bag. 

1. Cut out the pocket back and a matching piece of your main batting. Soft and Stable was my choice for batting. 

2 Use quilt basting spray to hold the batting to the wrong side of the fabric. Quilt as you like.

3. Square up and trim to 10" x 10".

3.  Place the pocket on the center insert with the the bottom and side edges together. On the right side of the insert, mark the point where the other half of the snap needs to be placed.

4 Attach the snap with prongs going through the right side of the pocket insert and the batting. Snap the pocket onto the insert.

5. Stay-stitch close to the edge through all layers on the two sides and the bottom. leaving the top of the pocket open.


The finished pocket section including pocket and center insert.
 

And that's it for now. 

Coming Soon: Finishing the outside of the bag.


Saturday, March 19, 2016

The Splendid Sampler Gallery, Something New, and Watson

Something New
For several weeks I've been trying to find time to make a new purse, and I finally feel caught up enough to start. The fabrics will be leftover from the "Kitty Craft" quilt along. They are such pretty fabrics, and it only makes sense to use those instead of buying something new. 

So far I've only decided on how to make the front pocket. I'm placing three hexagons on it. This will definitely be a design-as-I-go bag. It's my mystery quilt bag.


The Splendid Sampler Gallery

I love the variety in the Splendid Sampler blocks! Each one is so different from every other that has come along. Most of all, I relish learning new tricks and struggling with new challenges. We all have our specialties, but we only grow through accepting challenges that take us beyond our comfort zones.
Block 9, "Local Quilt Shop"
 Blocks 9 and 10 were given to us this week. Block 9  is one of my very favorites so far. I have such a weakness for quilted houses!
 
I'm not sure that I like my interpretation of the block. In fact, I'm pretty sure that I don't care for it at all. It much too busy for my taste, so I will quite likely remake it. That's at least the fourth one to land onto my list of blocks to redo so far. At this rate, if I actually do remake those less than happy blocks, I'll have two quilts and one will be made of all the discards. 

Block 10, "Iowa" with Block 9

Block 10 looks so easy, and it would have been quick and slick if I hadn't go myself all in a muddle with it. As it was, my seam ripper got a great workout. All's well that ends well, but I do hate wasted time.

Your Blocks

Keeping up with the pace of the blocks isn't easy. Lives fill up with other things, and we often need to slow down.

Marge Colleran
Marge has sent a photo for Blocks 5 & 6. They are perfectly precise! She's stitching these blocks at a pace that's comfortable for her, and that's just the way it should be!

Dixie has also slowed down a bit on The Splendid Sampler, but her sewing machine is getting a real workout! Look what she has been doing these past two weeks! A bargello quilt workshop and nine spring mug rugs!! Quite enough, don't you think?


This next week may the one that slows me down. I know I won't get Sunday's Splendid Sampler made on Sunday because I'll be hosting a meal for my family. That includes the newest member, whom I've yet to meet.

 Watson, my daughter's new baby.

Watson, there's a strip of bacon waiting for you at my house! Shhh...

Happy First Day of Spring!!


Tuesday, March 15, 2016

Cat In the Sewing Room, & the Hazards of Piecing Stars

Block 3

There's only one appliqued block to go on this little quilt, and the kitty has finally found the sewing room!


I've wanted to make this block from the very start. In fact, the idea of a cat in the sewing room was what got the whole idea for this little quilt going. I just couldn't figure out quite how to make it all fit. I envisioned the cat playing with the sewing machine or sitting on the sewing machine, but I couldn't translate that vision onto a 12" square. When I realized that I had to place the sewing machine in the background, the block came together.

I really enjoyed adding the extra details in this block. The scissors have that little French knot for a screw, and I used my machine's triple stitch to wrap the thread on the spools. I used that same triple stitch for the pins and the sewing machine needle, too. Hand embroidery would have worked just fine, but I've been enjoying this stitch a lot since I discovered it. I'll have to go back to the first block with the yarn basket and use this stitch to show the yarn wrapped on the balls, too.

The triple stitch on my machine.
 My very own, very ancient pincushion served as the model this time. The strawberry needle sharpener was lost long ago.
I'm not sure how I feel about the metallic thread used for the sewing machine needle. It Does it show up enough? 


I almost took this little bump out of the scissors handle. Now, it's nagging at me and I may yet remove and replace that one blanket stitch. Am I being too much of a perfectionist?

 
Pieced friendship stars two ways.

The friendship stars can be confusing! I made the first one with traditional piecing, then went on to make one with the paper pieced pattern. Look what happened! I got the half square triangle patches backwards when I pieced it the old fashioned way, and that one little patch on the upper right is a tiny bit shorter that it should be.  Paper piecing works so much better for me, and it's at least twice as fast.


Spring officially arrives this weekend. My neighbors daffodils are blooming early this year, and I need a new purse. I think the next week of sewing is planned out.


Wishing you a happy start to spring!

Sunday, March 13, 2016

D.I.Y. Small Table Top Ironing Board


My sewing room is so crowded! All of the necessary equipment doesn't even begin to fit conveniently into the size and configuration of my sewing space. As it's set up now, I have to walk around a table attached to one side of my sewing machine to get to the ironing board. It's usually not too much of a headache, and it does get me on my feet and out of my chair now and then.

Lately, though, I've been doing lots of paper piecing, and bouncing up to trot around the sewing table every few minutes is slowing everything down. I have a little cutting mat on the sewing table, but I really needed a small ironing board. So, I made one.

I started with an old wooden cutting board that was never used any more, but was taking up storage space in my kitchen.


I gathered the following items:
  • One old cutting board. Any piece of wood of a convenient size will do. Mine is 12" x 16". 
  • One piece of cotton batting about 3 inches wider and 3 inches longer that the top of the cutting board.
  • One piece of cotton fabric about 3 inches wider and 3 inches longer than the batting.
  • A roll of fabric fuse.
  • An iron.  
  • A stapler 

This is the procedure:

 1. Measure and cut the batting and the cotton fabric. Center the batting on the wrong side of the fabric.
 2. Fold the sides of the cotton over the batting and fuse in place with a hot iron to cover the edges of the batting.

4. Stand the cutting board on edge. With the batting facing the cutting board, pull one side of the fabric covered batting over the edge of the board and staple in place with a few staples. Flip the board to the opposite edge. Pull the batting snugly around and over this edge and staple.

My new paper piecing station is finished!


Friday, March 11, 2016

The Splendid Sampler Gallery, Messing Up, and a Sneak Preview

What a week! Between working on the new block for my own quilt along and keeping up with the Splendid Sampler, I've hardly left my sewing room.

First, a Sneak Preview

The third pair of blocks for "Kitty Craft" will be published next week. Kitty found the sewing room! We all knew that it was bound to happen sooner or later. Her she sits grooming herself. Or is she getting ready to go for the pincushion? Hard to tell, isn't it.


The Splendid Sampler Gallery

I love the Splendid Sampler! It's making me stretch and grow. This week, though, the blocks were easy. And, I messed up on both of them! I know better!

Lesson 1: Measure twice, cut once. 

I was so excited to find that Block #7 was designed for embroidery. Embroidery was my gateway drug to sewing, the skill I begged to learn at the age of four, the one that put the very first threaded needle in the grip of my chubby fingers, and the beginning of my lifelong sewing romance.

So, I played an entire day with my pretty threads. I tossed in applique, decorative machine stitches, and hand embroidery. So much fun. It was late in the evening when I took the completed block downstairs to square up and trim. I must not have been paying close attention, because I cut it too narrow on two sides! I'd started out with an extra large piece of background fabric, so I was able to add to the remaining sides to get a 6 1/2" square block. Now, it was the right size, but off balance.  I managed to salvage it with some extra embroidery on the larger sides. It will do.


 Lesson 2: Fabrics of similar value run together. 

Block #8 was a very traditional pattern that was easily pieced. I made it twice. The first time around I thought that the prints in my green fabrics might be different enough that they would contrast. I've been quilting for quite awhile, now, so how could I have suddenly forgotten all about value? I know the rules. I teach the rules, for goodness sake. Contrasting values are the magic to making a quilt pop. I managed to get it right on the second attempt, so now I have another extra block. I seem to be acquiring quite a few extra blocks.


Your Blocks

From Dixie Moore

No mistakes from Dixie! These blocks are perfect! 


Spring is almost here!! 
Have a lovely week!


Friday, March 4, 2016

The Splendid Sampler Gallery and Making a Paper Pieced Pattern


I'm having too much fun with this quilt along. I mean that literally! I need to make the next block for my own "Kitty Craft" quilt along, and I desperately need a new bag or two.

Tomorrow, I work on those. Tomorrow.

The fifth block for Splendid Sampler came out on Thursday. It's a divided 9-patch, slice and dice, and it whizzed together in no time. Now and then, something easy and relaxing is exactly what the doctor ordered.
Block #5

And then came the sixth block in the quilt along. Oh, my. I had to make it twice. I saw too many possibilities with the layout, so I sewed it with completely different values the first time around. Once again, I was working with tiny triangles, and though I am learning and getting better at this, it was a struggle to get the points right.

I wasn't finished, though. I like the original, and I wanted one similar to that as well.  So, I made it again. This time, I chose the easy way out, and paper pieced it. Slick! With paper piecing I was able to eliminate some of those tiny triangles, too.

It's hard to believe that these two blocks are from the same identical pattern!
Block #6

Your Blocks

From Marge Colleran

"I am using my stash and am having soooo much fun."

Marge's first four blocks


From Dixie Moore

Dixie has sewn her first five blocks all over again using a totally new group of fabrics. Such a difference!

From Dixie:
"... my two favorite blocks thus far are #4 and #5.  Who doesn’t like appliqué, for one, and the Simple Simon block was just a delight to stitch.  Now that I am settled in with my Civil War fabrics (these come from my flirtation with a blue and white Dear Jane quilt in 2010), I can dig in and enjoy this project as much as many of the other gals seem to.

What I’ve come to know thus far is just how sensitive the fabric is to rotary cutter and board. Each cut moves the fabric a hair; the fabric must be coaxed back to the line each time. When I do original appliqué or make mug rugs, being a hair off is not an issue. The other thing that fascinates me is just how powerful our machines are as we slip fabric under the foot pedal.  I am employing my oldest and smallest machine for these blocks. I think my larger machine would eat the blocks in the blink of an eye. Moreover, while I am a pinner, I can see the value of just carefully nesting the pieces into each other with the opposing pressed seams.  A small pin can distort, and quickly, sabotaging the careful work that came before.

I expect to be a much better piecer by the end of this journey, and that delights me."

Dixie's Blocks #1 - #5


Dixie's Block #6
A Tutorial

Make a paper piecing pattern for Block 6

Instructions

Print off the block diagram that came with the pattern. Choose your fabrics and locate where each will be placed. I wrote the letters right onto the diagram.


Fabrics as shown on the pattern: 


There are three basic pattern sections for the block..  I've shown the pattern measurements with sketches made on graph paper.  If you aren't comfortable with a computer drawing program, you can draw your pattern like this on graph paper.  I made the final pattern in color with the drawing program on Microsoft Word. I've numbered the pieces to show the order in which fabric pieces are sewn.

1. The Center Section

Draw a square 2" x 2". Draw a diagonal line from one corner to the next. Draw another square that is 1/4" larger on each side. The finished pattern is 2 1/2" x 2 1/2".  Make 4.

You will need to sew two of each color combination. The numbers indicate which fabric is placed first. 


2. Short Side Section

 Draw a rectangle 1" x 4". Divide as shown below.  Draw another rectangle that is 1/4" larger on each side. The finished pattern is 1 1/2" x 4 1/2". Make 2.

Color placement and numbers to show the order in which fabrics are added is shown here.

3. Long Side Section

 Draw a rectangle 1" x 6". Divide as shown below.  Draw another rectangle that is 1/4" larger on each side. The finished pattern is 1 1/2" x 6 1/2". Make 2.

 Color placement and numbers to show the order in which fabrics are added is shown here.

Assembly

The block is assembled exactly as shown in the original pattern. Use 1/4" seams throughout. I laid the sections out before sewing together so that I could keep my colors matched correctly. 

I removed the paper before sewing the sections together, but it can be left in place until the block is completed.


1. Sew the four 2 1/2" squares in the center together to make a 4 1/2" square.
2. Sew the short side sections to either side of the center squares. Be careful to line up the colors the way you want them to be.
3. Sew the long side sections to the opposite sides of the block.


That's it! 

Any questions can be left in the comment section of this blog
 or they can be sent to me via email. 
klee2strings@gmail.com