Saturday, October 18, 2014

Mitten Weather


Autumn is definitely here. My trees are turning wonderful shades of red and gold and my neighbor kiddos are raking the fallen leaves into "jumping piles".  They keep ringing my doorbell and asking me to watch them rake and jump. 


You see, I'm that funny old retired teacher who will sit on the porch and read stories to them or look at the bugs and caterpillars they have found - whether dead or alive, so my doorbell rings a lot! Too much fun!

But, I'd better get back to the point of this blog entry. 

As I said, autumn is here. That means winter is not far behind. And that thought led me to one of my favorite children's poems.

"Thumbs in the thumbs-place,
Fingers all together!
This is the song
We sing in mitten weather."

How perfect for a quick, little project. After "Autumn Flight" and "Snow Family Holiday" I was ready for a super easy mug rug.

Hope you like it!

"Mitten Weather"

If I have time, I might just make a few of these for the neighbor kiddos. 

I wonder how the pattern would look on a little book tote. Hmm...

Have a super day!

... and keep warm this winter!
... and don't forget your hat and mittens!


Saturday, October 11, 2014

The "Home" Quilt Along quilt top is done!

I am really excited about the way this little mystery wall hanging has turned out!  I do hope you like it as much as I do.

Thank you, everyone, for contributing your ideas as we designed and made this together!


This project was more than a bit scary for me!  I was as much in the dark about the finished product as the brave, faithful folks who bought the block patterns and stitched them up without knowing what the end result would be.

What if it turned out to be a disaster? What if everyone hated it?

What if... what if... what if ....


What ifs counted for more than one sleepless night. But now it's done!
Well, except for the finishing, but that will come later.

The Layout

The final layout that I settled on uses narrow (3/8") dark borders around the blocks to make them pop and wider soft green sashing to pull all of my colors together. Any two colors that bring out the best in your blocks will be wonderful.

I arranged and rearranged the blocks at least a dozen times. In the end, I balanced shapes, sizes, and colors in the best way I could. If you are making this, your block arrangement may be very different, and that is just fine! Who wants a quilt that's identical to everyone else's?

Then came the math. Oh my goodness!
All of those fractions!


Measure, measure, calculate, calculate.
Sew, write, check for errors - I thought I'd never get it right!
Thank goodness that part is done!

I've posted the layout pattern on Craftsy as a free pattern. If you like the layout, you could also use it with any other blocks of the sizes in this quilt. You might use some of my blocks and toss in some of your favorite blocks from here and there. Why not? We quilters are all creators of art, and art is definitely personal.

I said that the finishing will come later. I need to sandwich the top, batting, and backing, then quilt and bind. Sometimes waiting is a good thing! Do you see me smiling?

This quilt is pretty large for quilting on my little sewing machine, but I plan to get a new machine with a wider throat space within the next couple of months. Not a long arm or anything that fancy, but a machine with a 16" throat space so my quilts won't be quite so squished when I work on them. If all goes as planned, this will be my Christmas gift!

That's why I'm smiling!

When I have the new machine set up "Home" will be the very first quilting project.

Wishing all of you happy stitching and a very happy home!

And, please send me photos! I'll add them to the Quilt Along Photos page at the top of this blog. Can't wait to see what you do with this!


Monday, September 29, 2014

An Alternate Quilt Along Block and My Layout Plan

I've known for quite some time that the fabrics in my cookie jar block didn't fit in very well with the other blocks. As the quilt grew, the colors in the cookie jar stood out more and more as being out of place.

I couldn't deal with it! Not at all!

No choice but to make it over in fabrics that coordinate with the others. I chose chocolate cookies, too, this time. Because they added more contrast. And because I like chocolate. A LOT.

Since I was remaking it the block, I made a few other changes, as well.

First off, I thought I'd like the cookie jar better if it were smaller. Of course, when it was smaller it didn't fill the block completely, so a cup was added.

Oops! Others might prefer the changed block, too, and I can't expect anyone to pay for the block twice!

So it's FREE!!

All the changes inspired a new name for the block - Cookies and Cocoa.


My Layout Choice:

I'm now ready to begin putting this little wall hanging together. The plan with the house block in the center was by far the most popular with all of you, so that's what I'm using. I've added some little details for my own quilt that you may or may not want. For that reason there will be two sets of instructions. 

I've chosen to work with green sashings because greens pull the colors in my blocks together better than anything else I tried. I'll outline each of the blocks in a 1/4" dark green and then I'll separate everything with light, apple green sashings. 

As soon as I can, I'll post instructions for my layout (with 1/4" narrow borders) and for a similar plan without those little borders. 


This may still change a bit as I go along, but I'm hoping to have the quilt top finished within a week. Fingers crossed! 

And, if you do want the plan with the house block at the top center of the quilt, please let me know and I'll try to prepare that, too.

Now, back to work!!


Happy Monday, everyone!!


Wednesday, September 24, 2014

A Family of Snowmen for Christmas

Here it is! I've finished work on this little "Snow" family and their holiday preparations. Oh, my, what fun I had with these little characters!


Once again, I used a few new little bits plus lots of scraps from Christmases past. You may recognize the border fabric from last year's "Christmas Magic" mug rug and table runner. I so fell in love with that piece that I bought a LOT of it. You may be seeing it again. 

The holiday print is Blitzen by Basic grey for Moda #30290-14. It's actually from the year before last. My local quilt shop still has half a bolt or so, but it's getting harder to find. I went searching online and I found some on Etsy and some on another fabric website.

I have to tell you about my hubby's reaction to this quilt, but first I'll give you the background. 

When I first started quilting, 20 years ago or so, my guy simply didn't get it. Why was I cutting up nice fabric and putting little pieces together? He didn't even understand why the back of the quilt with the big fabric was not the top of the quilt. I tried to explain very carefully.

"Quilting is an art form," I said. "Designing these blocks and choosing the shapes and sizes of the pieces is creating a piece of art!"

"Nonsense," he responded. "Sewing is just sewing and a quilt is just something that goes on top of a bed." 

You can see we had a long way to go. 

Then, as time went on, he gradually became more interested in my quilts. When I started selling patterns he began to see things in a different light. "This quilting is really popular, isn't it?" he asked. Eventually, when looking at a new design, he said, "I didn't know you were such an artist."

Finally he had come around, but is it possible to go too far?


I brought up my finished Snow Family Holiday and the man asked for exact dimensions. Why? Because he wanted to go and order a frame for it!

"No, no, no!" I said. "It's a quilt! It's meant to be touched! It's fabric! You don't don't put a quilt behind glass unless it's a priceless antique in a museum!" Sigh... I wonder if we'll ever get it together. 

Well, time to get on to the next endeavor. 

Fall housecleaning, here we come!


Saturday, September 13, 2014

Autumn Purse: Days 3, 4, 5, and DONE!

It's finished! The autumn purse is packed with my "stuff" and the yellow purse has been put away till next summer.

This one was made with a lightweight upholstery fabric that will have much more durability than quilting cottons. It's more of an all season bag than it is something specifically for the winter months. I'll work on a real winter bag in a couple of months.

I wish I had a pattern for you, but I'm still trying to figure out how to write a pattern for something with this much complexity. If you've used any of my patterns you know that I don't want there to be any confusion about any part of the construction. A purse pattern written that way could cover up to 30 pages. I've been studying other patterns to see if there isn't some kind of middle ground between too vague and absolute overkill.

But on with the sequence of purse making.

This has been such a crazy week! I feel like I'm getting nowhere until I look back. In actuality quite a bit was accomplished.

Tuesday
Other stuff to do. No purse work.

Wednesday
I cut out the sections, stitched the seam at the bottom of the bag and made the casing for the plastic canvas insert that gives it a firm base.


Thursday
I only made the straps for the bag.


Friday
Day 1 of a two day marathon of purse making. Pockets were made and attached, straps were stitched in place, and the body of the bag was done by bedtime.


I did insert the pocket flaps into a seam this time and that worked so much better!
There is one large pocket on the back.


Friday

Zipper first. 

Then the lining. 

And the rest was easy, lickity split.

I had the entire purse competed by 3:00! Feeling good!


Three open pockets in the lining.

One 9" zippered pocket .

Tomorrow, I'll take some time off from sewing, but I'll think about which idea to work on next. 


Holidays are coming!


Friday, September 12, 2014

Quilt Along Layout Ideas

"Home" Layout Options

I planned to make progress on this purse today, but Glenda finished the last of her quilt along blocks and asked about a layout plan. So the morning was spent on ideas for the plan. I actually came up with a three plans and a new idea, too.

I really want to hear your opinions on this so I'll know how to go about writing the instructions.

This is what I've sketched out so far. I like all of these plans, but the layout might be dictated by size.

One of the 48" x 48" plans would be fine for a wall hanging.

Layout 1: 48" x 48"
This plan has the house at the top of the quilt with the word, "Home" appliqued above it.  The photo shows an arrangement that could work with my blocks. The diagram below it shows the plan measured out to scale.


Layout 2: 48" x 48" 
I don't have a photo example, but I did make a layout to scale. The big difference is with the location of the house. In this plan it's centered.

Layout 3: 54" x 54"
With secondary sashing and a double border, this quilt layout has grown into a good size for a small lap quilt or a larger wall hanging. Again, I've shown the scale drawing below the photo layout.


A final option: I haven't made a sketch to go with this idea. I was thinking of taking Layout 3 and adding to both the top and the bottom with some border additions. If it grew to 54" x 72", it would be a larger lap quilt, but it would also look lovely when laid over a plain bedspread on a single bed. I have just such a bed, so it's an idea in the works. 

With borders going all the way around this quilt could grow to a bed quilt, but it would immediately become too large to quilt on my little machine. 

Do you have preference? 
Waiting to hear from you!


Wednesday, September 10, 2014

A pair of mug rugs and a near disaster

My day started out with a lovely plan.

It was already Tuesday and I was anxious to get the mug rugs finished that I'd promised to get out this week.

These are for those folks who might have preferred a teapot or coffee block for the "Home" quilt along instead of the bookshelf block. The block size and the mug rug size are identical, and I made the pattern for both - a mix and match pair.

The quilt tops were appliqued with my favorite blanket stitch and ready for the next step.


Since I had my sewing machine set up for free motion quilting on my winter purse, I planned to finish the quilting on the pieces for that and then do the quilting on this little pair of mug rugs - kill two birds with one stone, so to speak.

The bag pieces went smoothly and I set them aside. Then I "sandwiched" up the mug rugs. I thought about the quilting pattern and decided to go with something nice and swirly because that's what steam looks like.

I slipped the mug rug under my needle and focused on making nice rounded swirls.


After a bit I noticed that my needle was going "thump, thump, thump" like it sometimes will when it becomes dull. Then my thread broke.

No problem. Rethread the machine and change the needle a the same time.

Except ....


What's this?
Oops!

I'd been quilting through both mug rugs!

No wonder the needle was going "thump, thump, thump"!

Oh, my gosh! Talk about appreciating my seam ripper.

It took awhile to undo the mess, and by the time I got it all undone it was lunchtime. Both mug rugs were filled with lovely little needle holes that needed fixing, too. So I sprayed them good with water so the fabric threads could relax, and I left them to dry while I ate a nice, healthy lunch of veggie soup, a pear, and a small piece of toast and peanut butter.


Needless to say, the winter bag is still waiting for the next step, but at least the mug rug damage is controlled and the mug rugs are finished.

All's well that end's well. 


Sunday, September 7, 2014

Building a Bag for Autumn

We're into September and the weather is starting to cool down. My pretty yellow summer purse is starting to look out of place and I desperately need something new.

Autumn Purse: Day 1

I pulled out my heavier purse weight fabrics this morning in hopes of finding one that really excited me. Not that I found much choice in my drawer. I have black with cream and cream with black. What was I thinking when I bought two pieces in the same basic colors? I'm not excited, but both are very practical, and either one of them will do nicely.


Hmm... I'll leave choosing for tomorrow.

I had the fabric, but not the other essentials, so I ran out and bought a zipper, some lining fabric, and thread. I didn't really have to go clear across town, but my daughter lives on over there. She's only a few blocks from our two largest fabric stores, and that gave me a great excuse to drop in and visit with her for a few minutes on a Saturday.

I want something really simple in this bag because I'd like to do it and have it done fairly quickly - not so fast as to be sloppy, but I won't be adding too many time consuming design details. I'll make something wonderful later. Right now, I just need a purse!

Now for a design plan. 

I like the size of my yellow purse, so that part is easy. The little outer pockets are great, too, but I need to make some changes in how to construct them. Those pocket flaps were such a pain! And I really don't need the magnetic closures on the small pockets. 

This is my first sketch. Pretty basic, isn't it?


Do you see how I've positioned flaps so they'll be sewn into a seam? I'm not sure if the pockets, themselves, will show on the outside of the bag or not. Still thinking about that. 

Tomorrow I begin cutting. 

Autumn Purse: Day 2

I was so late getting started with sewing on this new purse today! My morning simply got away from me. It started with oversleeping. I was up too late last night, but there was no way I could put my book down with the excitement of the last few chapters. The book was worth it, but the late email responses that followed could have waited till morning. 

After breakfast with the Sunday paper I changed sheets on beds, did laundry, and baked some yummy blueberry-raspberry muffins. I did get out my sewing machine, but I used it to repair a seam on a fitted sheet that ripped out as I was putting it on the bed. By then it was time for lunch. 

Finally, with the kitchen cleaned up, I was ready to begin my purse.

Like I said, I really don't want to take forever on this project. That settled my fabric choice. I'm going with the simple floral print and no other fabric for trim. The front and back pockets will be sewn onto the outside of the bag, and quilting will be  basic and easy. 

I cut out all the pieces that will be quilted first. "Stiff Stuff" is the batting for the body of the bag, but the pockets need to be lighter weight and more flexible so I'm using good old, basic, "Warm and Natural" for those. The backing fabric is a very inexpensive, lightweight muslin.

It's easier to quilt larger segments of fabric than lots of tiny pieces. Here are my main sections laid out in quilt sandwiches. The big piece is for the body of the bag. Other pieces are for pockets and for a separately attached strip at the top of the bag. I'm definitely adding that so I can experiment with setting my pocket flaps into a seam. 


As I said, really basic quilting. I don't want the quilting to be dominant on this bag so I'm using a fine 60 weight, black, polyester thread on the top with regular 50 weight cotton in the bobbin.  I'm also using the floral pattern on the fabric as a general guide. That way I don't have to think at all - just follow the flowers. This quilting is less about being decorative than it is about holding everything together and giving the bag body.

The stitches show up clearly on the wrong side. You can see that there are some overlaps and wandering lines. Since the fabric is duck-cloth in weight and tightly woven, the black quilting barely shows. Wandering lines can't be seen at all from the right side. 


The two largest sandwiches are quilted, but I had to stop early. 

Our son came over to visit this afternoon and he's staying for dinner. Love having him here!

The bag will wait till the next time I can sew on it. Family first.


Thursday, September 4, 2014

Quilt Along Blocks # 11 and # 12, Tools and a Bookshelf

I can hardly believe that the last two blocks of this quilt are finished! I suddenly feel lighter, like I've lost a few pounds! The next hurdle will be choosing a layout and putting the quilt top together. I won't even think about the actual quilting and binding just yet. For the next few days I'm going to savor the "doneness" of the blocks.

Block 11

The tools block will come as a surprise to a lot of folks. I don't know that tools were ever mentioned in our list of ideas. But, it is so fitting!

I love how it adds another dimension to the overall theme. The idea was inspired by my friend, Midge, of course.

My little camera doesn't allow me to adjust colors, so the bright, white background always looks gray. :(
Over our weekly coffee we chatted about what was needed to complete those last two blocks. "You've represented children and pets," she said, "and, there are several blocks that show women's interests, but what about men? Shouldn't there be something that has a more masculine feel in this quilt?"

She was absolutely right, of course. There are lots of very happy homes that have no men in them, but I would guess that there are at least as many homes in which the husband and father is very central to the meaning of family and home.

We brainstormed ideas. Lawn mower? Backyard grill? Fishing gear? Tools?

Tools won, hands down. How can you keep a home without a few tools?

Block 12

What to do with the last little block? I posed the question on my Facebook page and offered a choice of teapot or bookshelf.

The bookshelf won the vote by a large margin.


That would have been my own first choice, too. If I'm addicted to anything, it's books. 

And chocolate, of course, but we won't go into that today. 

I didn't even try to count the actual shelves holding books in my house. It's enough to admit that I have four large bookcases that are absolutely stuffed. Library books are scattered everywhere, too.

A home without books? Not for me at all. 

A quick little sidestep here

Have you ever used a hera marker? It's a lovely little tool, and very inexpensive. I marked the lines for lining up my books with a hera marker instead of a quilt marker.


So slick! It makes a tiny, visible crease, but leaves no residue that needs to be removed! I also like using the hera marker with anything that needs to fold smoothly and evenly - even for making my own bias tape. The crease creates a natural fold line that presses with beautiful ease.

Oh, something else! My friend, The Patchsmith, has a very clever idea for adding book titles using selvages of fabrics. Be sure to check out her bookshelf mug rug in Craftsy patterns.

Going back to the bookshelf now

I liked the bookshelf so much in all it's bright colors, and it really is the exact size for a mug rug. So I made one of those, too. 

I chose a totally different color concept for the mug rug. Black and white with just a splash of red can lend sophistication and elegance to almost anything. Even a mug rug.


But what if you want a teapot or a coffee mug in your quilt? 

Can you wait one more week?

I'll be posting a pair of mug rugs - just the same size as the quilt block. These will be mix and match. A teapot, a coffeepot, a cup, and a mug. You could easily use one of those to replace either the bookshelf or the spools block.


Now to choose a layout. Hmm....


I need better lighting for these photos!!
The original idea?

Something a little bit different?
I think I may want to redo my cookie jar in different fabrics.  When I made it I didn't know how my colors and fabrics would come together, but now the cookie jar stands out as different from the other blocks. Fortunately it's a very easy one to do over.

I need a couple of weeks to get to the layout plan. Other projects are screaming for attention!

Wishing you a lovely month of September!!


And, happy stitching!


Wednesday, August 27, 2014

Quilt Along Block # 10 "Window View"

More silhouettes? I thought I was finished with those, but it seems I was mistaken.

Okay, these aren't solid black like all of my silhouette children and their pets, but still. A silhouette, even with color and a collar, is basically a silhouette, isn't it? 


These little guys weren't ever a part of the plan for the Quilt Along, but I simply couldn't resist. 

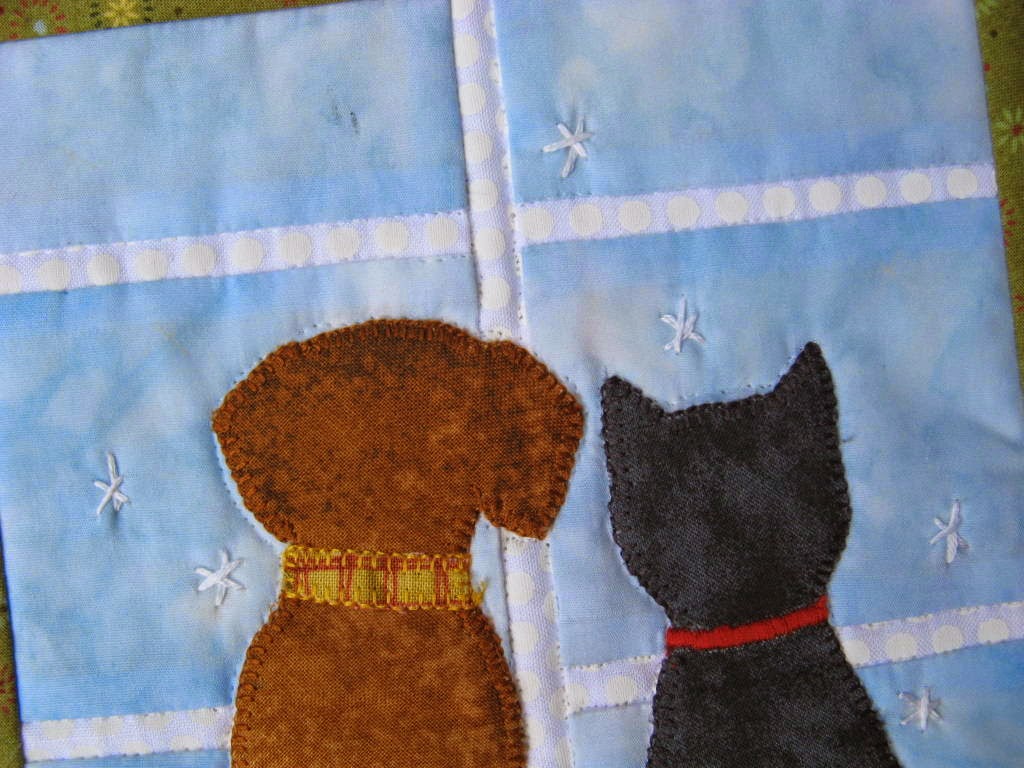
Our quilt has things to represent children, items that reflect traditional women's interests, but there were no pets. We needed some furry friends. There was one vertical 6" x 10" block needed, and these two fit the bill. So I placed a dachshund and a cat in the window. 

Wonder what they're watching so intently. 

I also turned these little guys into a mug rug. The size is right, the theme is fun, so why not?


With winter not far off on the horizon, I gave the mug rug pair some snowflakes to watch, but a person could choose anything. Falling leaves in the autumn - just a few embroidered stitches. A flock of birds for any season - black "v"s stringing across the window. Rain - slanted lines of quilting. Whatever one might imagine catching the interest of housebound pets.


It's time to go back to work on this quilt. It's almost done! 

I keep moving things around. Every time a new block is added, a change seems to be needed.
There are two blocks to go, one 10" x 10" in the space between the pets and the watering can, and a horizontal 6" x 10" above the current position of the cookie jar. 

Several ideas are in the works, too.

My friend, Midge has an opinion. "Things to show women, things to show kids," she remarked over our weekly coffee. "There's nothing masculine in this quilt."

Ahh...

Wise woman, Midge. 

I think there may just be another surprise coming along.