Sunday, May 21, 2017

"F" is for Fish


The pattern on Craftsy. 
Last week it was "G" is for Giraffe, and this week "F" is for Fish. What am I doing with the sudden onslaught of alphabet mug rugs? I have no clue how this all came about, and I don't know if this is the end or just the beginning of something altogether new.

I knew that I would surprise myself with the next project, and I surely did. I had no intention of making a mug rug with whimsical, imaginary fish, but it rained and rained last week. Everything was drenched, as water was poured off the roof, the trees, the plants, and everything else. It must have been all the water that filled my head with visions of fish.

It took more than two weeks of constant struggle to design the giraffe, but this one was sketched in just over an hour.  It's such an easy pattern that I stitched it together the same afternoon. The fabrics came entirely from my stash, too, so I didn't even have to go out in the rain to get supplies. So much fun!


Bubbles are insubstantial, so I simple outlined bubble shapes with white thread and my handy dandy, favorite machine blanket stitch. My stash of 1/4" buttons was raided for eyes, and I quilted a wavy pattern to give the water a sense movement.

My pattern is finished and, today, the sun came out! The sky is bright and blue, flowers are perking up, and, my goodness, but those birds are singing! It's definitely May.

I'm going to go for a walk in the sunshine, now. I can work on other things later.

Wishing you a fantastic week!

Wednesday, May 17, 2017

Sara Quilt, Block 5

This is the last of the patterns for the blocks I made for Sara's Quilt. It's taken forever, and it feel so good to have this done. 

Block 5, Double Dresden 


 I'm waiting now for Sara to find time to come over and help me design the border. She's in no rush to have her quilt, and I would much rather go slowly and have it turn out perfectly for her.


I'm really pleased with how this has turned out.

This afternoon, I'll be sewing up more schoolhouse blocks. Never a dull moment.

Friday, May 12, 2017

"G" is for Giraffe

After so many trials and errors, the giraffe mug rug finally came together. It reminds me of the pictures in a child's alphabet book, so I had no choice but to name it, "G" is for Giraffe.


There were so many missteps along the journey to finding the right design for this mug rug. I made a short list of some things that I need to keep in mind. 

  • I have the greatest success when I stick to designs that are lighthearted and fun. When I try to expand into something more artistic, I often run into trouble. 
  • Working too hard on an idea often backfires. 
  • It often takes several attempts to get things right. 
  • When I'm stuck, I need to take breaks and do things that are entirely different. Eventually ideas gel, but only when I'm relaxed and not overthinking the design. 
  • Fabric choices are everything! Fabrics that look perfect laid out on the cutting board may not look good at all when sewn together. 
  • Trial and error is part of the process.

I'm trying to plan ahead, but I'm not getting very far. In the meantime, I do have some short term project plans, so that's a start.
  1. If the world will slow down, I'll make the last block pattern for Sara's quilt.
  2. I'm waiting for Sara to find time to come over and help me choose a border plan for her quilt.
  3. I still want an old-fashioned schoolhouse quilt, but I'm planning to use more modern fabrics.
Tomorrow is Mother's Day! 
I wish you were here, Mom. Miss you!
 
Wishing you all a wonderful day.

Sunday, May 7, 2017

Sara Quilt, Block 7, Tutorial


We've had a of hectic couple of weeks with emergency rooms and doctor appointments for my sweet hubby. Getting older in combination with poor health isn't the least bit fun. I'm hoping it all slows down for a bit now.

Today, I have finally found a few minutes to hastily write up this pattern.

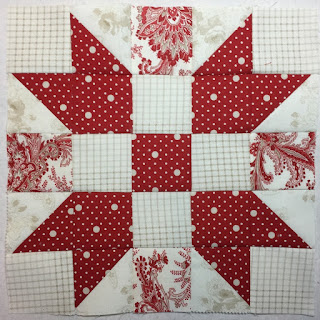
Sara Quilt, Block 7. 10 1/2" x 10 1/2"
This is a very basic variation on a star block, and so quick to stitch together.

You will need four fabrics, two creams, one main red, and one contrast red.
From the main red, cut:
  • Five squares 2 1/2" x 2 1/2"
  • Four squares 3 1/4" x 3 1/4"

From the contrast red, cut:
  • Four squares 2 1/2" x 2 1/2"

From Cream 1, cut:
  • Four squares 2 1/2" x 2 1/2"

From Cream 2, cut:
  • Four squares 3 1/4" x 3 1/4"

Make eight half square triangles.

1. Draw a diagonal line from corner to corner on the wrong side each of the 3 1/4" x 3 1/4" Cream 2 squares.
2. Align one of these squares on top of each of the 3 1/4" x 3 1/4" red squares, right sides together.

3. Stitch 1/4" from either side of the drawn line.

4. Cut on the line and open the half square triangles.

5. Press to the red. The patches will be slightly larger than needed. 

I made two versions of this block. The fabrics shown here are used in the second version.
6. Trim each half square triangle to 2 1/2" x 2 1/2".

Assemble the block.

1. Make rows 1 and 5, the top and bottom rows of the block. From left to right: Cream 1 square, half square triangle, contrast red square, half square triangle, Cream 1 square.

 2. Make rows 2 and 4. From left to right: half square triangle, red square, Cream 1 square, red square, half square triangle.

3. Make the middle row. From left to right: contrast red square, Cream 1 square, red square, Cream 1 square, contrast red square.

 4. Assemble as show above. Be very careful to place the half square triangles in the right position or ...


.... you just might wind up with an undesirable block!


I did take it apart and fix it. This quilt is for my granddaughter, and I really didn't like the accidentally invented block.


Now, on to writing up the pattern for Block 5, the final block pattern for Sara's quilt.

First, though, I'm going for a walk. It's such a beautiful day.


Sunshine in our little neighborhood park.


Wishing you a beautiful day!


Thursday, April 27, 2017

Sara's Quilt, Block 9, Tutorial

All of the blocks for Sara's Quilt are finished!! The patterns and tutorials are all mixed up in order, I know. It's just another example of how my brain bounces around from this to that at random.
Block 9, 10 1/2" x 10 1/2"


This was the final block that I made for Sara's Quilt, but there will be one more tutorial on my blog for block 7. The Dresden blocks will need a template, so that will be on Craftsy as a free pattern. Just more confusion, I know.

I can't believe that I forgot to take enough photos for this block! As a result, writing this blog took ten times as long as it would have if I hadn't had to make all of the diagrams. Sometimes I am such a scatterbrain! Sigh...

The diagram will be a useful guide to fabrics and their placement.

Eight different fabrics are used.
Cutting Instructions:

1. From each of the reds in the top row, cut one 2 1/2" x 2 1/2" square and one 3 1/4" square. Cut the 3 1/4" squares in half diagonally. 
2. From the Medium Red, cut four 3 1/4" squares. Cut each in half diagonally.

3. From Cream 1, cut four 2 1/2" squares and four 3 1/4" squares. Cut the 3 1/4" squares in half diagonally. 

4. From Cream 2, cut four 2 1/2" squares.

5. From the Center Cream, cut on 2 1/2" square.

Make half square triangle patches: 

1. From each of the main red fabrics you will have two triangles. Sew the triangles into half square triangle patches as shown. 

Sew one triangle of each with a Cream 1 triangle. Sew the other triangle with a Medium red triangle. 


2. The patches will be slightly larger than needed. Trim each to a 2 1/2" x 2 1/2" square.


 3. Four Medium red triangles and four Cream 1 triangles will remain. Sew each Medium Red triangle to a Cream 1 triangle to make four half square triangle patches. Trim each patch to 2 1/2" x 2 1/2" as before. 

Assemble the block.

Arrange the patches into rows and sew together.  


Next up, Block 7.
We are nearing the end.


Saturday, April 22, 2017

Two Patterns and Light at the End of the Tunnel

All of the blocks are finished - but I'm not celebrating quite yet.

When I saw  all of the blocks on my design wall, I realized that the quilt will need sashings and cornerstones. I love almost every one of my blocks, but except for the Dresden plate blocks, the quilt looks too crowded for my taste. I think I need to redo the center Dresden block as well. It's 1/2" smaller than the others and in the photo, I can tell that that small difference will be exaggerated when I add the sashings. I may change the fabrics on one other block. Can you tell which one doesn't quite seem to fit?

With 1" sashings, Sara's quilt will grow to 56" x 56" without a border. I'll consider whether or not to add that later. If the quilt gets too large, I won't be able to quilt it on my sewing machine. That may or may not be a good thing. More decisions to make later.

I've also added two free paper foundation patterns on Craftsy, Block 6 and Block 8. Either of these blocks could have been made with traditional piecing, but I got lazy. It was so much easier to draw the paper piecing patterns than it was to figure out all of the cutting measurements. Math really is my weakness.

Block 8

Block 6
There will be two more tutorials on my blog this week, and then, I think the entire pattern for Sara's quilt will be finished. I'll be happy dancing for sure when the entire quilt is done!!

Heigh ho, heigh ho. Off to work!


Monday, April 3, 2017

Spring Dance and Other Spring Mug Rugs

This mug rug makes me smile. I do love spring.


When my daffodils came into full bloom a week or so ago, I knew that I had to make a mug rug for them. I added a crocus for color, even though crocuses bloomed earlier. The butterflies haven't made an appearance yet, but the ants are out, so the butterflies will be fluttering about in no time. I used my artistic license card and tossed them all on the same mug rug. I love that card!

I know I've said this before, but when there several small pieces in an applique, it really helps to use an applique pressing sheet. I put each flower together one layer at a time. The pressing sheet is almost clear, so with my layout sketch underneath, it was easy to see where to place each piece of the applique. When a flower was completed, I peeled it off the sheet in one piece to arrange on the background.

The layering process.


A bit of embroidery adds detail. You know that I love those little details. I used free motion quilting to add depth and movement. The butterflies and daffodils really do seem to be dancing in the spring breeze.

Easter, May Day, and Mother's Day will be her soon, so here are a few other mug rug ideas for the season. All can be found in my Craftsy pattern store. https://www.craftsy.com/profile/2strings-s-pattern-store

2015 Quilt Along, Bunny and Basket
 
Mom Mug Rug

Lily Mug Rug
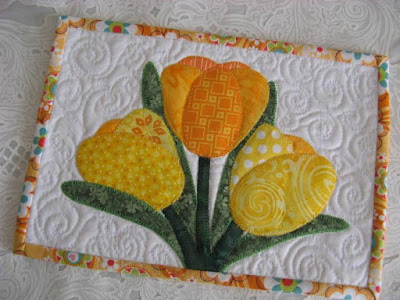
Spring Tulips Mug Rug
Baskets for Mom
Have I missed a spring flower in my mug rugs? If so, I'll need to correct that.
 
Happy April!!
Giggle!